The Nourishing Home

living healthier lives in service to the King!

  • Home
  • About
    • About TNH
    • Contact
  • Meal Planning
  • Health & Wellness
    • Real Food Basics
  • Whole30
  • GF Recipes
    • Whole30
    • Breakfast
    • Lunch
    • Entrées
    • Slow Cooker
    • Soups & Stews
    • Sides & Salads
    • Snacks
    • Desserts
    • Kids in the Kitchen
  • My Cookbook
  • Subscribe

8 Strategies for Saving Money at Farmers Markets

By Kelly · 9 Comments

8 Strategies for Saving Money at Farmers Markets | TheNourishingHome.com

April 1 is the traditional opening day of the season for many farmers markets across the country and with an exceptionally long and cold winter, it couldn’t come fast enough!

While shopping at local markets can be a lot of fun and a great way to try new foods, the cost of local and specialty produce can add up, if we’re not careful.  Here are eight strategies for saving at the farmers market this season:

1.  Shop With a Flexible List

Rule #1 of shopping is always – make a list!  Before you leave the house, look at your meal plan for the next 7-10 days and make a detailed shopping list that includes the name of each item you need and how much you need (quantity).  When it comes to produce, I also recommend including what meal the item is planned for, incase you find something at a better price that can easily be substituted, such as yellow squash for zucchini in summer squash pasta, or nectarines for peaches in oatmeal breakfast crumble.

Lemons Artichokes

2.  Know What’s in Season

In-season produce is usually more affordable, better tasting and contains more nutrients compared to produce that is not in season and is shipped from a far away location.  Know what’s in season before you shop using this cool page from the Natural Resources Defense Council. It allows you to see what’s in-season by state, by month and by food!

Another option is Lovacore, a free app that shows you what’s in season and what local markets carry what you’re looking for. For those who prefer the paper/pencil method, download a  free in-season printable guide.

Apple Compare 2

3.  Visit Several Markets in Your Area

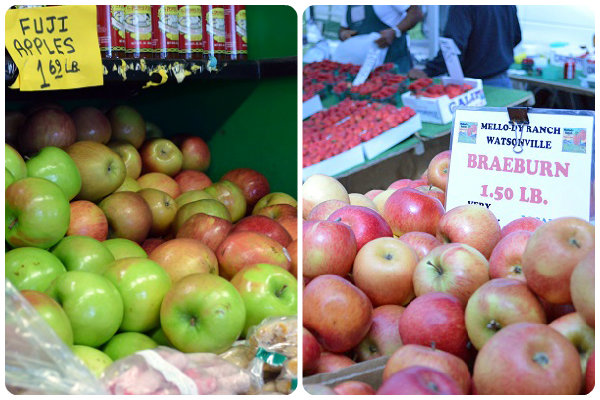
I live in a relatively small town, but there are 11 farmers markets within a 20-mile radius and there is an enormous variety at each one – including the prices. For example, I visited two farmers markets on the same day. One market had conventional apples for $1.69 per pound and were not labeled as local. Another had local, organic apples for just $1.50 per pound – a difference of almost 20¢/lb in favor of the locally-grown organic variety!

Get to know the markets in your area and be able to distinguish which is the most affordable, which is best for organic items, and which offers those unique produce items that are fun to experiment with. Plan your trips to each market according to your shopping list and your budget.  If you’re new to shopping at farmers markets, or need help finding some in your area, visit LocalHarvest.org or EatWellGuide.org.

Carrots

4.  Know What’s on Sale in Stores

I love supporting local farms, but sometimes shopping at grocery stores is the better option for a frugal grocery budget. Before you leave for the market, compare your shopping list with the sales circulars from your local stores and write down the sale prices. Then when you’re at the market, compare the stand prices against the prices you wrote down. But remember, choosing the lowest price isn’t always the best, since it might mean poorer quality and making an extra trip, thereby costing more in the long run in gas and time.

Chard Compare 2

5.  Walk the Entire Market First, Before Making Any Purchases

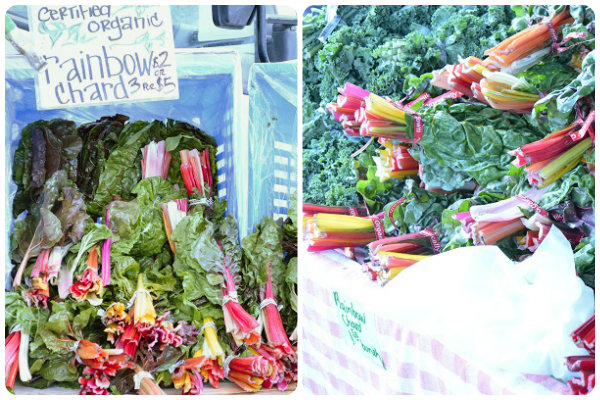
Not only do prices vary from market to market, but they can vary greatly from stand to stand within the same market! For example, the Swiss chard you see above on the left is $2 per bunch, while the Swiss chard on the right is $1.50 per bunch – and they’re both organic!

So before you buy anything, walk the entire market from end to end, noting the prices of the items on your shopping list along the way.  Then make a second pass through and choose the stands that have the best price for the best quality.

Peppers

6.  Shop the Clean 15 and Dirty Dozen

These lists, published yearly by the EWG, are a super helpful yes/no guide to buying organic.  Grapefruit, avocados and onions rank very low in terms of pesticide residue, so you can save money by opting not to buy these organic. This will allow you to better afford to purchase organic for items that do rank high with pesticide residue, like strawberries, peaches and celery.

On the other hand, don’t write off vendors who aren’t certified organic.  The process for becoming certified is very time-consuming and expensive and many small family farms just can’t afford to be certified, although they still follow organic practices. Ask if they use chemical pesticides or fertilizers or more natural methods instead, and what those methods are.

[Note from Kelly: I personally recommend getting to know your local farmers by discussing with them their farming methods and visiting their farms. Case in point, Tanaka Farms in Southern CA, is not organic certified but does follow organic practices and has farm tour visits and explains how they grow their produce. So to Tiffany’s point, yes, for some family farms it truly is an expensive process to be certified. But of course, we do have to be wary of those who would be dishonest. That’s why getting to know your local farmers is so important.]

Mandarin Oranges

7.  Buy “Seconds”

The farmers are looking to sell their foods, even if they’re ugly or misshapen.  These are often bagged and priced separately, or in a bin of their own, and marked down accordingly.  Take advantage of the deal if those items are on your list.

I’ve also seen venders sort through their boxes in the middle of the day, removing the foods that aren’t in tip-top shape.  If you see someone doing this, ask them if they’re selling those less-than-stellar items and how much they’re selling them for.  You might want to have a price in mind as well, incase they’ve never been asked for their ugly foods before.

Field Lettice

8.  Bargain When Buying in Bulk

Farmers work very hard to provide quality food, and the prices reflect this. It can be insulting to attempt to bargain with them over one or two heads of lettuce that were just cut from the field within the past 24-48 hours.  However, if you’re willing to buy 5-10lbs of something, they’re often willing to shave off a few dollars. Just be sure you have a plan for all the produce so it doesn’t go to waste!

BONUS!  Other tips to make your experience at the farmers market a good one:

  • Bring Cash – smaller bills and change if possible
  • Bring Your Own Bag – consider bringing back glass jars, egg crates and pallet/flat containers if you previously bought them from the vendors.  Some offer cash back for these items.
  • Arrive Early for Best Selection
  • Shop 30 Minutes Before Close for Possible Deals – Many people swear by this, but not all farmers discount their items just so they don’t have to bring them home! It’s worth a try once or twice though, to either rule the possibility out, or to have a new savings strategy!

What are your favorite tips for saving money at farmers markets?  Leave them in the comments! We’d love to hear from you!

Note from Kelly: Don’t miss all of the other great budgeting posts that Tiffany has shared here. Simply click here and keep scrolling through to see her many helpful posts on how to save money on your food budget.

You Might Also Like:

70+ Healthy Snacks Your Whole Family Will Love!
Real Food on a Budget, Part 2
Tips for Building & Organizing Your Own eBook Library

Filed Under: Real Food on a Budget, Resources ·

Bacon, Lettuce & Tomato Salad {with Avocado & Ranch}

By Kelly · 6 Comments

A special welcome to my sweet friend Katie at Simple Foody. Her site is all about feeding a large family real food on a budget. She’s visiting with us today sharing one of her favorite Salad-for-Dinner recipes. And after giving it a go ourselves, my youngest son put it best when he exclaimed … “BLT Salad, where have you been all my life?” Yep, this one’s a keeper! Thanks, Katie!

Bacon, Lettuce & Tomato Salad (with Avocado) The Nourishing Home

by Katie at Simple Foody

I love a good BLT, which is what inspired this salad. I know it might seem a bit odd sharing about salads in the midst of winter. But a hearty salad paired with a warm bowl of satisfying soup makes a delicious, filling meal (as well as a frugal one), which is why it often graces our table in the dark cold days of winter.

Of course, it will soon be getting warmer – thankfully!  So as spring arrives, we’ll trade in those large pots of soup for big bowls of salad topped with bits of oven-fried bacon and roasted chicken (or turkey) to make a complete, nourishing meal.

The beauty of this delicious Bacon, Lettuce & Tomato Salad is it works anytime of year. And it’s so simple. It really doesn’t take any time at all to pop that bacon into the oven while you rinse and chop the salad veggies, and make some homemade ranch dressing. Within 15 minutes of putting the bacon in the oven, you’ll have a gourmet-tasting meal that’s sure to impress and delight even the pickiest eaters!

BLT Salad wRanch Dressing

BLT Salad CloseUp

Print
Bacon, Lettuce & Tomato Salad {with Avocado & Ranch}

Yield: 4-5 servings, if served alone (or 5-6 servings if served with a side dish)

Recipe courtesy of Katie at Simple Foody.

Ingredients

  • 1/2 lb. nitrate-free bacon
  • 1 large head of lettuce (such as romaine or green leaf)
  • 1 ripe avocado
  • 1/2 pint cherry tomatoes
  • Optional Add-Ins:
  • Thinly sliced green onions or chives
  • Crumbled blue cheese or feta
  • Roasted or grilled chicken (or turkey)

Instructions

  1. Cook the bacon. (I prefer to oven-fry bacon because it saves time and creates less mess.).
  2. While bacon is cooking, rinse and chop the lettuce. Place in a large serving bowl.
  3. Cut the cherry tomatoes in half and dice the avocado, as shown in photo below. Thinly slice some green onions (or chives), if using.
  4. Place veggies on top of the salad, along with crumbled cheese, if desired.
  5. Once bacon is cooled, cut into bite-sized pieces and sprinkle on top of the salad. For a hearty salad, top with leftover roasted or grilled chicken (or turkey).
  6. Serve with a drizzle of your favorite dressing. We enjoy Kelly’s homemade ranch dressing or a creamy vinaigrette. (Blue cheese dressing is another delicious option.)
  7. Serve with a bowl of hearty soup or a crockpot baked potato for an even more satisfying meal. Enjoy!
3.1
https://thenourishinghome.com/2014/03/bacon-lettuce-tomato-salad/

AvocadoKitchen Tip: Cut the avocado in half lengthwise, place the seeded side on the counter, seed side up.  Hit the seed with the sharp edge of a knife then gently wiggle to release the pit from the fruit.  (To avoid injury, make sure your hand is not near the avocado when you strike it.)

To dice avocado, hold one half in your hand and gently score the flesh down to the peel cutting in strips lengthwise and cross-wise as shown in the photo.  Then using  a spoon, scoop it all out.  Ta-Da! Diced avocado without the mess.

Got leftover bacon? Be sure to whip up some homemade chocolate covered bacon for an amazing sweet treat! Yum!

You Might Also Like:

Chicken Zoodle Pho Bowl {Whole30}
Free Whole30 Meal Plans: Make Your 30-Day Journey Delicious!
Easy Grilled Herb Chicken (GF)

Filed Under: Salads, Whole30 ·

Raspberry Crumble Bars {from Everyday Grain-Free Baking}

By Kelly · 4 Comments

Raspberry Crumble Bars

In Southern California, fresh ripe raspberries arrive as early as May, which means it’s the perfect time to start stockpiling these delectable treats (as well as other delicious berry favorites, like organic strawberries and blueberries).

Once berry season is in full gear, we enjoy almost daily doses of fresh-from-the-field berries in homemade yogurt parfaits and atop grain-free granola. Of course, as the berries become overripe, they’re perfect for freezing and for making wonderful homemade preserves – both of which can be enjoyed year-round.

In celebration of berry season, I’m this special recipe from my cookbook, Everyday Grain-Free Baking. These delightful Raspberry Crumble Bars, with their slightly sweetened cookie crust, really highlight the sweet-n-tangy flavor of raspberries! (By the way, they’re absolutely delightful with any fruit preserves of choice! Feel free to substitute with apricot, strawberry, or mixed berry preserves.)

Raspberry Crumble Bars Close Up

Although there are several steps, these bars come to together quick-n-easy, making them a fun recipe for cooking with kids. They also freeze well, if you can resist the temptation of eating them all in one sitting

Book Cover EverydayGrainFreeBaking copyThis delightful recipe is just one of more than 100 irresistible grain-free, dairy-free recipes in my new cookbook – Everyday Grain-Free Baking!

From breads, biscuits and muffins to savory snacks and decadent treats, you’ll find step-by-step instructions, beautiful color photographs and helpful tips & tidbits to make all of your GF baking adventures a delicious success!

Click here to get a SNEAK PEEK of the book!

Print
Raspberry Crumble Bars

Yield: 12-16 bars

Ingredients

    For the Crust:
  • 1 1/2 cups blanched almond flour
  • 1/2 tsp baking soda
  • 1/4 tsp sea salt
  • 1/4 cup butter (or coconut oil), melted
  • 1 Tbsp pure honey
  • 1 tsp pure vanilla extract
  • 1 Tbsp coconut flour
  • 1/2 cup homemade raspberry preserves (or your favorite all-fruit preserves)
  • For the Topping:
  • 1/3 Tbsp butter (or coconut oil), melted
  • 1 tsp pure honey
  • 3/4 cup blanched almond flour
  • 1/2 cup unsweetened finely shredded coconut
  • 1/4 cup sliced almonds

Instructions

  1. Preheat the oven to 325ºF.. Lightly oil an 8x8-inch baking dish with coconut oil. Line the bottom with two pieces of parchment paper, making sure the paper extends over two sides of the dish. (This will allow you to lift the bars out of the dish once baked and cooled.)
  2. Make the crust: In a small bowl, combine the almond flour, baking soda and salt. In a medium mixing bowl, whisk together the melted butter (or coconut oil), honey and vanilla. Then whisk in the coconut flour. Stir in the blanched almond flour mixture to the butter mixture, until well combined. (The dough will be crumbly, but should be moist enough that it sticks together when you pinch it.)
  3. Spoon the dough into the prepared baking dish, and press it evenly along the bottom to form the crust. Bake the crust for 5-6 minutes, just until it rises a bit. Remove from oven.
  4. Spoon the preserves over the hot crust and spread evenly making sure to leave about 1/4-inch of bare crust on all sides. This prevents the preserves from seeping under the crust.
  5. Make the topping: In the same bowl you used for the crust, whisk together the melted butter (or coconut oil) and honey. Using a spoon, stir in the blanched almond flour and shredded coconut until incorporated but still a bit crumbly.
  6. Using your fingers, evenly crumble the coconut topping over the top of the preserves. Then evenly scatter the sliced almond across the top. Gently press the almonds into the crumble topping a bit.
  7. Bake the bars for 18-20 minutes, until the crumble topping is lightly golden brown. Cool completely When the bars are completely cool cover and transfer to the refrigerator to chill, about 2-3 hours.
  8. Once bars are cold, remove from fridge and run a knife along the two sides without parchment. Using the parchment, gently lift the bar flat out of the dish and place on a cutting board. Cut into bars and enjoy!

Notes

Be sure to wait to cut the bars until they are cold. Otherwise, they will be quite crumbly and not hold together well. Wrap any leftover bars and store in the fridge or freezer.

*Also note, you can use any homemade or all-fruit preserves you’d like to create these delicious cookie bars. Some of our other favorites are apricot, mixed berry and strawberry. Enjoy!

3.1
https://thenourishinghome.com/2014/03/raspberry-crumble-bars-gf/

You Might Also Like:

Dairy Free Sweet Vanilla Icing {Perfect for Cookie Decorating!)
Cookie Dough Bites Gift-in-a-Jar (GF)
Double Chocolate Chip Cookies (GF)

Filed Under: Cookies/Bars/Brownies ·

  • « Previous Page
  • 1
  • …
  • 54
  • 55
  • 56
  • 57
  • 58
  • …
  • 182
  • Next Page »

My New Cookbook is Here!

Welcome to The Nourishing Home!

I’m so glad you’re here and want you to feel right at home! My heart in creating this blog is to help you by sharing helpful meal planning strategies and nourishing GF recipes that are healthy, easy and delicious with thanksgiving to God! [Read More …]


All content (recipes, photos, posts, etc.) on this site is the creative property of Kelly Smith. You are welcome to share a photo via social media, as long as it contains a link back to the corresponding recipe or post from this site. However, you may not republish a recipe in its entirety in any form. For questions, or for permission to use a photo or recipe, please contact me via email at [email protected]. Thank you!

Please Note: All content (recipes, photos, text, etc.) on this site is the creative property of Kelly Smith of The Nourishing Home. You are welcome to share a photo via social media, as long as it contains a link back to the corresponding recipe from this site. However, re-publishing a recipe in any form is strictly prohibited. Additionally, please refrain from adapting recipes without properly linking back to the original recipe, and keep in mind that simple substitutions do not constitute an adapted or original recipe. For details regarding recipe copyright law, please visit the Food Blog Alliance.
The Nourishing Home is a participant in the Amazon Services LLC Associates Program, an affiliate advertising program designed to provide a means for sites to earn advertising fees by advertising and linking to amazon.com.

Privacy Policy
DMCA.com

Copyright © 2026 · All Rights Reserved · The Nourishing Home · Artwork by Nancy Panaccione · Site Design by Deluxe Designs · Log in