The Nourishing Home

living healthier lives in service to the King!

  • Home
  • About
    • About TNH
    • Contact
  • Meal Planning
  • Health & Wellness
    • Real Food Basics
  • Whole30
  • GF Recipes
    • Whole30
    • Breakfast
    • Lunch
    • Entrées
    • Slow Cooker
    • Soups & Stews
    • Sides & Salads
    • Snacks
    • Desserts
    • Kids in the Kitchen
  • My Cookbook
  • Subscribe

How to Make Honey Sweetened Fruit Preserves {using natural pectin}

By Kelly · 52 Comments

It's so easy to make your own honey sweetened fruit preserves perfect for spreading on breads, biscuits and for creating homemade fruit flavored yogurts.

Spring officially arrives this week, and with it comes the start of berry season here in Southern California. First to appear are red and delicious organic strawberries, followed by sweet-n-tangy raspberries, plump blueberries and one of my personal favorites – blackberries.

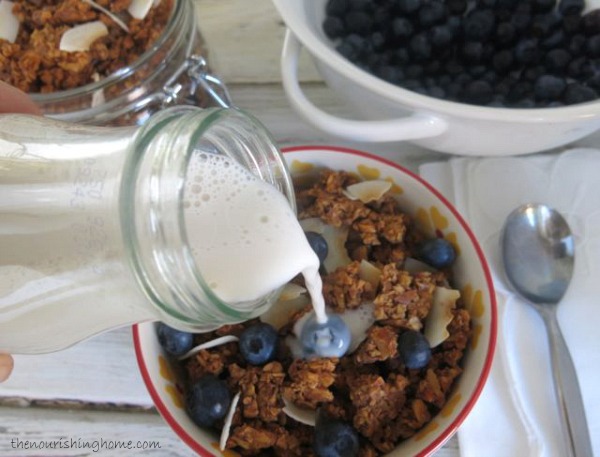
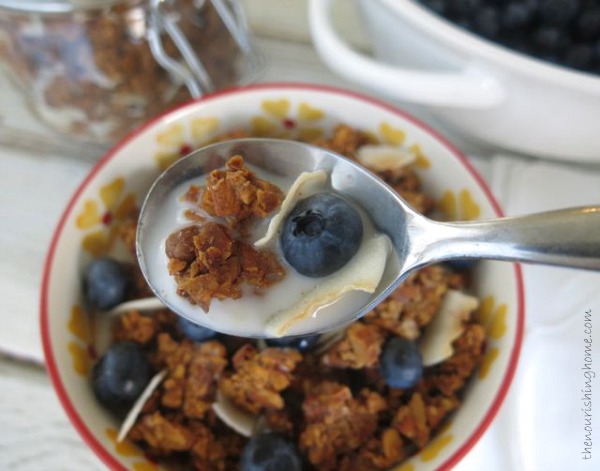
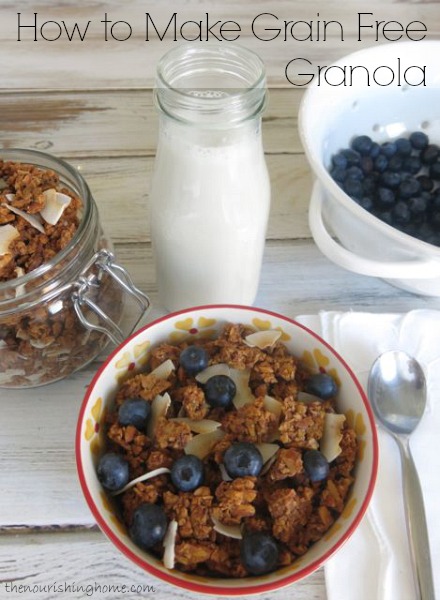
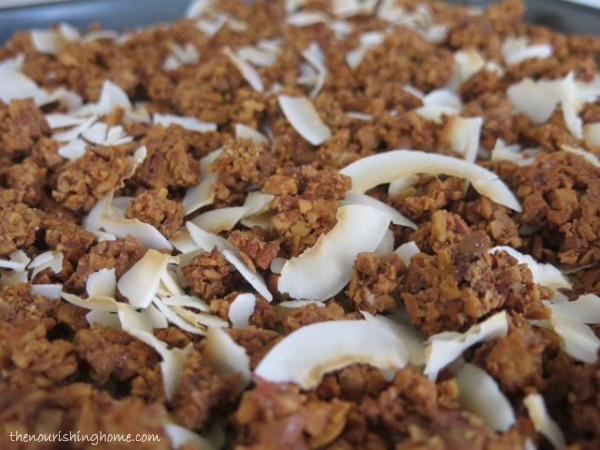
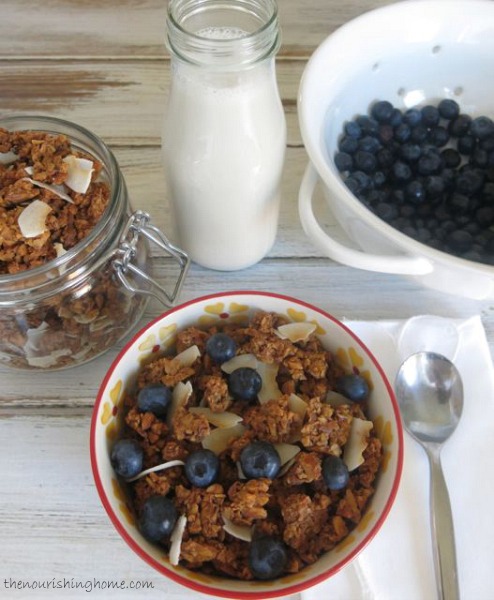
It’s no secret that we get a little excited about fresh berries around here. And rightly so! They’re not only absolutely delicious, but they’re chock full of beneficial nutrients and antioxidants too! That’s why they’re a favorite for enjoying in fruit salads and adding to grain-free granola, yogurt and desserts.

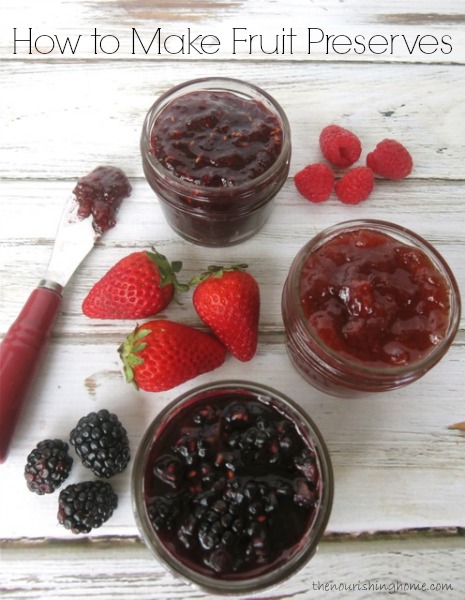
Of course, they also make amazing jams and preserves, which is why I’m sharing a simple method for making your own delightful honey sweetened fruit preserves using your favorite seasonal berries. A key part of this method is a little secret I learned from one of my favorite grain-free cookbooks.

The secret? Cranberries! By using a small amount of whole cranberries, you can avoid using powdered pectins to set your preserves. That’s because cranberries are high in natural pectin. So by including them in the recipe, your preserves will set-up nicely with just a little touch of fresh-squeezed lemon.

It's so easy to make your own honey sweetened fruit preserves perfect for spreading on breads, biscuits and for creating homemade fruit flavored yogurts.

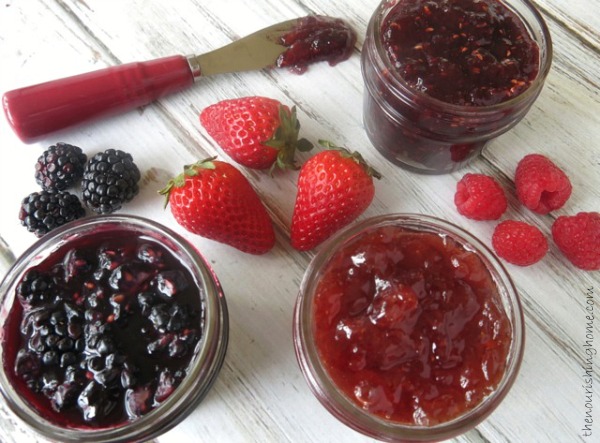
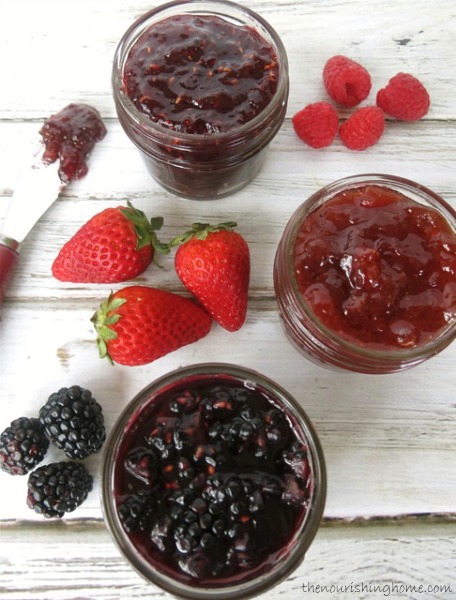
This easy recipe will enable you to make delicious berry preserves with less fuss and more all-natural flavor. Shown above (left to right): Blackberry Preserves, Strawberry Jam and Raspberry Preserves. Yum!

What to do with all that delicious homemade jam? Why not make these amazing jam-layered crumble cookie bars! Mmm, they are soooo gooood!

It's so easy to make your own honey sweetened fruit preserves perfect for spreading on breads, biscuits and for creating homemade fruit flavored yogurts.
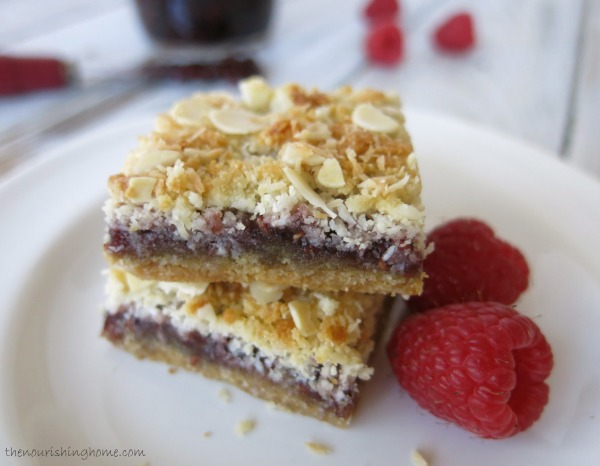
This special recipe at Deliciously Organic highlights the sweet fruity flavor of preserves sandwiched between two layers of scrumptious cookie crumble. Yes, please!

P.S. Just a friendly reminder, that I provide free monthly meal plans over at The Better Mom blog. Each week’s meal plan contains delicious family-friendly GF recipes utilizing a time-saving method to make getting a healthy dinner on the table a snap! I highly recommend you pop over to The Better Mom and download these free meal plans.

Print
Honey Sweetened Fruit Preserves {using natural pectin}

Yield: 4 one-cup servings

Ingredients

  • 4 cups of your favorite fresh berries, such as raspberries, strawberries or blackberries (or use thawed frozen berries)
  • 1 cup whole cranberries (fresh or frozen)
  • 1 to 1 1/4 cups pure honey (depending on how sweet you prefer your jam)
  • 1 tbsp of fresh-squeezed lemon juice (about 1/2 of a lemon)

Instructions

  1. Please Note: If making strawberry preserves, remove the stems and quarter the strawberries before measuring out 4 cups. For raspberry or blackberry jam, simply cut the berries in half before measuring. If making blueberry jam, no need to cut them.
  2. In a medium saucepan over medium/medium-high heat, bring the berries and honey to a boil while stirring. Then, reduce the temperature until the mixture remains at a constant simmer. Allow berries to simmer for 20 minutes, stirring occasionally.
  3. Once you reach the 20-minute mark, use the back of a wooden spoon to mash the cranberries against the side of the saucepan. This helps to release all of their natural pectin.
  4. Maintain a gentle simmer, making sure to stir the mixture frequently, so it does not scorch. While stirring, use the "back-of-spoon" method to break up any large pieces of fruit into smaller pieces. Or if you prefer a less chunky jam, thoroughly mash all of the berries.
  5. After 10 minutes, if the mixture is somewhat thick and no longer runny, turn off the heat. It will thicken more as it cools. If it is not thick enough, continue cooking at a gentle simmer, while stirring constantly until it thickens a bit more, then turn off the heat. (Keep in mind, preserves are looser than jellies, so once the mixture is chilled, it will be thick, but not gelatin-like.)
  6. Pour the fresh-squeezed lemon juice over the warm preserves, stir well and allow the mixture to cool to room temperature.
  7. Evenly distribute the cooled preserves among four 8 oz. glass jars making sure to leave about an inch of space between the top of the jam and the jar lid to accommodate for expansion. Then, cover and refrigerate or freeze. (Or you can preserve the jam by following the classic hot water bath canning method.)
  8. Because homemade jam/preserves do not contain any preservatives, I recommend placing one jar in the fridge to enjoy now, and freeze the three remaining jars for future use.

Notes

Recipe Variation: You can also combine berries to create delicious flavor combinations, such as my popular Jumble Berry Jam recipe.

Will Cranberries Affect the Flavor of my Jam? Yes, slightly. Cranberries will add a slightly tangy undertone, that is actually very pleasant in balancing the sweetness of the honey. This slight tartness may be more noticeable with milder fruits like strawberries, depending on your taste preferences.

If you're not a fan of cranberries, there are several things you can do if you wish to avoid their slight tart undertone ... First, I've found frozen cranberries to be less tart in flavor. Second, you can decrease the amount of cranberries to 3/4 cups and increase the berries by 1/4 cup. The jam won’t be as thick, but with milder fruits, such as strawberries, the mild tartness will be less noticeable.

In addition, if you are able to tolerate pectin (some diets restrict it), then you could opt to bypass the cranberries altogether and use a little Pomona’s Pectin instead to help thicken your jam, as I did in my homemade Peach Preserves recipe, since peaches are an especially mild fruit.

Did You Know: The words "jam" and "preserves" are often used interchangeably. However, there is a slight difference between the two. The fruit in preserves is often cut into chunks and allowed to remain somewhat whole, whereas jam is made using crushed or mashed fruit, which gives it a less chunky texture. So for this recipe, you can mash the fruit thoroughly during the cooking process to create a classic-style jam, or you can leave much of the fruit intact to create traditional preserves. Either option is delicious!

3.1
https://thenourishinghome.com/2014/03/honey-sweetened-fruit-preserves/

It's so easy to make your own honey sweetened fruit preserves perfect for spreading on breads, biscuits and for creating homemade fruit flavored yogurts.

You Might Also Like:

Our Favorite Healthy Salad Dressings (GF)
Crockpot Apple Butter (GF, DF)
Healthy Valley Ranch Dressing (GF)

Filed Under: Condiments ·

Make Your Own Enchilada Sauce (GF, DF)

By Kelly · 10 Comments

Today, I’m over at Keeper of the Home sharing a super easy Enchilada Pot Pie recipe that was an idea cooked up by my youngest son. He’s such a genius!

The base of the recipe calls for enchilada sauce, of course. But rather than rely on those canned sauces with sketchy ingredients, I took some time to perfect a delicious healthy enchilada sauce that can easily be adjusted to thick or thin, whichever you prefer – and it only takes 30 minutes or less to put together!

I know, I know. Time is always an issue. Believe me, as a Stay-in-the-Car Mom, constantly carting boys here and there, I’m pressed for time too. But seriously, let me share 3 great reasons to commit 30 minutes to make your own enchilada sauce: (recipe below)

1. Again, have you taken a look at the ingredients in canned enchilada sauces out there? yikes!
2. It’s super easy and a big batch can easily be divided up and kept frozen for months. bonus!
3. The taste is amazing and for me, that’s reason enough to make my own homemade sauce! yum!

Enchilada Pot Pie CloseUp

So I encourage you to schedule a little time on your next prep day to cook up a batch or two of this sauce recipe I’m sharing below. Then be sure to pop over to Keeper of the Home for my awesome Enchilada Pot Pie recipe. This hearty satisfying meal will bring a smile to your family’s faces and perhaps a sweat to their brows, depending upon how hot you make the sauce!

Print
Homemade Enchilada Sauce (GF, DF)

Yield: 2 cups

Ingredients

  • 2 tbsp olive oil
  • 1/2 cup finely chopped yellow onion
  • 3 cloves garlic, minced
  • 3 tbsp chili powder
  • 1 tsp ground cumin
  • 1 tsp dried oregano
  • 1/2 tsp sea salt
  • 2 cups homemade chicken stock
  • 3/4 cup organic tomato paste (or use tomato sauce, see *note below)

Instructions

  1. In a medium saucepan, heat oil over medium heat. Add onion and sauté until translucent (4-5 minutes). Then add garlic and stir until fragrant (about 1 minute).
  2. Add chili powder, cumin, oregano and salt. Stir using a wooden spoon, cooking for about 30 seconds.
  3. Add chicken stock and tomato paste, or for a thinner sauce, see recipe variation below. Continuing to stir to combine. Bring sauce to a gentle boil, then reduce heat to low and allow to gently simmer covered for 15 minutes.
  4. Adjust the seasonings, adding more salt to taste and additional chili powder to increase heat, if desired.
  5. If you prefer a non-chunky sauce, strain the mixture through a fine-mesh strainer into a bowl, pressing on solids to extract as much sauce as possible.
  6. Then serve atop your favorite enchiladas. Or try it in my Enchilada Pot Pie or Enchilada Casserole recipes. (Recipe inspired by Emeril Lagasse.)

Notes

* Recipe Variation: If you prefer a thinner enchilada sauce, you can substitute the tomato paste called for in this recipe with 2 cups of organic tomato sauce. Just be sure to reduce the chicken stock to 1 cup. Also, because tomato paste is much sweeter, you may wish to add a teaspoon or two of maple syrup or honey to add a little sweet undertone.

Also note: This sauce tastes best the next day, after the flavors have had a chance to meld. So I recommend making it the night before you plan to use it, or why not make a big batch to save time on future recipes.

To store for future use, allow sauce to cool and then add to mason jars or freezer-safe containers. Sauce can be refrigerated for up to one week or frozen for several months.

3.1
https://thenourishinghome.com/2014/03/make-enchilada-sauce-gf-df/

P.S. Not only is the enchilada sauce perfect for freezing, but so is my Enchilada Pot Pie recipe. Just check out the recipes notes at Keeper of the Home for details.

You Might Also Like:

Easy & Delicious Taco Salad (GF)
Oatmeal w/Ripe Pear & Raw Honey (Gluten-Free)
Lemon Snowball Cookie Bites (GF, DF, EF)

Filed Under: Uncategorized ·

How to Make Grain Free Granola {Step-by-Step}

By Kelly · 50 Comments

One crunchy bite is all it takes to become completely smitten with this grain free granola. Its cinnamony flavor and rich vanilla undertones is a delight!

One crunchy bite is all it takes to become completely smitten with this grain free granola. Its slightly sweet cinnamony flavor with rich vanilla undertones combines beautifully with crisp toasted coconut and your favorite fresh or dried fruit. It’s perfect with a splash of almond milk, or as a topping for yogurt parfaits and ice cream.

One crunchy bite is all it takes to become completely smitten with this grain free granola. Its cinnamony flavor and rich vanilla undertones is a delight!

Since going grain-free, I’ve slowly been finding new ways to make old favorites. And since my gluten-free granola is a tough act to follow, it’s been slow going to find a grain-free way to capture the crunchy, yet chewy texture of oats and ensure the formation of sweet cereal clusters. But I was up for the challenge!

Rather than boring you with the details of recipe development, I’ll jump straight to the punchline … Eureka! I’m beaming (and thanking the Lord) for the wonderful victory in achieving a grain free granola that is so close to my soaked oats version that I can now honestly say, I don’t miss those oats at all. And I’m betting you won’t either!

One crunchy bite is all it takes to become completely smitten with this grain free granola. Its cinnamony flavor and rich vanilla undertones is a delight!

Be sure to check out my Step-by-Step Photo Tutorial following the recipe below. I’ll walk you through each step of the process, so you’ll learn just how easy it is to make the best grain free granola ever! (Well, maybe I’m exaggerating just a little, but seriously, it’s REALLY good!)

One crunchy bite is all it takes to become completely smitten with this grain free granola. Its cinnamony flavor and rich vanilla undertones is a delight!

P.S. Just a friendly reminder, that I provide free monthly meal plans over at The Better Mom blog. Each week’s meal plan contains delicious family-friendly GF recipes utilizing a time-saving method to make getting a healthy dinner on the table a snap! I highly recommend you pop over to The Better Mom and download these free meal plans.

One crunchy bite is all it takes to become completely smitten with this grain free granola. Its cinnamony flavor and rich vanilla undertones is a delight!This delightful recipe is just one of more than 100 irresistible grain-free, dairy-free recipes in my new cookbook – Everyday Grain-Free Baking!

From breads, biscuits and muffins to savory snacks and decadent treats, you’ll find step-by-step instructions, beautiful color photographs and helpful tips & tidbits to make all of your GF baking adventures a delicious success!

Click here to get a SNEAK PEEK of the book!

Print
Grain Free Cinnamon Crunch Granola (DF)

Yield: 5-6 cups of granola

Ingredients

    Nut Mixture
  • 1 1/2 cups raw whole almonds
  • 1 cup raw whole cashews
  • 1 cup raw walnut halves
  • 1 tsp sea salt
  • All-Natural Sweetener
  • 1/4 cup *pure coconut butter, softened
  • 1/2 cup honey (I prefer a mild flavor such as sage or clover)
  • 2 tbsp pure vanilla extract
  • 1 tbsp ground cinnamon
  • 1 tsp coconut flour
  • 1/4 tsp sea salt
  • Add-ins
  • 3/4 cup unsweetened coconut flakes
  • Your favorite fresh or dried fruit

Instructions

    Soaking the Nuts
  1. Place the nuts and salt in a large bowl. Cover with warm filtered water so that the water level is at least two inches above the nuts. Cover the bowl with a plate or clean kitchen towel, and allow the nuts to soak 18-24 hours.
  2. When soaking time is completed, drain and rinse nuts. Place on a clean kitchen towel to absorb excess moisture.
  3. Preparing the Sweetener
  4. In a large bowl, whisk together the softened coconut butter and honey until smooth and creamy. Then add the remaining ingredients (vanilla, cinnamon, coconut flour and salt). Whisk until well combined; set aside.
  5. Processing the Nuts
  6. Using a food processor, place a couple of handfuls of the soaked nuts into the processor bowl and pulse to chop the nuts until they are about the size of oats, as shown in photo below. (Do not over-process or you will create nut meal. By using the pulse button, it will be easier for you to achieve a uniform size and ensure you don't over-process the nuts into flour.)
  7. Add the finely chopped nuts to the bowl with the honey mixture. Once all nuts are processed, use a rubber spatula to fold them into the honey mixture until well combined.
  8. Baking the Granola
  9. Preheat oven to 210°F. Line a 12x17-inch rimmed baking sheet with parchment paper.
  10. Spoon grain-free granola mixture onto the parchment-lined baking sheet. Use an angled spatula to evenly spread out the granola across the pan into a thin layer.
  11. Bake granola for two hours at 210°F. Then remove the baking sheet and gently flip over the granola, section by section, Use the top of your spatula to gently separate any large pieces into small cereal clusters.
  12. Return granola to the oven and bake another two hours. Then remove and use the spatula to again turn and gently stir the granola. Sprinkle top with unsweetened coconut flakes.
  13. Return granola to the oven and bake another 30-45 minutes, until coconut is slightly toasted. Turn off the oven. Place baking sheet on the stovetop to cool. After about 5-8 minutes, check the granola for the crunch-factor. If it's crunchy enough for you, allow it to continue cooling. If it isn't crunchy enough, return it to the warm oven and allow it to sit in the warm oven for 20-30 minutes more. Remove from oven and allow the granola to cool again on stovetop 5-8 minutes and again check the crunch-factor.
  14. When granola is crunchy enough for you, allow it to completely cool about 30 minutes. (Please note: The granola will become crunchier the cooler it is.) Then immediately transfer it to mason jars (or other airtight containers). Store in the pantry for up to two weeks or in the fridge or freezer for up to a month.
  15. Enjoy with your favorite mix-ins such as fresh or dried fruit. Or use it as a topping for yogurt parfaits or over ice cream.

Notes

See How It's Done: Remember to check out the photo tutorial following this recipe.

* Coconut Butter Substitution: In anticipation of the question about how to substitute the coconut butter called for in this recipe, you can replace the coconut butter with 3 tbsp of coconut oil (or softened butter), but the results (although tasty) are just not the same, since coconut butter gives the granola a deep rich flavor and provides an especially nice crunch without a heavy coconut taste or oily texture.

So, I really recommend making a small invest in a jar of pure coconut butter. It is truly delicious, which is why you'll be seeing it in many more recipes to come, such as my dairy-free cookie icing.

3.1
https://thenourishinghome.com/2014/03/how-to-make-grain-free-granola/

How to Make Grain Free Granola Step-by-Step

One crunchy bite is all it takes to become completely smitten with this grain free granola. Its cinnamony flavor and rich vanilla undertones is a delight!
1. Soaking the Nuts
Place the nuts and salt in a large bowl. Cover with warm filtered water so that the water level is at least two inches above the nuts. Cover the bowl and soak 18-24 hours.

One crunchy bite is all it takes to become completely smitten with this grain free granola. Its cinnamony flavor and rich vanilla undertones is a delight!
2. Rinsing and Drying the Nuts
When soaking time is completed, drain and rinse nuts. Place on a clean kitchen towel to absorb excess moisture.

One crunchy bite is all it takes to become completely smitten with this grain free granola. Its cinnamony flavor and rich vanilla undertones is a delight!
3. Preparing the Sweetener
In a large bowl, whisk together softened coconut butter and honey until smooth and creamy. Then add the remaining ingredients (vanilla, cinnamon, coconut flour and salt). Whisk until well combined; set aside.

One crunchy bite is all it takes to become completely smitten with this grain free granola. Its cinnamony flavor and rich vanilla undertones is a delight!
4. Processing the Nuts
Using a food processor, place a couple of handfuls of the soaked nuts into the processor bowl and pulse to chop the nuts until they are about the size of oats. (Do not over-process or you will create nut meal.) 

One crunchy bite is all it takes to become completely smitten with this grain free granola. Its cinnamony flavor and rich vanilla undertones is a delight!
5. Blending the Granola
Once all nuts are processed, use a rubber spatula to fold them into the honey mixture until well combined.

One crunchy bite is all it takes to become completely smitten with this grain free granola. Its cinnamony flavor and rich vanilla undertones is a delight!
6. Spreading the Granola on the Baking Sheet
Preheat oven to 210°F. Line a 12×17-inch rimmed baking sheet with parchment paper. Spoon grain-free granola mixture onto the parchment-lined baking sheet. Use an angled spatula to evenly spread out the granola across the pan into a thin layer.

One crunchy bite is all it takes to become completely smitten with this grain free granola. Its cinnamony flavor and rich vanilla undertones is a delight!
7, Baking & Turning the Granola
Bake granola according recipe instructions, gently turning the granola as outlined in the recipe above. Do not over mix, as you simply want to gently divide the mixture into small cereal clusters as shown above.

One crunchy bite is all it takes to become completely smitten with this grain free granola. Its cinnamony flavor and rich vanilla undertones is a delight!
8. Finishing the Granola
Sprinkle top with unsweetened coconut flakes, and continue baking per the recipe instructions above. The granola is ready when the coconut is lightly toasted and the granola reaches desired level of crunchiness.

One crunchy bite is all it takes to become completely smitten with this grain free granola. Its cinnamony flavor and rich vanilla undertones is a delight!

Enjoy with your favorite mix-ins such as fresh or dried fruit and a splash of milk. Absolutely delightful!

Disclosure: Some of the links in this post include affiliate links, providing The Nourishing Home a small percentage of the sale at no additional cost to you. Of course, you are not obligated to use these links to make a purchase, but if you do, it helps to support this site and ministry. Thank you!

You Might Also Like:

Almond Flour Blueberry Scones {Grain-Free, Dairy-Free Option}
Apricot-Almond "KIND" Bars (GF)
15 Fabulous Ways to Enjoy Dried Strawberries

Filed Under: Porridges & Cereals, Sweet ·

  • « Previous Page
  • 1
  • …
  • 55
  • 56
  • 57
  • 58
  • 59
  • …
  • 182
  • Next Page »

My New Cookbook is Here!

Welcome to The Nourishing Home!

I’m so glad you’re here and want you to feel right at home! My heart in creating this blog is to help you by sharing helpful meal planning strategies and nourishing GF recipes that are healthy, easy and delicious with thanksgiving to God! [Read More …]


All content (recipes, photos, posts, etc.) on this site is the creative property of Kelly Smith. You are welcome to share a photo via social media, as long as it contains a link back to the corresponding recipe or post from this site. However, you may not republish a recipe in its entirety in any form. For questions, or for permission to use a photo or recipe, please contact me via email at [email protected]. Thank you!

Please Note: All content (recipes, photos, text, etc.) on this site is the creative property of Kelly Smith of The Nourishing Home. You are welcome to share a photo via social media, as long as it contains a link back to the corresponding recipe from this site. However, re-publishing a recipe in any form is strictly prohibited. Additionally, please refrain from adapting recipes without properly linking back to the original recipe, and keep in mind that simple substitutions do not constitute an adapted or original recipe. For details regarding recipe copyright law, please visit the Food Blog Alliance.
The Nourishing Home is a participant in the Amazon Services LLC Associates Program, an affiliate advertising program designed to provide a means for sites to earn advertising fees by advertising and linking to amazon.com.

Privacy Policy
DMCA.com

Copyright © 2026 · All Rights Reserved · The Nourishing Home · Artwork by Nancy Panaccione · Site Design by Deluxe Designs · Log in