
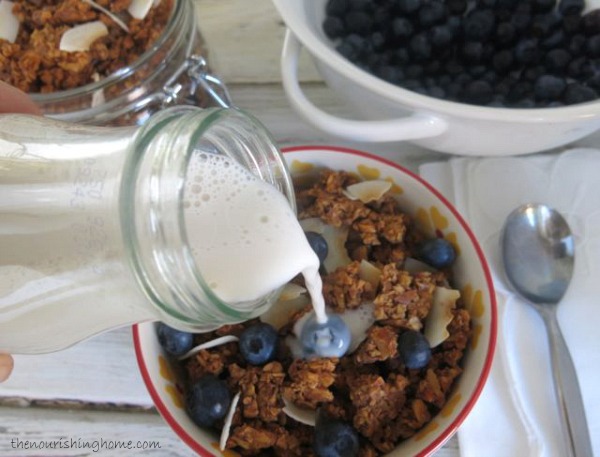
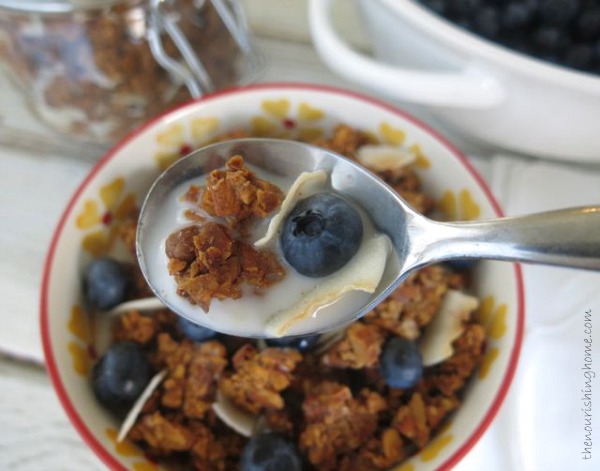
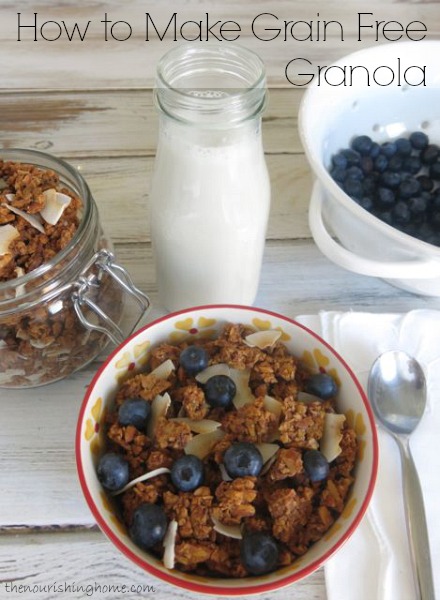
One crunchy bite is all it takes to become completely smitten with this grain free granola. Its slightly sweet cinnamony flavor with rich vanilla undertones combines beautifully with crisp toasted coconut and your favorite fresh or dried fruit. It’s perfect with a splash of almond milk, or as a topping for yogurt parfaits and ice cream.
Since going grain-free, I’ve slowly been finding new ways to make old favorites. And since my gluten-free granola is a tough act to follow, it’s been slow going to find a grain-free way to capture the crunchy, yet chewy texture of oats and ensure the formation of sweet cereal clusters. But I was up for the challenge!
Rather than boring you with the details of recipe development, I’ll jump straight to the punchline … Eureka! I’m beaming (and thanking the Lord) for the wonderful victory in achieving a grain free granola that is so close to my soaked oats version that I can now honestly say, I don’t miss those oats at all. And I’m betting you won’t either!
Be sure to check out my Step-by-Step Photo Tutorial following the recipe below. I’ll walk you through each step of the process, so you’ll learn just how easy it is to make the best grain free granola ever! (Well, maybe I’m exaggerating just a little, but seriously, it’s REALLY good!)
P.S. Just a friendly reminder, that I provide free monthly meal plans over at The Better Mom blog. Each week’s meal plan contains delicious family-friendly GF recipes utilizing a time-saving method to make getting a healthy dinner on the table a snap! I highly recommend you pop over to The Better Mom and download these free meal plans.
 This delightful recipe is just one of more than 100 irresistible grain-free, dairy-free recipes in my new cookbook – Everyday Grain-Free Baking!
From breads, biscuits and muffins to savory snacks and decadent treats, you’ll find step-by-step instructions, beautiful color photographs and helpful tips & tidbits to make all of your GF baking adventures a delicious success!
Click here to get a SNEAK PEEK of the book!
Ingredients
- 1 1/2 cups raw whole almonds
- 1 cup raw whole cashews
- 1 cup raw walnut halves
- 1 tsp sea salt
- 1/4 cup *pure coconut butter
, softened
- 1/2 cup honey (I prefer a mild flavor such as sage or clover)
- 2 tbsp pure vanilla extract
- 1 tbsp ground cinnamon
- 1 tsp coconut flour
- 1/4 tsp sea salt
- 3/4 cup unsweetened coconut flakes
- Your favorite fresh or dried fruit
Instructions
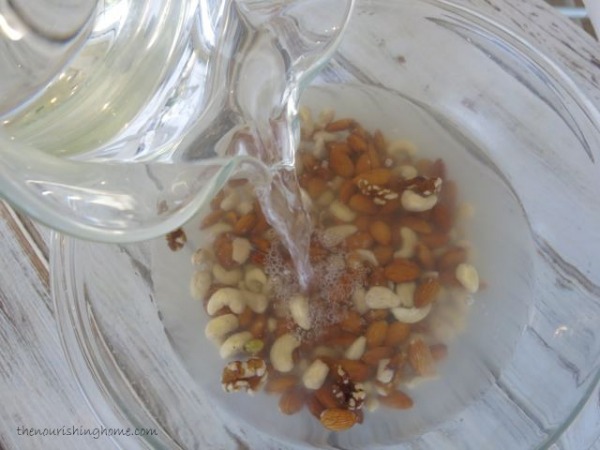
- Place the nuts and salt in a large bowl. Cover with warm filtered water so that the water level is at least two inches above the nuts. Cover the bowl with a plate or clean kitchen towel, and allow the nuts to soak 18-24 hours.
- When soaking time is completed, drain and rinse nuts. Place on a clean kitchen towel to absorb excess moisture.
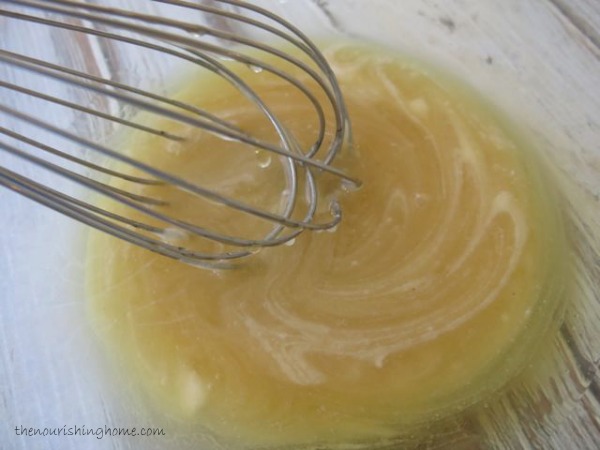
- In a large bowl, whisk together the softened coconut butter
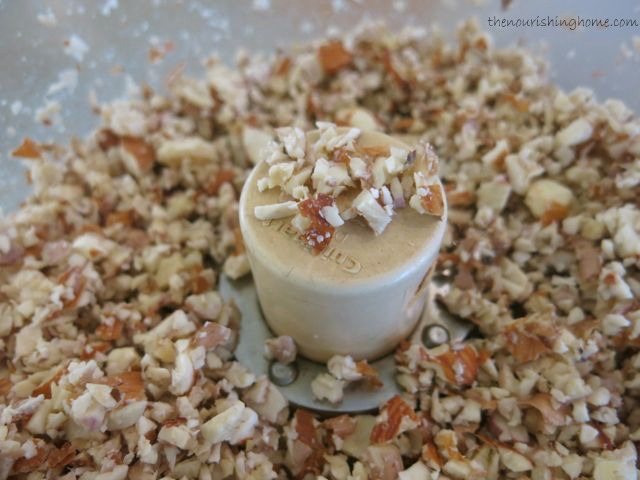
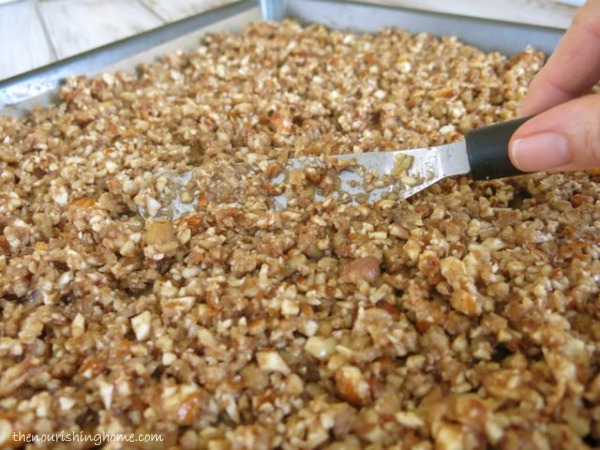
- Using a food processor, place a couple of handfuls of the soaked nuts into the processor bowl and pulse to chop the nuts until they are about the size of oats, as shown in photo below. (Do not over-process or you will create nut meal. By using the pulse button, it will be easier for you to achieve a uniform size and ensure you don't over-process the nuts into flour.)
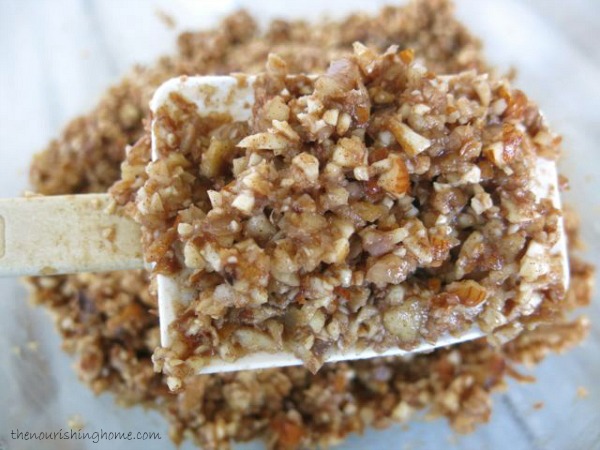
- Add the finely chopped nuts to the bowl with the honey mixture. Once all nuts are processed, use a rubber spatula to fold them into the honey mixture until well combined.
- Preheat oven to 210°F. Line a 12x17-inch rimmed baking sheet
with parchment paper.
- Spoon grain-free granola mixture onto the parchment-lined baking sheet. Use an angled spatula
to evenly spread out the granola across the pan into a thin layer.
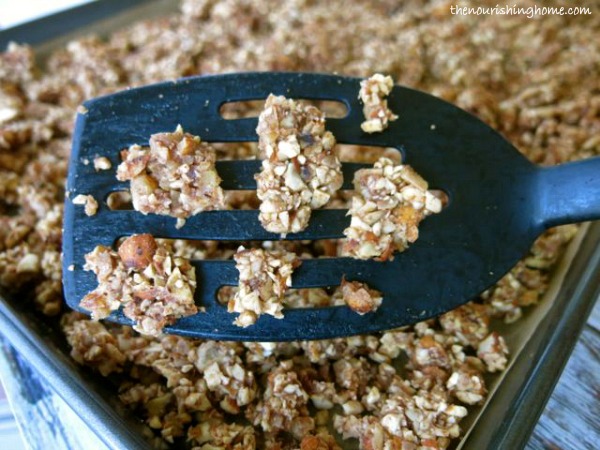
- Bake granola for two hours at 210°F. Then remove the baking sheet and gently flip over the granola, section by section, Use the top of your spatula to gently separate any large pieces into small cereal clusters.
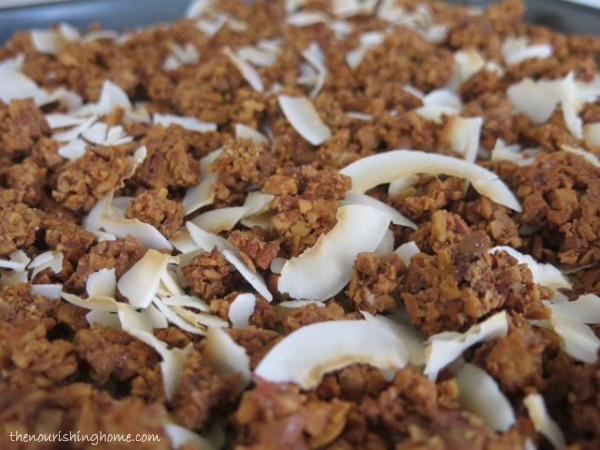
- Return granola to the oven and bake another two hours. Then remove and use the spatula to again turn and gently stir the granola. Sprinkle top with unsweetened coconut flakes
.
- Return granola to the oven and bake another 30-45 minutes, until coconut is slightly toasted. Turn off the oven. Place baking sheet on the stovetop to cool. After about 5-8 minutes, check the granola for the crunch-factor. If it's crunchy enough for you, allow it to continue cooling. If it isn't crunchy enough, return it to the warm oven and allow it to sit in the warm oven for 20-30 minutes more. Remove from oven and allow the granola to cool again on stovetop 5-8 minutes and again check the crunch-factor.
- When granola is crunchy enough for you, allow it to completely cool about 30 minutes. (Please note: The granola will become crunchier the cooler it is.) Then immediately transfer it to mason jars (or other airtight containers). Store in the pantry for up to two weeks or in the fridge or freezer for up to a month.
- Enjoy with your favorite mix-ins such as fresh or dried fruit. Or use it as a topping for yogurt parfaits or over ice cream.
Notes
See How It's Done: Remember to check out the photo tutorial following this recipe.
* Coconut Butter Substitution: In anticipation of the question about how to substitute the coconut butter called for in this recipe, you can replace the coconut butter with 3 tbsp of coconut oil (or softened butter), but the results (although tasty) are just not the same, since coconut butter gives the granola a deep rich flavor and provides an especially nice crunch without a heavy coconut taste or oily texture.
So, I really recommend making a small invest in a jar of pure coconut butter. It is truly delicious, which is why you'll be seeing it in many more recipes to come, such as my dairy-free cookie icing.
How to Make Grain Free Granola Step-by-Step
1. Soaking the Nuts
Place the nuts and salt in a large bowl. Cover with warm filtered water so that the water level is at least two inches above the nuts. Cover the bowl and soak 18-24 hours.

2. Rinsing and Drying the Nuts
When soaking time is completed, drain and rinse nuts. Place on a clean kitchen towel to absorb excess moisture.
3. Preparing the Sweetener
In a large bowl, whisk together softened coconut butter and honey until smooth and creamy. Then add the remaining ingredients (vanilla, cinnamon, coconut flour and salt). Whisk until well combined; set aside.
4. Processing the Nuts
Using a food processor, place a couple of handfuls of the soaked nuts into the processor bowl and pulse to chop the nuts until they are about the size of oats. (Do not over-process or you will create nut meal.)
5. Blending the Granola
Once all nuts are processed, use a rubber spatula to fold them into the honey mixture until well combined.
6. Spreading the Granola on the Baking Sheet
Preheat oven to 210°F. Line a 12×17-inch rimmed baking sheet with parchment paper. Spoon grain-free granola mixture onto the parchment-lined baking sheet. Use an angled spatula to evenly spread out the granola across the pan into a thin layer.
7, Baking & Turning the Granola
Bake granola according recipe instructions, gently turning the granola as outlined in the recipe above. Do not over mix, as you simply want to gently divide the mixture into small cereal clusters as shown above.
8. Finishing the Granola
Sprinkle top with unsweetened coconut flakes, and continue baking per the recipe instructions above. The granola is ready when the coconut is lightly toasted and the granola reaches desired level of crunchiness.
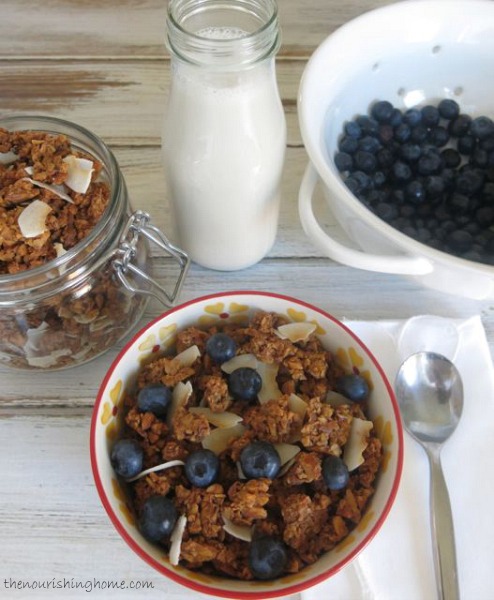
Enjoy with your favorite mix-ins such as fresh or dried fruit and a splash of milk. Absolutely delightful!

This looks so so good! I’m always looking for a granola to have handy for busy mornings. Making this tonight. Thank you.
Thanks so much, sweet friend! I hope you and your family enjoy it as much as we do. 🙂
Wow. That looks yummy. I’m going to have to check my pantry and start that today.
Just an FYI-you are saving me in so many ways. Doc took me off gluten in November due to hormone/thyroid problems, and I’m so glad I had already found/loved your blog and dabbled with GF recipes. It has been an interesting mindshift/learning curve, but I’m so glad to have your blog as a go to for encouragement and tasty meals to boot.
Now…If I can just get that 2-week meal plan going and stick to it. :0?
I just wanted to say thank you.
You are so welcome, Elaine. Thank you so much for your kind words. I just prayed for you that God will help you with this new transition. I know how challenging it can be to have go gluten-free (especially when the rest of your family doesn’t). But just know I’m here to help encourage and support you! Lots of blessings, Kelly 🙂
This looks really delicious. I gave up cold cereals when I first read “Nourishing Traditions” a number of years ago. I’ve made ‘nutola’ a few times and it is good, but not baked and not quite the same. I’m definitely going to try this recipe.
I have read many places that you should not soak cashews for longer than 6 hours I think. Do you have any problem with them turning slimy or anything when soaking them 18-24 hours?
Hi, Jennifer. Thanks for your note. I meant to notate in the recipe that you will find the cashews to turn a purplish color when you soak them with the almonds. It’s fine and doesn’t do anything to change the flavor. So although I have seen that note in NT about soaking cashews for 6-7 hours. Rather than try to soak all these nuts for different time spans, I just soak them all about 18 hours, then rinse and pulse-chop, as noted in the recipe. I haven’t experienced the cashews being slimy in this recipe. But perhaps it’s because they are combined with other nuts, are finely ground and then combined with a sweetener and roasted, so it just may not be noticeable for those reasons. However, you could certainly soak them separately. In fact you could soak each nut separate for the exact desired soak times. But again, I wanted to make this as easy as possible with as little clock-watching as possible. 🙂
If I already for soaked and dried my nuts can I just start at step 4 or do they need to be soft from soaking. thanks
Hi, Marybeth. They do not need to be soft. But do watch the bake time as it accounts for drying the nuts. So if you’re using dry nuts, I would recommend checking it at one hour, returning to oven and checking every half-hour for crispness. Let us know what you discover as far as a good cook time for dry nuts, as I am sure others will have this question. Thank you! 🙂
Your granola looks SO GOOD Kelly! I’m not even grain-free and I want to make it, lol! The tutorial is very helpful too, and I love the photos!! Now to restock my nuts so I can make this ASAP! 🙂
Thanks, Tiff! My hubby who loves my soaked oats granola recipe actually said this was delicious and would be a great way to get more protein in the mornings. So … just when I thought I would have something on hand I can eat, it’s disappearing before my eyes. I’m thinking of hiding it. LOL! 🙂
LOL – love that! I’m sharing via social media later today! HUGS!!
Thanks, sweet friend! xoxo
Hi Kelly,
This recipe sounds great and I really want to try it….just one question my husband doesn’t like honey , can I substitute coconut nectar in its place? For myself and the kids I would just use honey since we love it, but sometimes hubby complains that I don’t make things that he will eat ( he’s my biggest baby). I sometimes make granola bars with coconut nectar and occasionally switch up the recipes with honey instead the only difference I have found is that coconut nectar tends to yield a crunchier bar. Do you think this would cause the granola to be too crunchy or hard? Thanks Jen
Hi, Jen. I haven’t tried coconut nectar so I don’t know how it will come out in this recipe. It may be just fine since it’s granola and it isn’t vital that it sticks together. I do know that maple syrup works quite well in this recipe. If you use a light grade A syrup it won’t taste “mapley.” Also, since I don’t use coconut nectar, I am uncertain about how sweet it is compared to honey, if it’s sweeter you may wish to use less. Blessings, Kelly 🙂
Hi Kelly, I decided to make the granola using the honey as stated in the recipe and it came out amazing, the honey flavor was not strong at all. I will definitely be making this again. Thanks for the great recipe. Jen
Wonderful, Jen! So glad you enjoyed this. I really like mild honeys like clover and sage for that exact reason, they don’t cast a heavy honey flavor to baked goods. 🙂
You are a genius! This granola is amazing. Thank you for the recipe!
Thanks, Julie, for taking the time to leave a kind note. I am so glad you enjoyed this granola too. Blessings, Kelly 🙂
Hi Kelly! So, I’ve got my granola all ready to bake and I just now noticed the four hour bake time! Should have read through the recipe completely. It is already 7:30pm and I am not likely to stay up to roast tonight. Is it ok to wait till morning to bake it if I keep the mix covered overnight?
Well, I am up late and just saw this. Yes, I would cover and refrigerate it and wait for tomorrow. 🙂
I covered the mix and waited until the next day to bake and it turned out perfectly. It’s delicious! Thank you!
Yay! So glad it works out. Good to know should I or another reader run into this same issue! 🙂 Thanks, Hilary!
Just made this. LOVED it. I had it on my homemade Greek Yogurt and it was yummylicious. Some modifications I made…I don’t care for the fructose rush of honey (I usually use Really Raw Honey) so I used a volume of water equal to the honey with 1 Tablespoon of my preferred sweetener (Sweet Blend from Trim Healthy Mama- a blend of Erythritol and Stevia). I also didn’t quite have the full cup of walnuts so I finished the measurement with raw sunflower seeds. Everything else I did as written. It came out great! One just needs to plan ahead for soaking and the long low temp cook time. Thank you for sharing a truly healthy granola recipe!
Yay, so glad you enjoyed it and it worked well with your modifications. Thank you for taking the time to share them, as I’m sure there are others who will benefit from your advice. Blessings to you, Kelly 🙂
Hi Kelly, is it possible to omit the coconut flour? I am in the middle of this recipe and just saw that my flour has expired (2013) : ( Will it make a huge difference without it or is there a suggested substitution? I am looking forward to the granola again…it was so yummy last time! Thank you, Caitlin
Hi, Caitlyn. The small amount of coconut flour in this recipe serves as a binder to help keep the granola from being too crumbly once cooled. I haven’t tried it, but if you can tolerate arrowroot flour, you could substitute with that instead. Hope this helps! Many blessings and gratitude for your kind words! 🙂
I was hoping to make these for an event tomorrow. Can I decrease my soak time on the nuts to 4-5 hrs so that I have time to make them?
Thank you!
Yes, Emily. In fact, you don’t have to soak them at all. But the soaking process is recommended since it to helps remove phytic acid that makes nuts harder to digest. 🙂 I hope you have a wonderful event! 🙂
P.S. If you opt to not soak the nuts, it will impact the cooking time and it will be more crumbly. So I do recommend soaking the nuts at least for 4 hours. And also, if you opt not to soak at all then be sure to decrease the cook time (checking granola more frequently) since it will cook faster since there will not be as much moisture in the mixture. Hope this helps!
Kelly – is coconut butter the same as coconut cream from Tropical Traditions?
Thanks, Carol
Coconut cream generally refers to the cream that rises to the surface of coconut milk when it’s chilled, whereas coconut butter is actually whole coconut meat pureed. This is the kind of coconut butter I use: http://amzn.to/1rvY1Em So if you confirm with Tropical Traditions that that their “coconut cream” is actually coconut butter that would be the best bet since true coconut cream would not work for this recipe (it doesn’t have a high enough fat content). 🙂
Hi Kelly,
Just discovered your blog when googling grain-free granola. This looks so good, and am hoping to try it out this weekend. But I don’t have coconut butter. Do you know offhand whether this will work with coconut oil?
Looking forward to checking out the rest of your recipes!
Hi, Dr. Deb. Welcome, to The Nourishing Home. I’m so glad you found us here. Please be sure to check out our free GF whole food meal plans in the meal planning section of the site too!
To answer your question: Yes, you can use coconut oil, but I would only use 2-3 tbsp since it doesn’t have the same consistency as coconut butter. Or if you are not dairy-free you could substitute with 2-3 tbsp grassfed butter. I will tell you that the coconut butter really gives this a wonderful taste and texture. So definitely give it a try again when you can get some coconut butter. You can use coconut butter to create some pretty amazing frostings as well as other delicious desserts.
Wishing you much health and happiness! 🙂 Kelly
this is amazing!! can i use less mapple syrup? and also i have a small oven and when i did the first time, it got burn so quickly. should i lower the degrees?
Hi, Maz. Yes, you can use less maple syrup and since all ovens heat differently (some run hotter and some cooler) you should reduce the temp and perhaps turn the granola more frequently. If you start to notice it getting over browned and yet still not crispy enough, reduce the oven temp further. Better to bake low and slow than to burn it. 🙂 Hope this next batch is perfect! Blessings, Kelly
Just come across your site and I love it! I’ve recently started my own healthy food blog and hope it will be as impressive and delicious as yours. I will definitely be trying some of your recipes and think I need to invest in your book!
Hi, Stef. I’m so sorry I missed your comment. Please forgive me for the oversight. Thanks so much for taking the time to leave a kind note. I’m so happy you’re enjoying the recipes here. Blessings to you for a Happy & Healthy New Year!
Thank you so much for this recipe! I’ve just finished soaking the nuts and am mixing together my sweetener.
One thing- the recipe calls for 2 tbsp of vanilla extract… Surely that is supposed to say teaspoons?
So glad you’re excited to try this yummy recipe. And yes, that’s correct – it is two tablespoons of vanilla extract. It really does get it a great vanilla flavor. Enjoy! 🙂
Hi there, is the temperature stated correct? I have just tried to make this and after less than 30 minutes half of it was burnt to a crisp. This is a very expensive recipe to get wrong so as you can imagine I am extremely disappointed. The temperature said 210 degrees. Is that degrees Celsius or farenheit? You have not made that clear.
Hi, Stacey. I’m sorry to hear your granola burned. I have revised the recipe to confirm that the temp is fahrenheit and not celsius. I live in the U.S. and use U.S. measurements and temps for all recipes on this site. Of course, I appreciate my international readers and so I will be more mindful to be clear about the fact my baking recipes are Fahrenheit. It sounds like you assumed the recipe was formulated for celsius and if so, that would definitely explain the burnt results. However, if you followed the recipe as outlined and baked the granola at 210F, then it should have turned out just fine as we make regularly and it turns out exactly as pictured in the post. If you did bake at 210F and still had trouble, you may want to have your oven temp checked, as it’s not uncommon for some ovens to run hot. You can do this by following this protocol here: http://www.finecooking.com/item/35478/how-to-calibrate-your-oven Blessings, Kelly 🙂
Thanks. Yes, assumed that it was Celsius. Thanks for the advice on the oven temp thing. My oven does run hot.
Bummer and apologies again. I’m glad you took the time to let me know so I could correct the recipe to include Fahrenheit. You’ve helped other international friends as a result, I’m sure! Hugs to you, Kelly
Hi Kelly,
Is it important to soak the nuts? I assume that you do this to reduce the phytic acid content to make the nutrients more bioavailable rather than as a necessary cooking step? Just wanted to clarify before diving in to try out the recipe.
Thanks!
Hi, Naomi. I do recommend soaking the nuts and not just because of the phytic acid issue, but also because it softens the nuts and makes the resulting hot cereal taste more like a porridge (reduces the crunch factor and increases the creaminess of the cereal). 🙂
Hi Kelly–I am wondering if I can substitute a different nut for cashews? I cannot eat legumes and so cannot eat peanuts or cashews.
Thanks,
Noelle
Yes, you can use any nut you’d like. Softer nuts will give it more chewiness. 🙂