The Nourishing Home

living healthier lives in service to the King!

  • Home
  • About
    • About TNH
    • Contact
  • Meal Planning
  • Health & Wellness
    • Real Food Basics
  • Whole30
  • GF Recipes
    • Whole30
    • Breakfast
    • Lunch
    • Entrées
    • Slow Cooker
    • Soups & Stews
    • Sides & Salads
    • Snacks
    • Desserts
    • Kids in the Kitchen
  • My Cookbook
  • Subscribe

Simple Healthy Breakfasts in 15 Minutes or Less!

By Kelly · 10 Comments

Breakfast Collage
The morning rush hour can be quite a challenge. Believe me, I know! But in the hustle-bustle of getting kids dressed and out the door for school (or ready to be schooled at home), it’s important to also take time out to start the day with a healthy breakfast!

Eating a nutritious breakfast not only helps kids stay healthy, but it also helps them to do better in school. Studies show that kids who eat a wholesome breakfast have improved cognitive function, memory, behavior and attention span.

So what better motivation is there than that for whipping up a delicious and nutritious breakfast – not just for the kiddos, but you and your spouse too!

Of course, time is always hard to come by. That’s why, I’ve put together a round-up of some quick, yet healthy, gluten-free (and grain-free) breakfast recipes that will give your kids the energy they need to do their best in school, without slowing you down during the busy morning rush hour.

Time-Saving Tip: Breakfast can be especially simple, when you plan ahead. By doubling or tripling your favorite go-to breakfast recipes (like biscuits, waffles, pancakes, muffins, etc.), you can freeze the extras. Then, simply reheat them throughout the week for a super fast and nutritious breakfast. Another benefit to stockpiling already-prepared healthy breakfast foods is minimal clean-up – saving you even more time! Yeah!

Simple, Healthy, Gluten-Free (and Grain-Free) Breakfast Ideas

Banana Split Yogurt
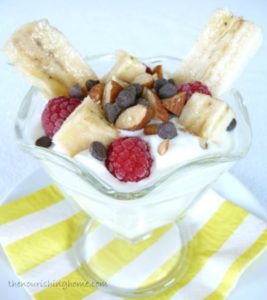
Fruit & Yogurt Parfaits

What kid wouldn’t want an ice cream sundae for breakfast? So why not offer your family the next best thing … breakfast sundaes made with wholesome yogurt, crispy nuts and fresh fruit. And of course, there’s always the classic fruit & yogurt parfait made by layering yogurt with homemade granola and fresh berries.

Of course the healthiest yogurt is homemade, so if you have a few minutes to spare on the weekend, I highly encourage you to give it a try. In my “How to Make Greek-Style Yogurt“ post, I show you just how simple it is to make both dairy and non-dairy yogurt.

Gluten-Free Oatmeal & Grain-Free Breakfast Porridge

It’s no surprise that studies have shown processed cereals to be among the worst breakfast foods for children (and adults too). For example, Tufts University researchers discovered that children who ate oatmeal scored up to 20 percent higher on academic tasks than children who ate processed cereal for breakfast.

Cinnamon Apple Breakfast Porridge Close UpAnd incase you or your kids think oatmeal is boring, think again? There are lots of delicious ways to liven-up oatmeal, such as my family’s favorite quick and easy …
• Banana Split Oatmeal Breakfast Buffet and
• Cinnamon Maple Crunch Oatmeal.

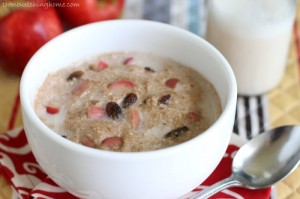
Grain-free? No problem! My simple Cinnamon Apple Breakfast Porridge is a delicious grain-free alternative to oatmeal, as shown in the photo at right!
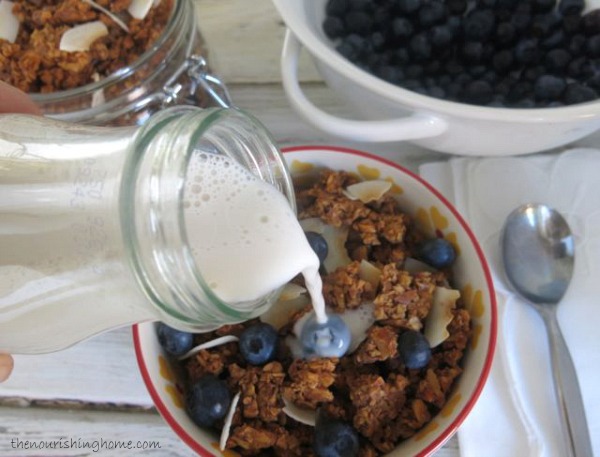
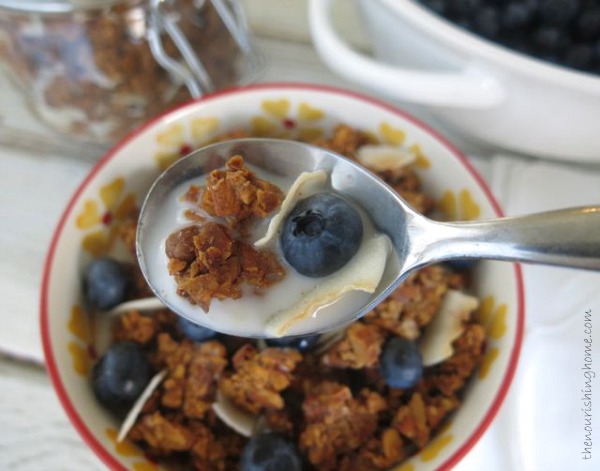
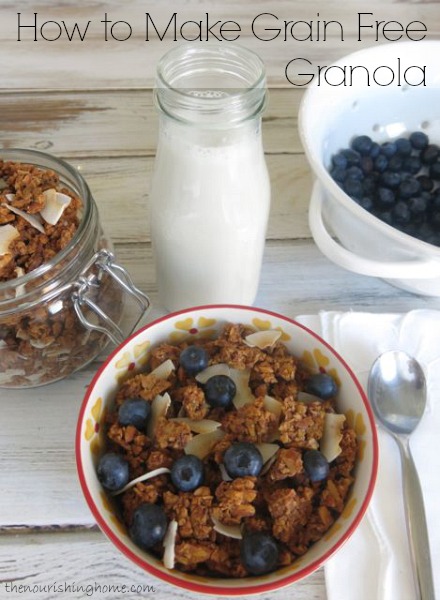
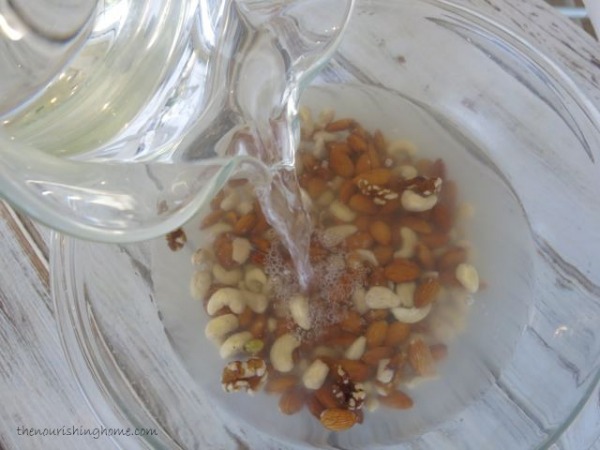
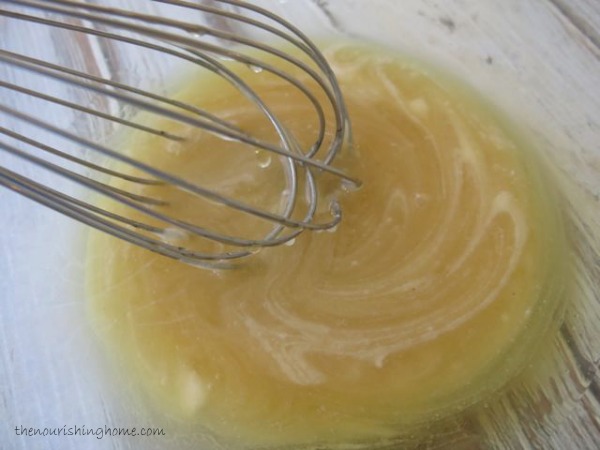
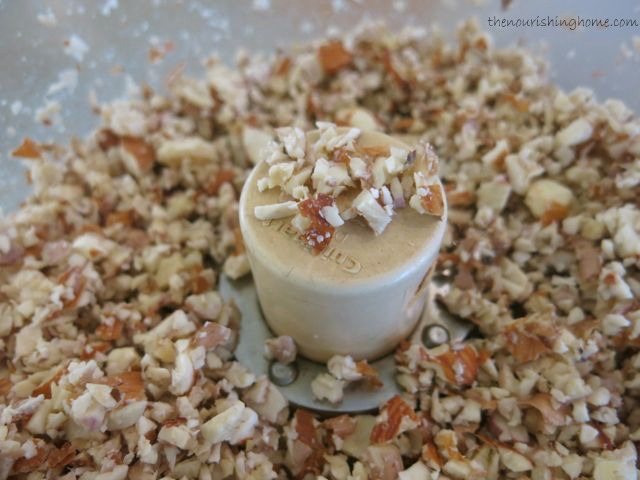
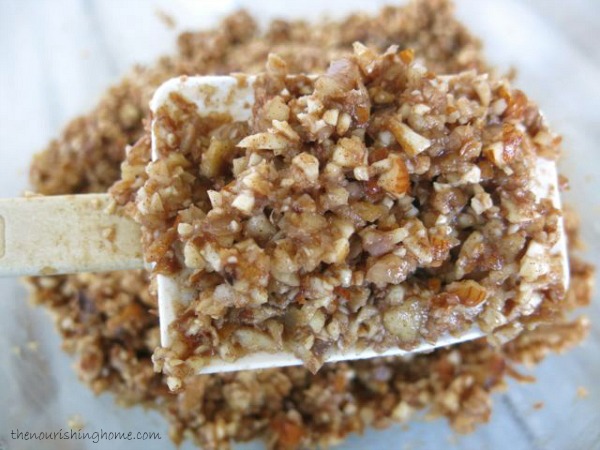
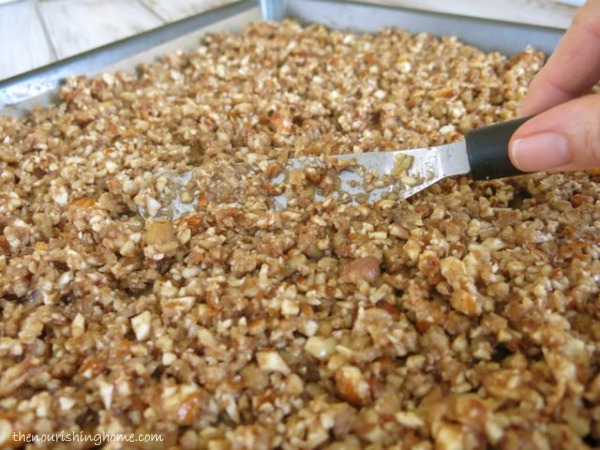
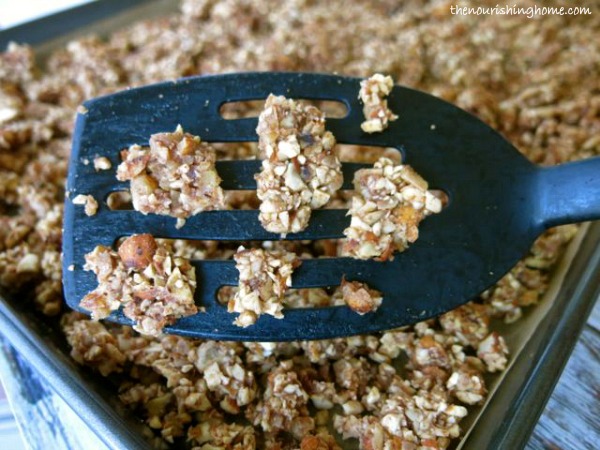
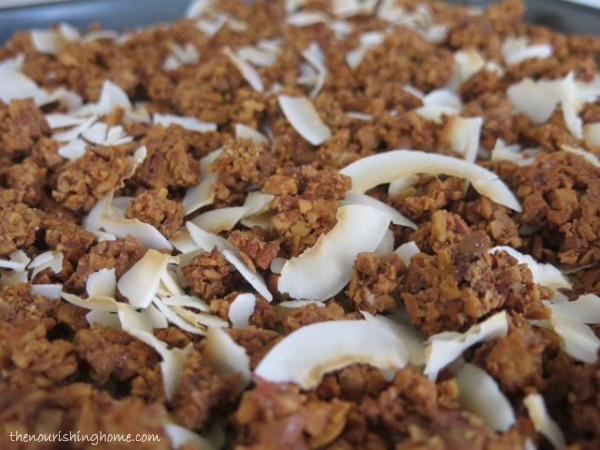
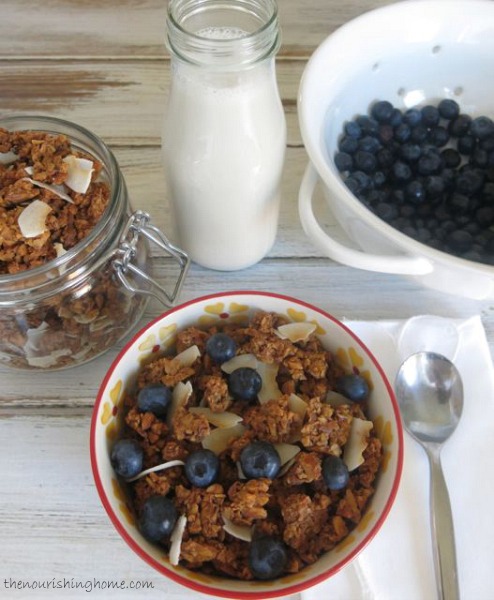
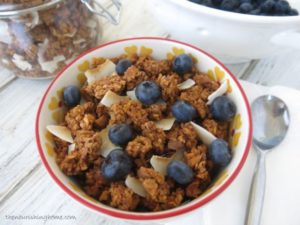
granola in bowlHomemade Granola

And continuing on the topic of healthy alternatives to processed cereals, homemade gluten-free granola has all the crunch-appeal and sweet flavor of cereal without any health detriments.

Grain-free? Again, no problem, my delicious Grain-Free Cinnamon Crunch Granola is amazing, and so easy to make, as shown in the photo!

Breakfast Sandwiches

There are lots of ways to build a quick-n-easy breakfast sandwich that’s as healthy as it is delicious …

Bacon Egg Cheese Biscuit• Transform leftover biscuits into Bacon, Egg & Cheese Biscuits – a great breakfast for families on-the-go …  No biscuits, no problem. Simply substitute with your favorite wholesome toasted bread or bagel.

• Use leftover waffles to assemble a wonderful waffle sandwich, or leftover pancakes to create Nut Butter & Jam Pancake Sandwiches.

• And don’t forget about breakfast wraps! A little salsa, cheese and scrambled eggs can magically transform into a delicious Breakfast Burrito or Breakfast Tostada.

Veggie Egg Scramble Close UpAn Egg-cellent Way to Start the Day!

Eggs are packed with protein and nutrients, including the important B-complex vitamin choline, which is associated with better neurological function. And they’re so quick and easy to prepare.

Whether it’s a simple Toad in the Hole or a quick Veggie Egg Scramble with your favorite add-ins, you’ll be serving up a hearty breakfast that will keep your kids fully energized and ready to learn!

Got More Than 15 Minutes to Spare?

Weekends are a great time to try new breakfast recipes and to cook-up double or triple batches of your favorite breakfast staples in order to save time later (as mentioned above). That way, you’ll knock out at least two days or more worth of breakfasts, rather than just one.

Here are some of my favorite breakfast foods that can easily be doubled (or tripled for that matter):

  • Pancakes
  • Waffles
  • French Toast
  • Biscuits
  • Muffins
  • Boiled eggs

Storing breakfast foods:

The following homemade breakfast foods can be individually wrapped and stored in airtight containers in the freezer for up to a month. When ready to serve, no need to thaw – simply place in a 200°F oven to reheat until warmed.

  • Pancakes
  • Waffles
  • French Toast
  • Biscuits, whole grain (be sure to cut in half first before freezing)

The homemade breakfast foods listed below are best stored in the refrigerator (not freezer). Simply place in airtight containers in the fridge for up to 5-6 days. When ready to serve, place in a 200°F oven to reheat until warmed.

  • Biscuits, almond flour (be sure to cut in half first before freezing)
  • Muffins (especially almond flour muffins)
  • Boiled eggs
  • Yogurt (dairy or non-dairy)

6 pancake muffins CloseUpMore healthy breakfast ideas & recipes …

Some of our favorite weekend breakfast recipes can be found in the breakfast section of this site and on my breakfast pinterest board. Again, these recipes can easily be doubled or tripled and stored in the fridge or freezer for a super-quick weekday breakfast!

I also encourage you to pop over to KitchenAid to check out my quick and easy Grab-n-Go Pancake Muffins that can be made in less than 30 minutes, plus they reheat beautifully, so why not bake a double batch!

Three cheers for healthy breakfasts that are as easy to prepare, healthy and delicious!

Joyfully Serving HIM, Kelly

You Might Also Like:

Quick & Easy Breakfast Sandwiches
Peach Pancakes
Coconut Flour Banana Pancake Buddies (GF, DF)

Filed Under: Egg Dishes, Pancakes/Waffles, Porridges & Cereals ·

How to Make Grain Free Granola {Step-by-Step}

By Kelly · 50 Comments

One crunchy bite is all it takes to become completely smitten with this grain free granola. Its cinnamony flavor and rich vanilla undertones is a delight!

One crunchy bite is all it takes to become completely smitten with this grain free granola. Its slightly sweet cinnamony flavor with rich vanilla undertones combines beautifully with crisp toasted coconut and your favorite fresh or dried fruit. It’s perfect with a splash of almond milk, or as a topping for yogurt parfaits and ice cream.

One crunchy bite is all it takes to become completely smitten with this grain free granola. Its cinnamony flavor and rich vanilla undertones is a delight!

Since going grain-free, I’ve slowly been finding new ways to make old favorites. And since my gluten-free granola is a tough act to follow, it’s been slow going to find a grain-free way to capture the crunchy, yet chewy texture of oats and ensure the formation of sweet cereal clusters. But I was up for the challenge!

Rather than boring you with the details of recipe development, I’ll jump straight to the punchline … Eureka! I’m beaming (and thanking the Lord) for the wonderful victory in achieving a grain free granola that is so close to my soaked oats version that I can now honestly say, I don’t miss those oats at all. And I’m betting you won’t either!

One crunchy bite is all it takes to become completely smitten with this grain free granola. Its cinnamony flavor and rich vanilla undertones is a delight!

Be sure to check out my Step-by-Step Photo Tutorial following the recipe below. I’ll walk you through each step of the process, so you’ll learn just how easy it is to make the best grain free granola ever! (Well, maybe I’m exaggerating just a little, but seriously, it’s REALLY good!)

One crunchy bite is all it takes to become completely smitten with this grain free granola. Its cinnamony flavor and rich vanilla undertones is a delight!

P.S. Just a friendly reminder, that I provide free monthly meal plans over at The Better Mom blog. Each week’s meal plan contains delicious family-friendly GF recipes utilizing a time-saving method to make getting a healthy dinner on the table a snap! I highly recommend you pop over to The Better Mom and download these free meal plans.

One crunchy bite is all it takes to become completely smitten with this grain free granola. Its cinnamony flavor and rich vanilla undertones is a delight!This delightful recipe is just one of more than 100 irresistible grain-free, dairy-free recipes in my new cookbook – Everyday Grain-Free Baking!

From breads, biscuits and muffins to savory snacks and decadent treats, you’ll find step-by-step instructions, beautiful color photographs and helpful tips & tidbits to make all of your GF baking adventures a delicious success!

Click here to get a SNEAK PEEK of the book!

Print
Grain Free Cinnamon Crunch Granola (DF)

Yield: 5-6 cups of granola

Ingredients

    Nut Mixture
  • 1 1/2 cups raw whole almonds
  • 1 cup raw whole cashews
  • 1 cup raw walnut halves
  • 1 tsp sea salt
  • All-Natural Sweetener
  • 1/4 cup *pure coconut butter, softened
  • 1/2 cup honey (I prefer a mild flavor such as sage or clover)
  • 2 tbsp pure vanilla extract
  • 1 tbsp ground cinnamon
  • 1 tsp coconut flour
  • 1/4 tsp sea salt
  • Add-ins
  • 3/4 cup unsweetened coconut flakes
  • Your favorite fresh or dried fruit

Instructions

    Soaking the Nuts
  1. Place the nuts and salt in a large bowl. Cover with warm filtered water so that the water level is at least two inches above the nuts. Cover the bowl with a plate or clean kitchen towel, and allow the nuts to soak 18-24 hours.
  2. When soaking time is completed, drain and rinse nuts. Place on a clean kitchen towel to absorb excess moisture.
  3. Preparing the Sweetener
  4. In a large bowl, whisk together the softened coconut butter and honey until smooth and creamy. Then add the remaining ingredients (vanilla, cinnamon, coconut flour and salt). Whisk until well combined; set aside.
  5. Processing the Nuts
  6. Using a food processor, place a couple of handfuls of the soaked nuts into the processor bowl and pulse to chop the nuts until they are about the size of oats, as shown in photo below. (Do not over-process or you will create nut meal. By using the pulse button, it will be easier for you to achieve a uniform size and ensure you don't over-process the nuts into flour.)
  7. Add the finely chopped nuts to the bowl with the honey mixture. Once all nuts are processed, use a rubber spatula to fold them into the honey mixture until well combined.
  8. Baking the Granola
  9. Preheat oven to 210°F. Line a 12x17-inch rimmed baking sheet with parchment paper.
  10. Spoon grain-free granola mixture onto the parchment-lined baking sheet. Use an angled spatula to evenly spread out the granola across the pan into a thin layer.
  11. Bake granola for two hours at 210°F. Then remove the baking sheet and gently flip over the granola, section by section, Use the top of your spatula to gently separate any large pieces into small cereal clusters.
  12. Return granola to the oven and bake another two hours. Then remove and use the spatula to again turn and gently stir the granola. Sprinkle top with unsweetened coconut flakes.
  13. Return granola to the oven and bake another 30-45 minutes, until coconut is slightly toasted. Turn off the oven. Place baking sheet on the stovetop to cool. After about 5-8 minutes, check the granola for the crunch-factor. If it's crunchy enough for you, allow it to continue cooling. If it isn't crunchy enough, return it to the warm oven and allow it to sit in the warm oven for 20-30 minutes more. Remove from oven and allow the granola to cool again on stovetop 5-8 minutes and again check the crunch-factor.
  14. When granola is crunchy enough for you, allow it to completely cool about 30 minutes. (Please note: The granola will become crunchier the cooler it is.) Then immediately transfer it to mason jars (or other airtight containers). Store in the pantry for up to two weeks or in the fridge or freezer for up to a month.
  15. Enjoy with your favorite mix-ins such as fresh or dried fruit. Or use it as a topping for yogurt parfaits or over ice cream.

Notes

See How It's Done: Remember to check out the photo tutorial following this recipe.

* Coconut Butter Substitution: In anticipation of the question about how to substitute the coconut butter called for in this recipe, you can replace the coconut butter with 3 tbsp of coconut oil (or softened butter), but the results (although tasty) are just not the same, since coconut butter gives the granola a deep rich flavor and provides an especially nice crunch without a heavy coconut taste or oily texture.

So, I really recommend making a small invest in a jar of pure coconut butter. It is truly delicious, which is why you'll be seeing it in many more recipes to come, such as my dairy-free cookie icing.

3.1
https://thenourishinghome.com/2014/03/how-to-make-grain-free-granola/

How to Make Grain Free Granola Step-by-Step

One crunchy bite is all it takes to become completely smitten with this grain free granola. Its cinnamony flavor and rich vanilla undertones is a delight!
1. Soaking the Nuts
Place the nuts and salt in a large bowl. Cover with warm filtered water so that the water level is at least two inches above the nuts. Cover the bowl and soak 18-24 hours.

One crunchy bite is all it takes to become completely smitten with this grain free granola. Its cinnamony flavor and rich vanilla undertones is a delight!
2. Rinsing and Drying the Nuts
When soaking time is completed, drain and rinse nuts. Place on a clean kitchen towel to absorb excess moisture.

One crunchy bite is all it takes to become completely smitten with this grain free granola. Its cinnamony flavor and rich vanilla undertones is a delight!
3. Preparing the Sweetener
In a large bowl, whisk together softened coconut butter and honey until smooth and creamy. Then add the remaining ingredients (vanilla, cinnamon, coconut flour and salt). Whisk until well combined; set aside.

One crunchy bite is all it takes to become completely smitten with this grain free granola. Its cinnamony flavor and rich vanilla undertones is a delight!
4. Processing the Nuts
Using a food processor, place a couple of handfuls of the soaked nuts into the processor bowl and pulse to chop the nuts until they are about the size of oats. (Do not over-process or you will create nut meal.) 

One crunchy bite is all it takes to become completely smitten with this grain free granola. Its cinnamony flavor and rich vanilla undertones is a delight!
5. Blending the Granola
Once all nuts are processed, use a rubber spatula to fold them into the honey mixture until well combined.

One crunchy bite is all it takes to become completely smitten with this grain free granola. Its cinnamony flavor and rich vanilla undertones is a delight!
6. Spreading the Granola on the Baking Sheet
Preheat oven to 210°F. Line a 12×17-inch rimmed baking sheet with parchment paper. Spoon grain-free granola mixture onto the parchment-lined baking sheet. Use an angled spatula to evenly spread out the granola across the pan into a thin layer.

One crunchy bite is all it takes to become completely smitten with this grain free granola. Its cinnamony flavor and rich vanilla undertones is a delight!
7, Baking & Turning the Granola
Bake granola according recipe instructions, gently turning the granola as outlined in the recipe above. Do not over mix, as you simply want to gently divide the mixture into small cereal clusters as shown above.

One crunchy bite is all it takes to become completely smitten with this grain free granola. Its cinnamony flavor and rich vanilla undertones is a delight!
8. Finishing the Granola
Sprinkle top with unsweetened coconut flakes, and continue baking per the recipe instructions above. The granola is ready when the coconut is lightly toasted and the granola reaches desired level of crunchiness.

One crunchy bite is all it takes to become completely smitten with this grain free granola. Its cinnamony flavor and rich vanilla undertones is a delight!

Enjoy with your favorite mix-ins such as fresh or dried fruit and a splash of milk. Absolutely delightful!

Disclosure: Some of the links in this post include affiliate links, providing The Nourishing Home a small percentage of the sale at no additional cost to you. Of course, you are not obligated to use these links to make a purchase, but if you do, it helps to support this site and ministry. Thank you!

You Might Also Like:

How to Make Dairy & Non-Dairy Greek-Style Yogurt {no straining required}
Double Chocolate Banana Bars
Raw Cookie Dough Bites (GF)

Filed Under: Porridges & Cereals, Sweet ·

  • « Previous Page
  • 1
  • 2

My New Cookbook is Here!

Welcome to The Nourishing Home!

I’m so glad you’re here and want you to feel right at home! My heart in creating this blog is to help you by sharing helpful meal planning strategies and nourishing GF recipes that are healthy, easy and delicious with thanksgiving to God! [Read More …]


All content (recipes, photos, posts, etc.) on this site is the creative property of Kelly Smith. You are welcome to share a photo via social media, as long as it contains a link back to the corresponding recipe or post from this site. However, you may not republish a recipe in its entirety in any form. For questions, or for permission to use a photo or recipe, please contact me via email at [email protected]. Thank you!

Please Note: All content (recipes, photos, text, etc.) on this site is the creative property of Kelly Smith of The Nourishing Home. You are welcome to share a photo via social media, as long as it contains a link back to the corresponding recipe from this site. However, re-publishing a recipe in any form is strictly prohibited. Additionally, please refrain from adapting recipes without properly linking back to the original recipe, and keep in mind that simple substitutions do not constitute an adapted or original recipe. For details regarding recipe copyright law, please visit the Food Blog Alliance.
The Nourishing Home is a participant in the Amazon Services LLC Associates Program, an affiliate advertising program designed to provide a means for sites to earn advertising fees by advertising and linking to amazon.com.

Privacy Policy
DMCA.com

Copyright © 2026 · All Rights Reserved · The Nourishing Home · Artwork by Nancy Panaccione · Site Design by Deluxe Designs · Log in