The Nourishing Home

living healthier lives in service to the King!

  • Home
  • About
    • About TNH
    • Contact
  • Meal Planning
  • Health & Wellness
    • Real Food Basics
  • Whole30
  • GF Recipes
    • Whole30
    • Breakfast
    • Lunch
    • Entrées
    • Slow Cooker
    • Soups & Stews
    • Sides & Salads
    • Snacks
    • Desserts
    • Kids in the Kitchen
  • My Cookbook
  • Subscribe

Top 10 Tips to Get Your Grill On!

By Kelly · 8 Comments

Top 10 Grilling Tips

Summer is the perfect time to get your grill on and invite your family and friends over for a fun and flavorful cookout.

If you’ve seen my meal plans, then you know that grilling is one of my top time-saving methods for quick weeknight dinners. But it’s also one of my favorite ways to entertain too! That’s because it’s so easy to get everything ready in advance. Then when guests arrive, you can continue to converse in the beautiful outdoors, while flipping real food on the grill.

And if you’ve decided to Join Us for the Whole30 and take advantage of my free Whole30 Meal Plans, you’ll notice that I include a lot of great grilling recipes not just because they’re quick-n-easy, but because they’re also the best way to avoid becoming a short-order cook since virtually everyone loves grilled foods!

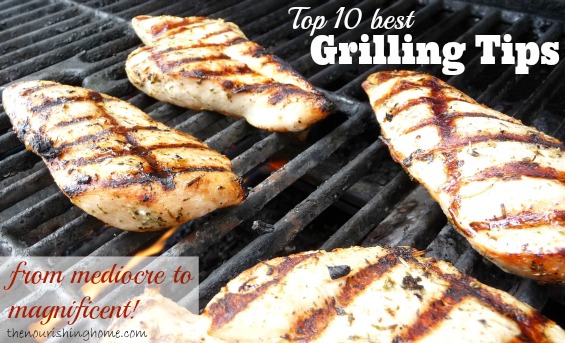
Of course, there are a few tricks of the trade that I’ve learned through the years that really do make a significant difference in turning grilled foods from mediocre to magnificent! I’m sharing these with you, so you can avoid some common pitfalls, and instead experience all the benefits of successful grilling!

P.S. Looking for foolproof grilling recipes guaranteed to please?! Be sure to see my Top Reader Favorite Grilling Recipes below … Happy Grilling!

Top 10 Best Grilling Tips:

Chicken kebobs on grillBy following these 10 simple steps, you’ll find grilling to be one of the easiest ways to get delicious, healthy meals on the table in a snap!

1. Before You Light Up … The key to great grilling is preparation – mise en place is essential. So get your grilling tools, meat, vegetables, brushes, platter, glazes, sides and hungry mouths ready before you light up the grill. Once you’ve got food on the grill, you want to be sure you have everything ready in advance, so you can focus your attention on grilling for best success. In other words, don’t try to grill and cook the rest of the meal at the same time. Your kitchen is inside; your grill should be outside. Trying to run between the two usually ends with less than satisfying results.

2. Turn Up the Heat! Another secret of success is to be sure to preheat your grill at least 10-15 minutes before cooking. A properly preheated grill sears foods on contact, which helps to prevent sticking, and even more important, results in a more flavorful and moist outcome.

3. Keep It Clean. The easiest way to remove debris is when the grill is hot. So after preheating, give the grill racks a good scrub down with a wire brush to remove any remains from the previous cooking session. Then, wipe the racks down with oil, and that’s basically all the maintenance necessary.

4. Taste is Always in Season. When it comes to grilling, there are several methods for infusing grilled foods with extra flavor. A quick way is to use glazes (like BBQ Sauce) – sweet coatings often made with honey, maple syrup, or molasses that are brushed on during the last few minutes of grilling.

Similarly, flavorful dry rubs applied a few hours before cooking also add a delicious burst of flavor. Dry rubs consist of herbs and spices, while wet rubs include the addition of oils, dijon mustard and such.

For an even deeper infusion of flavor, use sweet-n-tangy marinades made with acidic liquids, such as citrus juices and vinegars. Marinades not only enhance your grilled foods’ flavor, when it comes to meat, they also help to tenderize as well.

And of course, after the foods off the grill, there’s still delicious ways you can infuse your meats with flavor, such as easy-to-make “compound butters” like my Whole30 Cilantro Lime Chimichurri made with flavorful ghee and fresh herbs.

5. Take the Chill Off. Cold meat and poultry doesn’t cook evenly. So be sure to take meats and poultry out of the fridge about 15-20 minutes before grilling to bring them to room temperature. You’ll be amazed at what a difference this simple step makes in locking in both flavor and moistness.

6. Let it be. When grilling, resist the urge to repeatedly flip your food. Instead, give it time to sear; turning only when grill marks form. Waiting for meat to sear not only creates a more flavorful result, but also helps to reduce sticking.

7. Not to be Overdone. To avoid overcooking, it’s best to remove meats, poultry and seafood just before they reach the desired doneness since they continue to cook a bit after coming off the grill. An instant-read thermometer provides the most accurate results, but you can also gently poke steak and chops with your index finger; the firmer the meat feels, the more well-done it is. With seafood, look for opacity; well-done fish fillets will be opaque all the way through. For chicken, make a slit in the thickest part of the cut. Any juices that escape should run clear.

8. Another trick of the trade … If your food starts to get too dark before it’s cooked through, turn down the heat and move it to a cooler part of the grill to finish cooking. Or turn off the grill and cover, until food reaches desired doneness (keeping in mind point #7 above).

9. Lock in Moisture. Once your food has been grilled to perfection, give it some time to rest. Allowing grilled meats and poultry to rest on a clean platter, tented with foil, enables the juices to redistribute evenly. This leads to a moist, flavorful result. (The general rule of thumb is to allow small-to-medium cuts to rest about 5-10 minutes, and larger cuts or roasts to rest about 15 minutes.)

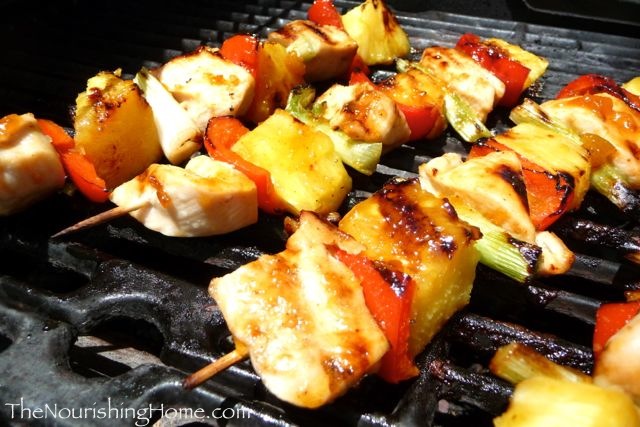
10. Just do it! Now that you’ve got the low-down, it’s time to throw-down some meat and veggies and get your grill on! There are so many great grilling recipes out there, so if you’re new to grilling, start out with something simple (like my Grilled Herb Chicken with Pineapple Salsa shown above).

Then, build on your skills from there by giving some of my Top Reader Favorite Recipes a sizzle, such as:
• Strawberry Cobb Salad with Grilled Herb Chicken
• Grilled Fajita & Veggies Steak Salad
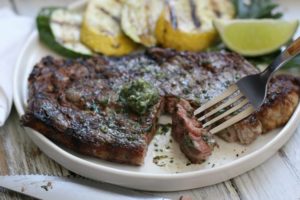
• Grilled Ribeye Steak with Cilantro Lime Chimichurri
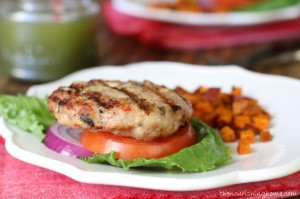
• Grilled Southwestern Chicken Burgers
• Grilled Shrimp Kebobs
• Easy Grilled Herb Turkey Breasts

Wishing you and your family a very blessed summer! Happy Grilling!

follow-me-on-pinterest-button

You Might Also Like:

Healthy Chicken Nuggets (GF)
Fettuccine Alfredo w/Balsamic Chicken Medallions (Gluten-Free Option)
Grilled Shrimp Kabobs (GF)

Filed Under: Beef/Pork, Poultry, Seafood ·

Meal Plan Monday: June 10–23

By Kelly · 2 Comments

all-fruit-pops1-1024x846

FEATURED RECIPE: Kids LOVE ice pops! These homemade all-fruit popsicles are not only a deliciously refreshing treat, they’re also healthy and economical too!

One of my favorite ministries is serving as the Meal Planning Contributor for The Better Mom, where I share my bi-weekly real food meal plans as a way to help inspire and encourage others. Each bi-weekly meal plan includes what’s on the menu for breakfast, lunch and dinner, as well as links to more than 40 of the delicious real food recipes featured.

Why is this called “Meal Plan Monday,” when it’s posted on Saturday?
I thought it would be nice to give you the heads-up about what’s on the menu for the week ahead. That way, you have time to take advantage of incorporating some (or all) of the meals featured, if you’d like. Remember: To view the recipe links for each of the meal plans below, please pop on over to The Better Mom.

So … without further ado … here’s what’s on the menu for the next two weeks at
The Nourishing Home. Again, you can find each of the recipe links over at
 The Better Mom.
New Meal Plan 49aNew Meal Plan 49b

P.S.  I’ve provided free links, so you can download the new Meal Plan Template for your own personal use.

P.S.S. If you’d like to learn more about meal planning, please check out my FREE Video Course “Mastering Meal Planning.”

Wishing you and your family a very blessed and joy-filled Good Friday and Easter!

Joyfully Serving Him, Kelly

follow-me-on-pinterest-button

You Might Also Like:

Meal Plan Monday: September 2–15
Meal Plan Monday: May 7–13
Meal Plan Monday: March 18–31

Filed Under: Meal Plans ·

Baja-Style Cilantro Rice

By Kelly · 18 Comments

Cilantro Baja Style Rice

Some of the more popular Mexican-style restaurants have their own unique versions of this simple, yet flavorful rice dish, which tends to be a well-kept secret when you start to inquire about the ingredients.

Now I don’t claim to be an ace detective here, but I do enjoy unmasking the subtle spices in popular dishes and recreating them into real food favorites.

I think you’ll find this easy recipe to be a delicious replica of one of the more popular Baja style rice dishes out there – without any of the unhealthy ingredients, of course! It makes the perfect side to just about any Mexican-themed meal, as well as pairs nicely with many Asian-inspired dishes as well.

And in case you’re wondering about the health benefits of white rice, I highly recommend this article on brown vs. white rice. For those who can tolerate grains, it’s not a health-compromise to enjoy a homemade white rice dish on occasion. In fact, it may actually be easier on your gut than brown rice, especially if prepared using homemade bone broth.

Plus, unlike brown rice, milled rice (white rice) does not require soaking. That’s because the outer bran/germ layer as been removed, which contains the highest levels of phytic acid. So for some, white rice may actually be easier to digest. Of course, this may not be the case for those who are grain sensitive and are therefore following a grain-free diet.

Print
Baja-Style Cilantro Rice (Gluten-Free)

Yield: 5-6 servings

Ingredients

  • 2 tbsp butter
  • 1/2 tsp dried parsley
  • 1/2 tsp sea salt
  • 1/2 tsp onion powder
  • 1/2 tsp garlic powder
  • 1/4 tsp freshly ground black pepper
  • 2 cups of white basmati rice
  • 2 cups of homemade bone broth
  • 1 cup of filtered water
  • 2-3 tbsp of minced fresh cilantro

Instructions

  1. In a medium saucepan, over medium heat, melt the butter and add all the seasons. Stir well to combine.
  2. Add the rice and stir well, making sure all of the rice is well coated with the butter-seasoning mixture. Cook the rice, stirring constantly for about 2-3 minutes.
  3. Then, increase the heat to high and add the bone broth and water. Once the rice comes to a gentle boil, cover the saucepan and reduce the heat to low/simmer. (I know it’s tough to resist, but don't peek under the lid.)
  4. Allow rice to cook about 15 minutes. Then turn off the burner and remove the pan from the heat.
  5. Let the rice sit, covered, for an additional 5 minutes. (Again, try not to peek under the lid, or you’ll allow the steam to escape.)
  6. Then, remove the lid and add the minced cilantro. Fluff the rice with a fork to separate the grains and distribute the cilantro throughout the rice. (You can also create a delicious Veggie Confetti Style Rice by adding an assortment of fine-diced sautéed veggies. See recipe note below.)
  7. You can serve the rice immediately, or put the lid back on to keep it warm while you finish cooking the rest of your meal. Enjoy!

Notes

Recipe Variation: For a delicious Veggie Confetti Rice dish, heat a medium skillet over medium-high heat. Add a tablespoon or two of ghee (or butter) and sauté one-and-a-half cups of your favorite fine-diced veggies, such as onion, bell peppers, mushrooms, carrot and zucchini. Set aside. Prepare the cilantro rice according to recipe above. Then, toss in the sautéed veggies and combine as noted in step 6 of the recipe above. Absolutely delicious and nutritious!

3.1
https://thenourishinghome.com/2013/06/baja-style-cilantro-rice/

follow-me-on-pinterest-button

You Might Also Like:

Roasted Herb Potatoes (GF)
Simple & Savory Watermelon Salsa
Summer Veggies Brown Rice Risotto (Gluten-Free)

Filed Under: Sides ·

  • « Previous Page
  • 1
  • …
  • 88
  • 89
  • 90
  • 91
  • 92
  • …
  • 182
  • Next Page »

My New Cookbook is Here!

Welcome to The Nourishing Home!

I’m so glad you’re here and want you to feel right at home! My heart in creating this blog is to help you by sharing helpful meal planning strategies and nourishing GF recipes that are healthy, easy and delicious with thanksgiving to God! [Read More …]


All content (recipes, photos, posts, etc.) on this site is the creative property of Kelly Smith. You are welcome to share a photo via social media, as long as it contains a link back to the corresponding recipe or post from this site. However, you may not republish a recipe in its entirety in any form. For questions, or for permission to use a photo or recipe, please contact me via email at [email protected]. Thank you!

Please Note: All content (recipes, photos, text, etc.) on this site is the creative property of Kelly Smith of The Nourishing Home. You are welcome to share a photo via social media, as long as it contains a link back to the corresponding recipe from this site. However, re-publishing a recipe in any form is strictly prohibited. Additionally, please refrain from adapting recipes without properly linking back to the original recipe, and keep in mind that simple substitutions do not constitute an adapted or original recipe. For details regarding recipe copyright law, please visit the Food Blog Alliance.
The Nourishing Home is a participant in the Amazon Services LLC Associates Program, an affiliate advertising program designed to provide a means for sites to earn advertising fees by advertising and linking to amazon.com.

Privacy Policy
DMCA.com

Copyright © 2026 · All Rights Reserved · The Nourishing Home · Artwork by Nancy Panaccione · Site Design by Deluxe Designs · Log in