The Nourishing Home

living healthier lives in service to the King!

  • Home
  • About
    • About TNH
    • Contact
  • Meal Planning
  • Health & Wellness
    • Real Food Basics
  • Whole30
  • GF Recipes
    • Whole30
    • Breakfast
    • Lunch
    • Entrées
    • Slow Cooker
    • Soups & Stews
    • Sides & Salads
    • Snacks
    • Desserts
    • Kids in the Kitchen
  • My Cookbook
  • Subscribe

Healthy Fruit & Cream Bars!

By Kelly · 18 Comments

Healthy Fruit & Cream Bars

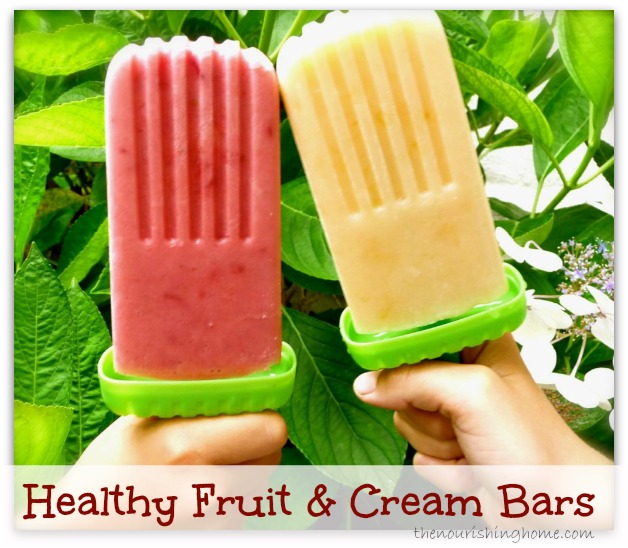
“I Scream, You Scream! We All Scream for Ice Cream!” … especially when it’s fresh fruit covered in wholesome creamy goodness!

Making homemade frozen treats like these fabulous Fruit & Cream Bars is not only a healthy and delicious way to celebrate summer, it’s also a great way to keep the ice cream man at bay!!

And who hasn’t been tempted at one point or another by the ice cream man? I’d like to say that my kids have never succumbed to his wiles (or more accurately, that I’ve never caved in to their pleas for “just this one time”). But the truth is, we have done business with the ice cream man, and frankly my boys did enjoy the indulgence, while I wrestled with the thought of all those chemicals and preservatives entering into their little bodies.

That’s why, I set about on a mission to become The Ice Cream Mom! So each summer I take a little time to make the most fabulous frozen treats – so tempting and tasty that even the ice cream man doesn’t stand a chance!

P.S. Looking for even more fabulous frozen treats your family will love? Be sure to check out out my “Top 10 Ice Pop Making Secrets of Success” and just a friendly reminder that you can always download a FREE copy of my Healthy Ice Pops & Frozen Treats eBook, simply by becoming a subscriber to The Nourishing Home.

Joyfully Serving HIM, Kelly

Print
Strawberry & Cream Bars (GF, DF option)

Yield: Six 3- to 4-ounce size pops

Ingredients

  • 1 pound fresh ripe organic strawberries
  • 1 cup coconut milk or whole milk yogurt
  • 2-3 tbsp raw honey (we prefer sage due to it's mild flavor)
  • 1/8 tsp pure vanilla extract

Instructions

  1. Remove stems from strawberries.
  2. Finely dice four of the strawberries; set aside.Cut the remaining strawberries into halves and place them into your blender or Vitamix. Then, add the remaining ingredients to the blender, except for the finely diced strawberries. Blend until thoroughly combined.
  3. Next, add the finely diced strawberries and blend on low just a couple of seconds to mix together.
  4. Pour mixture evenly into six 3- or 4-ounce pop molds making sure to leave at least a half-inch of space at top for expansion that occurs during freezing. Freeze for at least 6-8 hours.
  5. When ready to serve, run the pop mold under warm water for a few seconds to loosen before removing the mold.
  6. What a fun and healthy way to enjoy summertime with your kiddos without compromising good nutrition.

Notes

Wondering about the super cute pop molds shown in the photo? They're called Tovolo Groovy Ice Pops. They come in a set of six and are super durable and fun!

Please note: Ripe fruit is much sweeter and more flavorful. So be sure to use only fully ripened fruit in your ice pops for the best flavor. Also note: When fresh ripe fruit is not available, you can use frozen fruit to make ice pops. However, it's best to allow the frozen fruit to thaw first, before blending it. That's because you may need to add more liquid to get frozen fruit to blend properly and this will change the flavor and texture of your ice pop.

3.1
https://thenourishinghome.com/2013/06/healthy-frozen-fruit-cream-bars/

Print
Peaches & Cream Bars

Ingredients

  • 4 large fresh ripe organic peaches
  • 1 cup organic whole milk yogurt (or coconut cream)
  • 2-3 tbsp pure maple syrup (or raw honey)
  • 1/8 tsp pure vanilla extract

Instructions

  1. Remove skins from peaches.
  2. Cut one peach in half. Finely dice the peach half; set aside. Cut the remaining peaches (including the leftover peach half) into slices. (Be sure to slice them right over your blender or Vitamix container to catch all of the juices in the container.) Then, add the remaining ingredients to the blender, except for the finely diced peach half. Blend until thoroughly combined.
  3. Next, add the finely diced peach half and blend on low just a couple of seconds to mix together.
  4. Pour mixture into pop molds and freeze for at least 6-8 hours.
  5. When ready to serve, run the pop mold under warm water for a few seconds to loosen before removing the mold.
  6. What a fun and healthy way to enjoy summertime with your kiddos without compromising good nutrition.

Notes

Wondering about the super cute pop molds shown in the photo? They're called Tovolo Groovy Ice Pops. They come in a set of six and are super durable and fun!

Please note: Ripe fruit is much sweeter and more flavorful. So be sure to use only fully ripened fruit in your ice pops for the best flavor. Also note: When fresh ripe fruit is not available, you can use frozen fruit to make ice pops. However, it's best to allow the frozen fruit to thaw first, before blending it. That's because you may need to add more liquid to get frozen fruit to blend properly and this will change the flavor and texture of your ice pop.

3.1
https://thenourishinghome.com/2013/06/healthy-frozen-fruit-cream-bars/

follow-me-on-pinterest-button

You Might Also Like:

Annie's No Bake Cheesecake (GF)
Homemade Vanilla Bean Ice Cream {and Exciting News!}
Frozen Banana Bites – Summer Fun with the Kids!

Filed Under: Frozen Treats ·

Favorite Summertime Fajitas (GF)

By Kelly · 4 Comments

Sizzling Summer Fajitas

Grilling is one of my favorite cooking methods – especially in the summer when the weather is just gorgeous!

We especially enjoy entertaining in the summer, which is why I like to keep the menu simple, yet delicious – so I can spend more time with my guests and less time in the kitchen.

That’s why this recipe is one of my favorite “go-to” meals for summertime gatherings with family and friends.

Everything can be done in advance, so all you’ll need to do is throw the fajita kebobs on the grill when you’re ready to eat. Then, just place everything on the table and allow guests to fill their plates with their favorite fajita fixins and sides. Simple, yet super satisfying!

Fajitas-close-up

And whether you’re a novice, or veteran griller, be sure to check out my Top 10 Best Grilling Tips for some secrets of success that are certain to take your grilled foods to a whole new level of excellence!

Print
Favorite Summertime Fajitas (GF)

Yield: 4-5 servings

Ingredients

    Fajita Ingredients:
  • 1.25 pounds of beef sirloin steak, cubed or boneless, skinless chicken breasts, cubed (or use a combo)
  • 1 large red onion, cut into wedges
  • 1 large red bell pepper, cut into 2-inch pieces
  • 1 large yellow bell pepper, cut into 2-inch pieces
  • Fajita Marinade:
  • 1/4 cup olive oil
  • 1/4 cup of fresh-squeezed lime juice (approx. 2 limes)

  • 2 cloves garlic, finely minced

  • 1 tsp sea salt

  • 1/2 tsp freshly ground black pepper

  • 1 tsp homemade Emeril Essence Seasoning (or favorite fajita seasoning)

Instructions

  1. In a small bowl, whisk together the Fajita Marinade ingredients. (The marinade can be made ahead of time and refrigerated for up three days.)
  2. Cut kebob ingredients into cubes/pieces that can be easily thread onto a skewer. Be sure to keep the beef and/or chicken chunks to no more than 2×2-inches in size, so they’ll cook evenly along with the veggies. (Speaking of which, feel free to add additional veggies – organic zucchini, yellow squash and mushrooms are all great options!)
  3. Next, brush the kebobs generously with the marinade. Then, cover marinated kebobs and refrigerate for at least one hour to allow flavors to meld. (Please note, you can make the kebobs in advance and keep them refrigerated for up to three days.)
  4. When ready to eat, preheat grill to medium heat making sure it’s thoroughly preheated before you begin grilling. Cook kebobs over medium heat about 3-5 minutes. Then, carefully turn the kebobs over and continue cooking for another 3-5 minutes, or until they reach the desired level of doneness.

Notes

Since grill temperatures can vary dramatically, be sure to keep a close eye on your kebobs. If the meat or veggies start to get too dark before they’re cooked through, turn down the heat and move the kebobs to a cooler part of the grill to finish cooking. Or turn off the grill and cover the kebobs, until the meat is cooked to desired level of doneness.

3.1
https://thenourishinghome.com/2013/06/beef-chicken-fajitas/

follow-me-on-pinterest-button

You Might Also Like:

Slow Cooker Buffalo Chicken Sliders {Whole30, GF, DF}
A Simply Delicious Thanksgiving Menu
Meatloaf Muffins … Fun for the Whole Family! (DF, GF)

Filed Under: Beef/Pork, Poultry, Whole30 ·

Crispy Zucchini Sticks w/Creamy Avocado Dip (GF)

By Kelly · 2 Comments

 photo Avocado-Creamy-Dip_zpsf668189f.png

I recently had the pleasure of reviewing a new eCookbook published by a few of my wonderful real foodie friends. It’s called *The Veggie Book – a wonderfully thorough resource full of delicious recipes and helpful tips on all things veggie! (*See note below about affiliate links.)

Co-authors Debra {Sweet Kisses & Dirty Dishes} and Sara {Your Thriving Family} asked if I’d be willing to test a few of the recipes and so I intentionally chose a couple that included ingredients I’ve been struggling to get my boys to eat. Yes, I’m a tough cookie! LOL!

The Veggie BookI’m pleased to share that this recipe is one of my boys favorites and is honestly the first recipe I’ve found that gets them excited about eating zucchini. In fact, we even came up with our own tasty variation to the recipe which I’m also sharing below. So as you can probably guess, we’re pretty excited about giving many more of the recipes in this book a try!

*The Veggie Book contains more than 50 recipes that are easy-to-make and utilize common everyday ingredients. The majority of the recipes are cooked veggie recipes prepared using common techniques such as roasting, sautéing, baking and grilling. The main veggies featured in the book include: asparagus, broccoli, cabbage, carrots, green beans, kale, spinach, peas, sweet potatoes, tomatoes and zucchini.

So if you’re interested in finding more ways to get your family {kids} to eat more veggies, then this book is for you!

*Disclosure: If you opt to purchase using any of the affiliate links in this post, a small portion of the sale goes to support The Nourishing Home at no additional cost to you. There is no obligation to purchase, but if you do, you are helping to support the free resources, meal plans and recipes here at The Nourishing Home. Thank you!

Print
Crispy Zucchini Sticks w/Creamy Avocado Dip (GF)

Yield: 4 servings

This wonderful recipe is just one of the many easy-to-make recipes featured in The Veggie Book – a comprehensive guide to getting more veggies on your family's plate!

Ingredients

  • 2 large organic zucchini
  • 1 1⁄2 cups GF breadcrumbs (or blanched almond flour)
  • 1 tbsp dried parsley
  • 1 tsp dried dill weed
  • 1 tsp garlic powder
  • 1 tsp onion powder
  • 1 tsp sea salt
  • 1/4 tsp freshly ground black pepper
  • 1⁄4 cup whole milk yogurt
  • 1 large egg

Instructions

  1. Preheat oven to 375 degrees. Line a baking sheet with parchment paper; set aside.
  2. Remove the ends and cut zucchini lengthwise into 6 strips.
  3. In a medium shallow bowl, mix together the almond flour, parsley, dill, garlic powder, onion powder, sea salt and pepper.
  4. In a separate shallow bowl, whisk together the yogurt and egg.
  5. Dredge each zucchini spear in the wet mixture, shaking off excess. Then dredge in the dry mixture, making sure to well coat.
  6. Place zucchini spears cut side up on parchment-lined baking sheet. Drizzle a small amount of butter over each spear. Bake for 15-18 minutes, until lightly golden brown.
  7. Serve with Homemade Ranch Dressing or Creamy Avocado Dip (recipe in notes below). Be sure to check out my Crispy Parmesan Zucchini Sticks variation below. Enjoy!

Notes

Recipe Variation – Crispy Parmesan Zucchini Sticks: Reduce the 1 1/2 cups of breadcrumbs (or almond flour) to 1 cup, and add 1/2 cup grated parmesan to the dry mixture and omit the dill. Follow the rest of recipe as outlined above. Serve with warm marinara sauce. SO YUMMY!

Creamy Avocado Dip: In a medium bowl, mash together the following ... 2 avocados, 1/4 cup cultured sour cream (or whole milk yogurt), juice of one lime, 1 clove of minced garlic and 1/2 tsp of sea salt. Allow to sit for 30 minutes before serving to allow flavors to meld. Or add the avocado pits to the top, cover and refrigerate up to 8 hours. (This is a thick dip. To make it a little thinner for more delicate dipping items, thin with a few tablespoons of water.)

3.1
https://thenourishinghome.com/2013/06/crispy-zucchini-sticks-wcreamy-avocado-dip-gf/

follow-me-on-pinterest-button

You Might Also Like:

15 Fabulous Ways to Enjoy Dried Strawberries
Wilted Greens (GF)
More Bacon, Peas!

Filed Under: Sides ·

  • « Previous Page
  • 1
  • …
  • 87
  • 88
  • 89
  • 90
  • 91
  • …
  • 182
  • Next Page »

My New Cookbook is Here!

Welcome to The Nourishing Home!

I’m so glad you’re here and want you to feel right at home! My heart in creating this blog is to help you by sharing helpful meal planning strategies and nourishing GF recipes that are healthy, easy and delicious with thanksgiving to God! [Read More …]


All content (recipes, photos, posts, etc.) on this site is the creative property of Kelly Smith. You are welcome to share a photo via social media, as long as it contains a link back to the corresponding recipe or post from this site. However, you may not republish a recipe in its entirety in any form. For questions, or for permission to use a photo or recipe, please contact me via email at [email protected]. Thank you!

Please Note: All content (recipes, photos, text, etc.) on this site is the creative property of Kelly Smith of The Nourishing Home. You are welcome to share a photo via social media, as long as it contains a link back to the corresponding recipe from this site. However, re-publishing a recipe in any form is strictly prohibited. Additionally, please refrain from adapting recipes without properly linking back to the original recipe, and keep in mind that simple substitutions do not constitute an adapted or original recipe. For details regarding recipe copyright law, please visit the Food Blog Alliance.
The Nourishing Home is a participant in the Amazon Services LLC Associates Program, an affiliate advertising program designed to provide a means for sites to earn advertising fees by advertising and linking to amazon.com.

Privacy Policy
DMCA.com

Copyright © 2026 · All Rights Reserved · The Nourishing Home · Artwork by Nancy Panaccione · Site Design by Deluxe Designs · Log in