The Nourishing Home

living healthier lives in service to the King!

  • Home
  • About
    • About TNH
    • Contact
  • Meal Planning
  • Health & Wellness
    • Real Food Basics
  • Whole30
  • GF Recipes
    • Whole30
    • Breakfast
    • Lunch
    • Entrées
    • Slow Cooker
    • Soups & Stews
    • Sides & Salads
    • Snacks
    • Desserts
    • Kids in the Kitchen
  • My Cookbook
  • Subscribe

Grilled Pineapple Chicken Kebobs

By Kelly · 12 Comments

Grilled Pineapple Chicken Kebobs

Happy First Day of Summer! – the perfect time to fire-up your grill and enjoy some fun in the sun over a delicious, healthy meal.

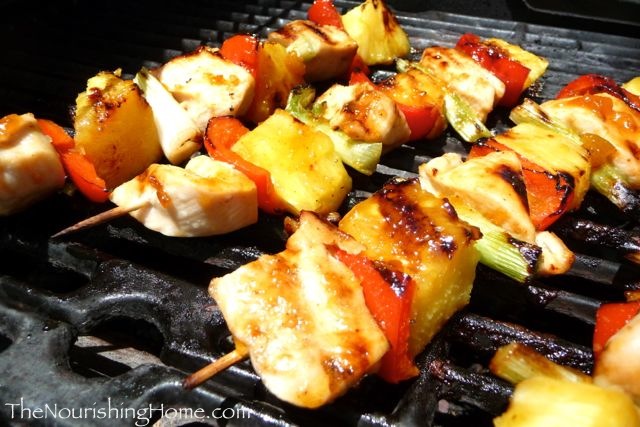
These easy-to-make chicken kebobs are a delicious way to celebrate the tropical flavors of summer and spend less time in the kitchen too! That’s because you can pre-make the kebobs and refrigerate them up to three days in advance, so they’re ready to go on the grill whenever you’re ready for the party to begin.

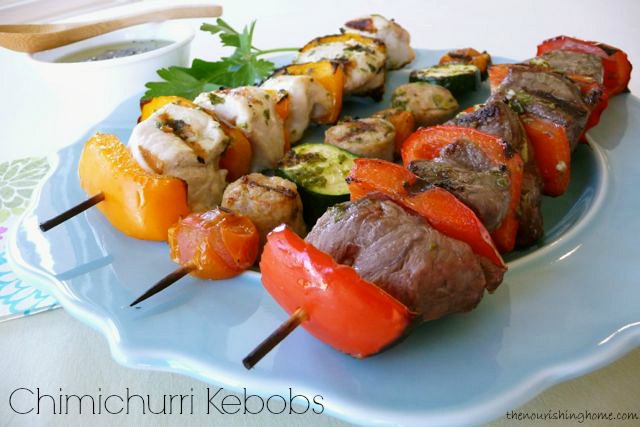
And whether you’re a novice, or veteran griller, be sure to check out my Top 10 Best Grilling Tips for some secrets of success that are certain to take your grilled foods to a whole new level of excellence!

chicken kebobs mise en place

Remember your “mise en place” – preparing the barbecue glaze and precutting all the ingredients in advance, makes putting these kebobs together a snap! If using bamboo skewers, be sure to soak them in warm water while you’re preparing the rest of the ingredients. That way, everything is ready for you to begin the kebob-making process.

If you have children, get them involved (with careful supervision, of course) – kids love to thread ingredients onto skewers. And it’s a great tactic for getting those picky eaters to try something new, since kids are more likely to try a food that they’ve helped to make! This is just one of many reasons why getting your Kids in the Kitchen is such a blessing!

Chicken kebobs on grill

When you’re ready to eat, simply fire-up the grill and get ready for an amazingly sweet-n-spicy way to celebrate summer with your family and friends!

Print
Grilled Pineapple Chicken Kebobs (GF)

Yield: serves 4

Ingredients

    For the Sweet & Spicy Glaze:
  • 1/2 cup organic all-fruit apricot preserves
  • 1 small clove garlic, finely minced
  • 1 tbsp olive oil
  • 2 tsp coconut aminos (or organic soy sauce)
  • 2 tsp dry mustard
  • 1/8 tsp cayenne pepper (use more if you like it extra spicy!)
  • 1/2 tsp sea salt
  • For the Kebobs:
  • 1.25 pounds of boneless, skinless chicken breasts, cut into cubes
  • 1 fresh pineapple, cubed
  • 1 large red pepper, cut into 2-inch pieces
  • 1 bunch of scallions, cut into 2-inch pieces

Instructions

  1. In a small bowl, whisk together the Sweet & Spicy Glaze ingredients – apricot preserves, garlic, olive oil, coconut aminos (or soy sauce), dry mustard, cayenne pepper and salt. (The sauce can be made ahead of time and refrigerated for up to a week, or kept in freezer for up to a month – defrost in frig overnight when ready to use.)
  2. Cut kebob ingredients into cubes/pieces that can be easily thread onto a skewer. Be sure to keep the chicken chunks to about 2x2-inches in size, so they’ll cook evenly along with the veggies. Speaking of which, feel free to add additional veggies as well – organic zucchini, yellow squash, mushrooms, red onion are all great options! (Also note, you can make the kebobs in advance and keep them refrigerated for up to 3 days.)
  3. When ready to eat, preheat grill to medium heat making sure grill is thoroughly preheated before you begin grilling. Cook kebobs uncovered over medium heat about 2-3 minutes. Then carefully turn the kebobs over and generously brush the upturned side with the Sweet & Spicy Glaze.
  4. Continue cooking the kebobs for about another 2 minutes. Then turn them over again, generously brushing the upturned side with glaze. Cook about one minute more, and turn the kebobs a final time and brush with the remaining glaze. Turn off the grill and cover for about a minute to allow the glaze to set and chicken to finish cooking through. Serve with a side of baja-style cilantro rice and grilled plantains.
  5. Please note: Since grill temperatures can vary dramatically, be sure to keep a close eye on your kebobs. If the chicken or veggies start to get too dark before they’re cooked through, turn down the heat to low and move the kebobs to a cooler part of the grill to finish cooking. Or turn off the grill and cover the kebobs, until chicken is cooked through.
3.1
https://thenourishinghome.com/2013/06/grilled-pineapple-chicken-kebobs/

follow-me-on-pinterest-button

You Might Also Like:

Soy-Free Teriyaki Chicken {Slow Cooker Recipe}
Lentils & Carrots with Swiss Chard (GF)
3 Meals with 1 Main Dish: Tasty Ground Turkey Recipes

Filed Under: Poultry ·

Fresh Summer Grilling with Chimichurri …

By Kelly · 5 Comments

Chimichurri Sauce & Kebobs

Chimichurri, where have you been all my life? Seriously, I can’t believe we only recently discovered this tangy, flavorful taste sensation.

Apparently, grilled meats in Argentina are never served without a side of chimichurri. And having tasted it, I can see why!

This brightly colored sauce (that also doubles as a marinade) traditionally features fresh parsley, oregano, garlic, oil and vinegar with a hint of chili pepper – although the variations are endless.

In fact, there really is no one right way to make it. Some prefer more garlic for extra bite, while others prefer no garlic and instead focus solely on fresh herbs. My version pairs fresh cilantro with flat-leaf parsley to create subtle citrusy undertones.

Chimichurri Sauce Recipe

Our favorite way is to enjoy this tangy, peppery sauce is to use it as both a marinade and a condiment on meat-n-veggie kebobs. As a marinade, it brings an amazing depth of flavor to beef, poultry, fish and sausage. As a sauce, we like to lightly drizzle it over finished grilled foods for a fresh zip of bold flavor.

I encourage you to experiment in creating your own signature chimichurri – it’s truly a culinary endeavor worth pursuing!

Print
Chimichurri Sauce & Kebobs (GF)

Yield: 4-5 servings

Ingredients

    Chimichurri Sauce:
  • 1 cup loosely packed organic flat-leaf parsley leaves and tender stems
  • 2 tbsp packed organic cilantro leaves and tender stems
  • 3-4 cloves garlic, crushed
  • 1 tsp sea salt
  • 1/8 to 1/4 tsp red pepper flakes
  • 2 tbsp red wine vinegar
  • 1/3 cup extra virgin olive oil
  • Kebob Ingredients:
  • 1.25 pounds of meat or poultry of your choice, such as
  • • grassfed beef sirloin steak, OR
  • • organic boneless, skinless chicken breasts, OR
  • • nitrate-free Italian sausage (or use a combo of meats)
  • 1 large organic zucchini, thick-sliced
  • 1 large red bell pepper, cut into 2-inch pieces
  • 1 large yellow bell pepper, cut into 2-inch pieces
  • 10-12 organic cherry or grape tomatoes

Instructions

  1. In a food processor, pulse together the fresh parsley, cilantro, crushed garlic, salt, red pepper flakes and vinegar. Then, pulse in the olive oil, making sure to not over process or sauce will emulsify. (Note: The marinade can be made ahead of time and refrigerated for up to three days.)
  2. Cut kebob ingredients into cubes/pieces that can be easily thread onto a skewer. Be sure to keep the beef, chicken and/or sausage chunks to no more than 2x2-inches in size, so they’ll cook evenly along with the veggies. (Speaking of which, feel free to add additional veggies – red onion and mushrooms make delicious additions!)
  3. Next, set aside about 2-3 tablespoons of the chimichurri for use as a condiment to accompany your grilled kebobs, if desired.
  4. Then, brush the remaining chimichurri sauce onto the kebobs. Cover the marinated kebobs and refrigerate for at least one hour to allow flavors to meld. (Please note, you can make the kebobs in advance and keep them refrigerated for up to three days.)
  5. When ready to eat, preheat grill to medium heat making sure it’s thoroughly preheated before you begin grilling. Cook chimichurri kebobs over medium heat about 3-5 minutes. Then carefully turn the kebobs over and continue cooking for another 3-5 minutes, or until they reach the desired level of doneness.
  6. Remove from grill and cover with foil. Allow meat to set for a few minutes before serving. Then, lightly drizzle a little of the chimichurri over the top of the kebobs, if desired. These kebobs pair beautifully with a side of baja-style rice.
  7. Please note: Since grill temperatures can vary dramatically, be sure to keep a close eye on your kebobs. If the meat or veggies start to get too dark before they’re cooked through, turn down the heat and move the kebobs to a cooler part of the grill to finish cooking. Or turn off the grill and cover the kebobs, until the meat is cooked to desired level of doneness.

Notes

Whether you’re a novice, or veteran griller, be sure to check out my Top 10 Best Grilling Tips for some secrets of success that are certain to take your grilled foods to a whole new level of excellence!

3.1
https://thenourishinghome.com/2013/06/chimichurri-sauce/

follow-me-on-pinterest-button

You Might Also Like:

Lemon-Garlic Roasted Chicken (GF)
Homemade "Emeril's Essence" Seasoning Blend
Veggie Quiche with Hash Brown Crust

Filed Under: Beef/Pork, Condiments, Poultry, Whole30 ·

Tips for Making Healthy Homemade Frozen Pops {Plus, Free Healthy Pops eBook!}

By Kelly · 1 Comment

Discover my top 10 tips for making healthy homemade frozen pops and also get a free copy of my popular eBook, Healthy Ice Pops & Frozen Treats!

Growing up, there were few things more exciting during summer than hearing that little ditty playing that meant only one thing … the Ice Cream Man is coming! Sadly, we now know that these tempting treats are chock-full of unhealthy preservatives and harmful additives.

Discover my top 10 tips for making healthy homemade frozen pops and also get a free copy of my popular eBook, Healthy Ice Pops & Frozen Treats!
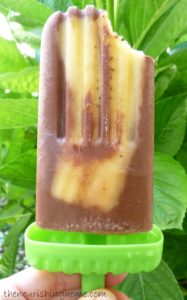
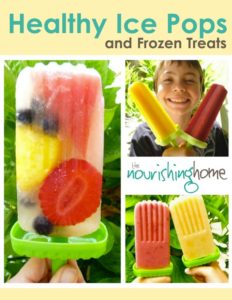
So what’s a real food lovin’ momma to do? Why not say goodbye to the ice cream man and hello to the “Ice Cream MOM!” with a FREE copy of my Healthy Ice Pops & Frozen Treats eBook. The fact is, there is no need to rely on the ice cream man (or store-bought goodies either) to bring a smile to your kiddos faces. Making homemade frozen ice pops and treats is so easy, delicious and economical! And it’s a super FUN way to get your kids in the kitchen this summer too! That’s why I’m not only sharing my “top 10 tips for making healthy frozen pops” below, but I’m also giving away a free copy of my popular eBook, Healthy Ice Pops & Frozen Treats when you Subscribe to The Nourishing Home.

10 Tips for Making Healthy Homemade Frozen Pops

Discover my top 10 tips for making healthy homemade frozen pops and also get a free copy of my popular eBook, Healthy Ice Pops & Frozen Treats!

Chocolate-Covered Banana Pops are just one of more than a dozen healthy ice pop recipes in my free eBook for subscribers.

1. As mentioned, there are all kinds of delicious ingredients that can be used to make healthy homemade frozen pops. Some of the best options for creating successful ice pops include: 100% fruit juices, smoothies, yogurt, pudding, ice cream and sherbet. You can also use other healthy options  such as coconut water, kefir, kombucha and herbal or green teas.

2. Additionally, frozen pops are a great opportunity to add an extra boost of nutrition – especially for those picky eaters. Adding ingredients like yogurt, kombucha, or dairy/water kefir can add a healthy dose of probiotics. Similarly, you can sneak in a bit of pureed veggies into most pop recipes without significantly altering the flavor or texture of the ice pop.

3. Since all ingredients expand during the freezing process, be sure to leave at least 1/4-inch space at the top of your pop molds when filling them. Also keep in mind that ingredients with more air content (such as smoothies) expand more than solid ingredients (like yogurt).

4. Speaking of pop molds – there is no need to purchase fancy ice pop moldsDiscover my top 10 tips for making healthy homemade frozen pops and also get a free copy of my popular eBook, Healthy Ice Pops & Frozen Treats! (unless you want to and your budget permits). You can make ice pops out of everyday household items, such as dixie cups, ice cube trays, candy molds, etc.

5. And the best method for ensuring your popsicle stick remains securely centered in your ice pop (if you’re not using pop molds), is to simply cover the top of dixie cup (or whatever you’re using as your mold) with a small piece of foil after pouring in your ingredients. Then, cut a small slit in the center of the foil and carefully insert a popsicle stick into the center of the mold.

6. Delicious additions – Adding whole or diced fruits suspended in your ice pops makes for interesting textures and flavors, such as in my Fruit & Cream Bars. You can also add other ingredients such as carob/chocolate chips, or even nuts and cookie bits. Similarly, layering ingredients, such as in my Banana Split Pops recipe, is a great way to combine flavors and create pretty striped pops.

7. And speaking of layering ingredients, it’s important to be sure each layer freezes solid before adding the next layer. Also, like ingredients stick together better. For example, layering several types of fruit juice bases together works better than trying to layer juices with ice cream.

8. It’s also important to keep in mind that different ingredients freeze at different rates. For example, fruit juice pops freeze faster than yogurt based pops. And of course, freezing time also depends on the size of the ice pop. For best results, pops should be frozen overnight, or at least for a minimum of 6-8 hours. And as far as storage goes, pops left in molds generally stay fresh for about 1-2 weeks.

9. To unmold an ice pop without the pop sticking to the mold, it’s best to either let the pop sit out at room temp for a few minutes, or run the mold under water for a minute. Then remove the mold and enjoy!

10. Get creative! There are lots of ideas and inspiration to be found via pinterest and google searches for healthy ice pops. And, just a friendly reminder that you can always download a FREE copy of my Healthy Ice Pops & Frozen Treats eBook, simply by becoming a subscriber to The Nourishing Home.

Wishing you and your family a healthy, happy summer!

Joyfully Serving HIM, Kelly

follow-me-on-pinterest-button

You Might Also Like:

Banana Split Pop (GF, DF Option)
Frozen Banana Bites – Summer Fun with the Kids!
Happy-Happy Grain Free Ice Cream Cake (GF, DF option)

Filed Under: Frozen Treats ·

  • « Previous Page
  • 1
  • …
  • 86
  • 87
  • 88
  • 89
  • 90
  • …
  • 182
  • Next Page »

My New Cookbook is Here!

Welcome to The Nourishing Home!

I’m so glad you’re here and want you to feel right at home! My heart in creating this blog is to help you by sharing helpful meal planning strategies and nourishing GF recipes that are healthy, easy and delicious with thanksgiving to God! [Read More …]


All content (recipes, photos, posts, etc.) on this site is the creative property of Kelly Smith. You are welcome to share a photo via social media, as long as it contains a link back to the corresponding recipe or post from this site. However, you may not republish a recipe in its entirety in any form. For questions, or for permission to use a photo or recipe, please contact me via email at [email protected]. Thank you!

Please Note: All content (recipes, photos, text, etc.) on this site is the creative property of Kelly Smith of The Nourishing Home. You are welcome to share a photo via social media, as long as it contains a link back to the corresponding recipe from this site. However, re-publishing a recipe in any form is strictly prohibited. Additionally, please refrain from adapting recipes without properly linking back to the original recipe, and keep in mind that simple substitutions do not constitute an adapted or original recipe. For details regarding recipe copyright law, please visit the Food Blog Alliance.
The Nourishing Home is a participant in the Amazon Services LLC Associates Program, an affiliate advertising program designed to provide a means for sites to earn advertising fees by advertising and linking to amazon.com.

Privacy Policy
DMCA.com

Copyright © 2026 · All Rights Reserved · The Nourishing Home · Artwork by Nancy Panaccione · Site Design by Deluxe Designs · Log in