The Nourishing Home

living healthier lives in service to the King!

  • Home
  • About
    • About TNH
    • Contact
  • Meal Planning
  • Health & Wellness
    • Real Food Basics
  • Whole30
  • GF Recipes
    • Whole30
    • Breakfast
    • Lunch
    • Entrées
    • Slow Cooker
    • Soups & Stews
    • Sides & Salads
    • Snacks
    • Desserts
    • Kids in the Kitchen
  • My Cookbook
  • Subscribe

How to Section Citrus Fruit {Easy Citrus Salad}

By Kelly · 5 Comments

Citrus Salad

This easy citrus salad makes a delightful summer side dish. With the sweet and tangy combination of fresh grapefruit and oranges, it’s an especially refreshing accompaniment to the bold flavors of barbecue.

How to Section Citrus Fruit

Citrus Segment close up

If you’re new to sectioning citrus, it’s really a very simple process. I’m happy to show you how. Just be sure to use a sharp chef’s knife. A good quality knife makes all the difference in making tasks like chopping, dicing and mincing – or in this case sectioning citrus – a breeze!

Cut ends of citrusStep One: Trim Ends of Citrus Fruit
Using a sharp chef’s knife, carefully trim the ends off of the citrus fruit.

(Not shown in the photo: If you use citrus zest in various recipes, a great money- and time-saving tip is to zest the fruit before you trim and section it. Place the zest into an airtight freezer-safe container and store in the freezer for future use.)

Cut rind off citrusStep Two: Trim Peel from Citrus Fruit
Place the citrus fruit on its now flat bottom.

Then, carefully trim the peel from the fruit by following the natural curve of the fruit.

Be sure to start at the top and slightly angle your knife so you’re trimming only the peel, sparing as much of the fruit as possible.

Cut out each section of citrus
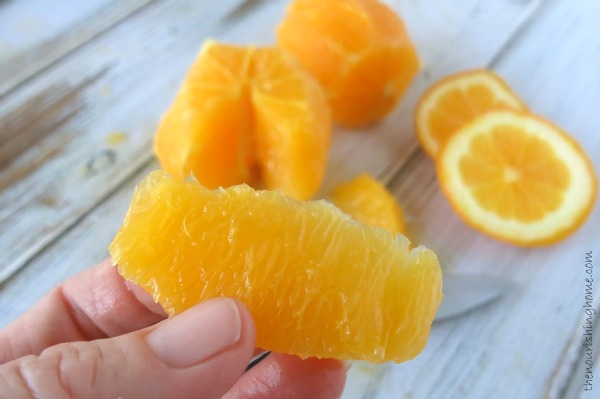
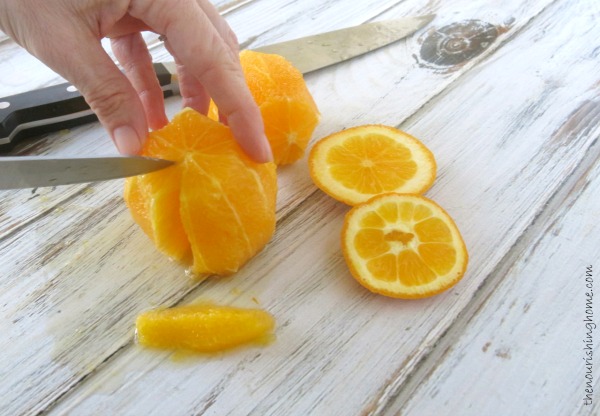
Step Three: Section the Fruit
Once the peel is removed, you can switch to a sharp pairing knife, if preferred. Then carefully cut each section of the citrus fruit out so that no membrane remains. Citrus segments are not only wonderful for making gorgeous fruit salads, but can also be used to create delicious yogurt parfaits and many other healthy treats.

(P.S. Rather than tossing out the remaining citrus membranes, save them for juicing or in smoothies.)

BBQ w:Citrus Salad

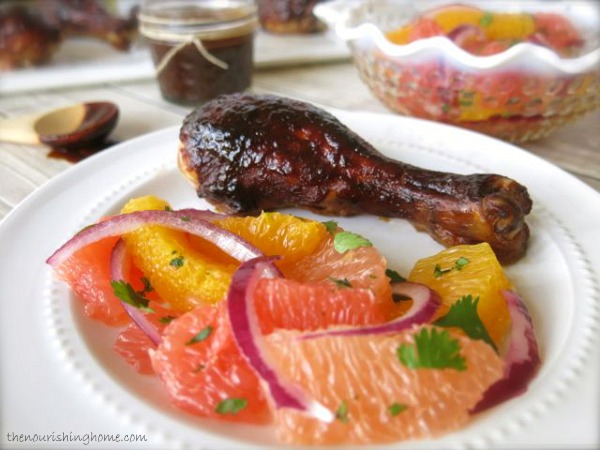
P.S. Got leftovers? Simply toss any leftover citrus salad with your favorite fresh mesculn greens for a beautiful summer salad. Looking for the perfect BBQ sauce? Check out my tips for foolproof BBQ chicken.

Print
Easy Citrus Salad (GF)

Yield: 4 servings

Ingredients

  • 1 large ruby red grapefruit
  • 1 large tangerine
  • 1 large navel orange
  • 1 cup sliced red onion
  • 1 tbsp chopped fresh cilantro
  • 1 tbsp olive oil
  • 1/2 tsp lime zest
  • 1 tbsp fresh squeezed lime juice
  • 1 tsp honey
  • Pinch of sea salt

Instructions

  1. Peel and section the grapefruit, tangerine and orange. (If you’re new to sectioning citrus fruit, see photo tutorial above.)
  2. Place citrus segments, red onion and cilantro into a large bowl.
  3. In a small a small bowl, whisk together the olive oil, lime zest, lime juice, honey and salt.
  4. Pour the lime oil mixture over the citrus mixture and gently toss to combine.
  5. Serve with Foolproof BBQ Chicken, or place on top of a bed of mesclun greens for a delicious summer salad!
3.1
https://thenourishinghome.com/2014/06/how-to-section-citrus-fruit/


You Might Also Like:

Healthy Ambrosia Salad with Toasted Coconut
Apple-Carrot (& cabbage) Coleslaw
Grilled Fajita Salad {Whole30, DF, GF}

Filed Under: Salads ·

How to Make Perfect Scrambled Eggs {And Veggie Egg Scrambles}

By Kelly · 13 Comments

Veggie Egg Scramble How to Make Perfect Scrambled Eggs

Exciting News: This is just one of a bunch of Whole30 Recipes here at The Nourishing Home. PLUS I’ll be sharing even more Whole30-compliant recipes as we start our next Whole30 Challenge on January 18, 2015. So be sure to join us to Jumpstart Your Health with Whole30!

My husband is the first to admit that he’d be eating out every night if it came down to him having to cook dinner. But this awesome man (no matter what he thinks of his cooking skills) can do one thing that few have mastered and that’s scramble up the lightest, fluffiest eggs I’ve ever tasted.

Achieving perfect scrambled eggs is often hit or miss for most of us, and if you do a quick search on google, you’ll find tons of advice as a result. But I figured rather than ask the “experts,” I’d go straight to the man who actually makes what I consider to be the finest scrambled eggs in the world.

So, what’s my hubby’s secret? There’s actually five keys to perfect scrambled eggs …
• A splash of milk,
• A touch of salt,
• Gentle whisking,
• Just the right heat, and
• Stir, stir and fold!

But before I explain the above tips, let me start with a quick note about how to make an amazing veggie egg scramble, since this is one of our favorite ways to enjoy scrambled eggs. It’s also a frugal and delicious way to use up those leftover veggies in your fridge.

Veggies

Before I realized my hubby had supernatural egg scrambling skills, I used to be chief egg scrambler in our home. I quickly learned at least one lesson about successful egg scrambling and that is … it’s best to scramble the eggs solo. If you sauté veggies and pour whisked eggs over them in an attempt to scramble the two together, it usually goes one of two ways:
• Eggs that are too moist and runny, or
• Eggs that are dry and/or rubbery
(It also often results in veggies that are overcooked and mushy.)

A better option with more consistent results is to first sauté the veggies, place them on a plate and wipe out the skillet. Add butter or oil to the clean skillet and scramble the eggs as directed below. Once the eggs are nearly done, add the sautéed veggies on top and gently fold them in. Adding the veggies at the end of the egg scrambling process definitely results in lighter, fluffier eggs with the delicious taste of sautéed veggies in every bite!

Okay, so now that we have that covered, back to perfect egg scrambling …

How to Make Perfect Scrambled Eggs

Perfect Scrambled Eggs

Step One: The Recipe
The first step in achieving perfect scrambled eggs is the egg-to-milk ratio. According to my hubby, a splash of milk for every two eggs is ideal. What’s a splash? About a scant tablespoon. So for every two eggs, you’ll want to add just shy of a tablespoon of milk (dairy or non-dairy is fine). You’ll also want to add a dash of salt. Salt not only enhances flavor, but helps to make the eggs more tender. So for every two eggs, be sure to add a pinch of salt.

Place the eggs, milk and salt into a bowl and whisk gently with a fork, just enough to combine well. If you whisk vigorously and over-beat the eggs, it will actually make them tougher, not lighter.

Step Two: The Cooking Method
Another key to perfect scrambled eggs is a dual-heat method that helps to ensure fluffy curds without overcooking. This is achieved by starting at medium-high heat and changing to low heat partway through the cooking process. Here’s how …

Heat a 10-inch skilled over medium-high heat, add a teaspoon or two of cold butter to the pan. Once the butter begins to get bubbly, add the whisked egg mixture. As shown in the photo above, use a spatula to scrape the bottom and sides of the skillet to form large curds. As soon as your spatula leaves a trail in the pan with minimal raw egg filling in the gap, reduce the heat to low and begin gently folding the eggs over to finish the cooking process without breaking up the curds. When the eggs are cooked through, but still moist and glossy in appearance, immediately transfer them to a serving plate.

Veggie Egg Scramble Close Up

So there you have it – my husband’s tips for scrambling up the perfect eggs with the added bonus of how to incorporate some delicious sautéed veggies for an extra boost of nutrition.

And incase you’re wondering if my hubby will be contributing more recipes here at The Nourishing Home, in his words, “I’d much rather do dishes than have to cook a meal.”

Now that’s one offer I’m always happy to take him up on! And of course, his offer to continue scrambling up our morning eggs.

You Might Also Like:

Potato Casserole Lasagna {Whole30, GF, DF}
Ready to Jumpstart Your Health? Join me for Whole30!
Jumpstart Your Health with Whole30

Filed Under: Breakfast, Egg Dishes, Whole30 ·

Real Food Guide to Gluten-free Food at Costco

By Kelly · 35 Comments

GF Collage Cover

Note from Kelly: I always get excited about the budget-saving tips that Tiffany shares with us each month, but this one is a real gem – not only because it helps to save money, but also time! By having this handy list to compare prices, we can quickly see what gluten-free items may be available at our local Costco and make a quick trip over to check them out. So thank you, Tiffany, as always for yet another incredibly helpful post!

No doubt about it, saving money on real food is hard. We have an aggressive grocery budget of $330 to feed four people for four weeks. It’s a budget that has been attainable for several years now, but despite my best efforts, I still went over budget last month.

So when others say they struggle with affording whole foods, I completely understand! We started our own real food journey a couple years ago and back then, I could have really used a tour guide of sorts. A guide to tell me what to buy, where to get it and how much it was going to cost. Having a list like that would have GREATLY reduced my stress level, freed up more time and overall, made the switch to real food just a whole lot easier.

While I can’t go back in time and re-do the baby steps we’ve already taken, I can take what I’ve learned and create a tour guide for those who need the help NOW. That’s exactly what this post is: It’s a real food guide to healthy food at Costco – the gluten-free edition.

After walking the isles over and over again at my local Costco, I’ve compiled a pretty good list of gluten-free foods that are affordable. The list is broken down into different categories, depending on how you shop for gluten-free foods:

  • “100% Gluten-free foods” are certified, stamped and labeled as gluten-free. According to the manufacturer, these are processed and packaged in gluten-free facilities, so there should not be any risk for cross-contamination.
  • “Gluten-free foods” are those that naturally do not contain gluten, but are not certified or marked as gluten-free. These items might be processed or packaged in facilities that handle wheat, so there is a chance for cross-contamination. If you are Celiac or highly allergic to gluten, use your own discretion when making a purchase.

There’s also a bonus category: Honorable mentions. However, just because an item is labeled gluten-free, doesn’t make it healthy. High fructose corn syrup, hydrogenated oils and MSG are all gluten-free, but they’re all food additives, far from real food and flat out not healthy for you! Keep in mind that this list is not all encompassing. While I have done my best to include as many items as I possibly could in this gluten-free food at Costco guide, there will always be variation depending on where you live. For those who don’t have sensitivities to gluten, you might want to check out my original frugal real food at Costco list for even more real food items that are affordable at Costco.

Without further ado – here we go!

Flours

100% Gluten-Free (certified)

Honeyville Blanched Almond Flour, $17.99 for 3 pounds For gluten-free/grain-free bakers, almond flour is a staple item in the pantry. At just $6/lb, Honeyville’s blanched almond flour at Costco is a STEAL! I checked at least three other brands and they all come up costing over $2 per pound MORE than Honeyville. If you’re a fan of Kelly’s GF recipes here on this site, you’ll notice that she exclusively uses Honeyville blanched almond flour and has even conducted a Kitchen Showdown showing how Honeyville compares to another popular brand.

Nutiva Coconut Flour, $6.99 for 4 pounds Yes, you read that right! Costco has coconut flour for just $1.75/lb! This is another amazing deal for all real foodies alike, especially since some brands cost as much as $6/lb.

Essential Baking Multigrain Bread, $7.99 for (2) 17oz loaves Homemade gluten-free bread can be difficult to master if you’re new to gluten-free baking, so this is a nice addition when you’re just craving a sandwich. While this price seems a bit high for bread, it’s actually very affordable for gluten-free bread, costing about 50% less than the average single loaf on most store shelves! Quinoa Corn Rice TruRoots Quinoa, $18.00 for 4 pounds Quinoa is actually a seed, not a grain, and this nutritionally dense food is an excellent option for many gluten-free diets. Costco has it for just $4.75/lb, and considering you’ll get approximately eight servings from one pound, this makes for a very frugal accompaniment to dinner.

MiRancho Corn Tortillas, $2.99 for 24 count Corn tortillas are a must-have in our house for taco night. If you can’t make your own from GMO-free corn masa (or are feeding too many to warrant making them from scratch), this is an excellent alternative at just 12¢ per tortilla.

Lundberg Short Grain Brown Rice, $12.99 for 12 pounds Rice is a staple in many gluten-free homes, and at just over $1/lb for brown rice, this is a great way to buy in bulk and save. Would you believe that some other brands of gluten-free rice cost over $5/lb? GF Honorable Mention 2 Honorable Mentions

  • Luke’s MultiGrain & Seed Cracker, $7.89 for 20oz (100% certified)
  • Luke’s Organic Brown Rice Chips, $6.99 for 20oz (100% certified)
  • Late July Organic Tortilla Chips, $5.99 for 24oz (100% certified)
  • Mary’s Gone Crackers, $8.39 for 20oz (100% certified)
  • Pure Ancient Grains Bar, $15.99 for 15 count (100% certified)
  • KIND Variety Pack, $17.99 for 18 count (100% certified)

The “honorable mentions” are gluten-free, however, that doesn’t mean that they’re 100% real food. There may be unhealthy additives or preservatives, so it’s always best to check labels. Plus, they’re incredibly expensive!! You’re basically paying a lot more money for convenience and may end up with far less nutrition in return. Still, I understand the need to satisfy a craving for a simple cracker or nut bar. So you may wish to purchase these if they fit your dietary lifestyle and there’s room in your grocery budget. Otherwise, opt to make these foods from scratch instead using the delicious recipes on Kelly’s snack recipe page (there’s 10 to choose from). Nuts Collage

Gluten-Free Foods

UPDATE: It has come to our attention that some Kirkland nuts at many Costco locations may have an allergy statement indicating that certain nut varieties may contain wheat or have been processed in a plant or on equipment that handles wheat. Therefore, it is extremely important to read labels to ensure any product you purchase is 100% gluten-free, particularly for those with Celiac disease.

Kirkland Cashews, $14.99 for 2.5 pounds At just $6 per pound, these are some of the most affordable cashews you’ll find.  Plus, you can get salted or unsalted at the same great price.

Kirkland Peanuts, $6.99 for 2.5 pounds Peanuts are technically a legume, not a tree nut, so peanuts might offer a viable nut alternative to those who are allergic to tree nuts. They’re also just $2.80/lb at Costco – perfect for snacking, baking or even making homemade peanut butter.

Kirkland Almonds, $13.99 for 2.5 pounds Whole almonds can be ground into almond meal or almond butter if you have the right equipment, making these whole nuts an excellent money saving opportunity. It’s important to note that California is the only state producing commercial almonds (the ones you would buy in a store). Because California requires that all almonds be pasteurized, there’s a chance that the premium charged on “raw” almonds is purely for profit. If you’re able to get raw almonds locally for $5.60 or less per pound, take advantage! Otherwise, look into the true source of your almonds to be sure you’re not overpaying for almonds that aren’t really raw. Seeds Nutiva Hemp Seed, $12.99 for 24 ounces Hemp seeds are incredibly high in protein, and another excellent alternative for those with nut allergies – especially since they have a nutty flavor! We use them to make protein smoothies, and at just 54¢ per serving, they’re incredibly frugal. P.S. Nuts and seeds can be used to make dairy-free milk alternatives. Get the recipes, tutorials and see how much you can save by making it yourself HERE.

Nutiva Chia Seeds, $13.99 for 32 ounces Chia seeds are a powerhouse of nutrition and protein, and are often used in recipes as the binder. Plus, a little bit goes a long way! They’re just 44¢ per ounce at Costco, which is about a 50% savings off most local stores and even other online retailers! GF Honorable Mentions Honorable Mention

  • Qia Superfood Cereal, $14.59 for 22 ounces
  • Pink Wild Alaskan Salmon, $12.89 for (6) 6 ounces
  • Wonderful Pistachios, $17.89 for 24 ounces

While technically gluten-free, the Qia Superfood Cereal could easily be made at home for much less by buying the ingredients in bulk and measuring them out into a container. In this case, you’re again paying for convenience and not the food itself.

The Alaskan salmon is an excellent deal at just $5.72 per pound, but do be aware of the BPA that might be in the can. They’re not labeled, so you should double check with the manufacturer before consuming on a regular basis.

Finally, the price of pistachios is actually higher than other online retailers. It’s given “honorable mention” because sometimes it’s easier to buy everything from one store, at one time, rather than making several trips or placing orders through several companies. Just know that these nuts are priced on average $2-3 more per pound than other shops.

Screen Shot 2014-05-28 at 12.51.32 PMBONUS! Free Shopping List
Get both the real food and gluten-free editions of the Costco price list together in a one-page format that you can download and print.  Simply visit this page (or click on the image at left), scroll down to the entry form and enter your email address for instant access. This helpful free list makes shopping much quicker and easier!

P.S. If you’re still working on creating a grocery budget (learn how to budget HERE), know that buying in bulk will save you money over time, but it requires an upfront cost that can sometimes be difficult to afford. A great strategy is to aim for just one item each budget cycle and go from there. Soon you’ll create a meal plan from a stocked pantry and be able to save extra funds to splurge on better meat or organic produce! 

What gluten-free foods do you buy from Costco? Leave your finds in the comments!

Note from Kelly: Don’t miss all of the other great budgeting posts that Tiffany has shared here. Simply click here and keep scrolling through to see her many helpful posts on how to save money on your food budget.

You Might Also Like:

How Much Food is Enough?
How Much is Your Time Worth?
8 Tips for Real Food on a Budget {and how to set healthy living goals}

Filed Under: Real Food on a Budget ·

  • « Previous Page
  • 1
  • …
  • 47
  • 48
  • 49
  • 50
  • 51
  • …
  • 182
  • Next Page »

My New Cookbook is Here!

Welcome to The Nourishing Home!

I’m so glad you’re here and want you to feel right at home! My heart in creating this blog is to help you by sharing helpful meal planning strategies and nourishing GF recipes that are healthy, easy and delicious with thanksgiving to God! [Read More …]


All content (recipes, photos, posts, etc.) on this site is the creative property of Kelly Smith. You are welcome to share a photo via social media, as long as it contains a link back to the corresponding recipe or post from this site. However, you may not republish a recipe in its entirety in any form. For questions, or for permission to use a photo or recipe, please contact me via email at [email protected]. Thank you!

Please Note: All content (recipes, photos, text, etc.) on this site is the creative property of Kelly Smith of The Nourishing Home. You are welcome to share a photo via social media, as long as it contains a link back to the corresponding recipe from this site. However, re-publishing a recipe in any form is strictly prohibited. Additionally, please refrain from adapting recipes without properly linking back to the original recipe, and keep in mind that simple substitutions do not constitute an adapted or original recipe. For details regarding recipe copyright law, please visit the Food Blog Alliance.
The Nourishing Home is a participant in the Amazon Services LLC Associates Program, an affiliate advertising program designed to provide a means for sites to earn advertising fees by advertising and linking to amazon.com.

Privacy Policy
DMCA.com

Copyright © 2026 · All Rights Reserved · The Nourishing Home · Artwork by Nancy Panaccione · Site Design by Deluxe Designs · Log in