The Nourishing Home

living healthier lives in service to the King!

  • Home
  • About
    • About TNH
    • Contact
  • Meal Planning
  • Health & Wellness
    • Real Food Basics
  • Whole30
  • GF Recipes
    • Whole30
    • Breakfast
    • Lunch
    • Entrées
    • Slow Cooker
    • Soups & Stews
    • Sides & Salads
    • Snacks
    • Desserts
    • Kids in the Kitchen
  • My Cookbook
  • Subscribe

Morning Glory Muffins (GF, DF)

By Kelly · 4 Comments

Morning Glory Muffins (grain-free dairy-free)

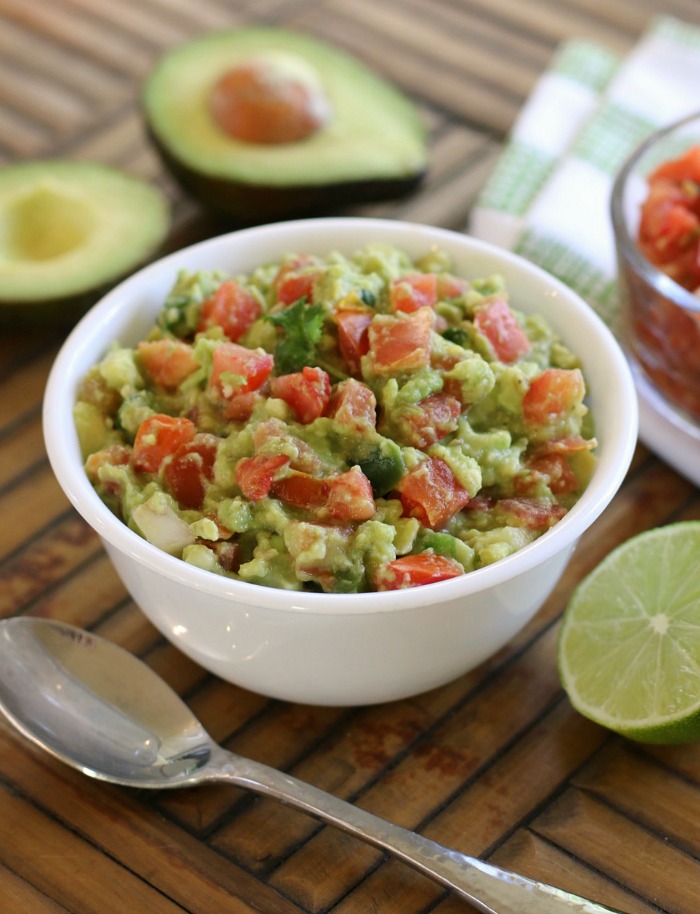
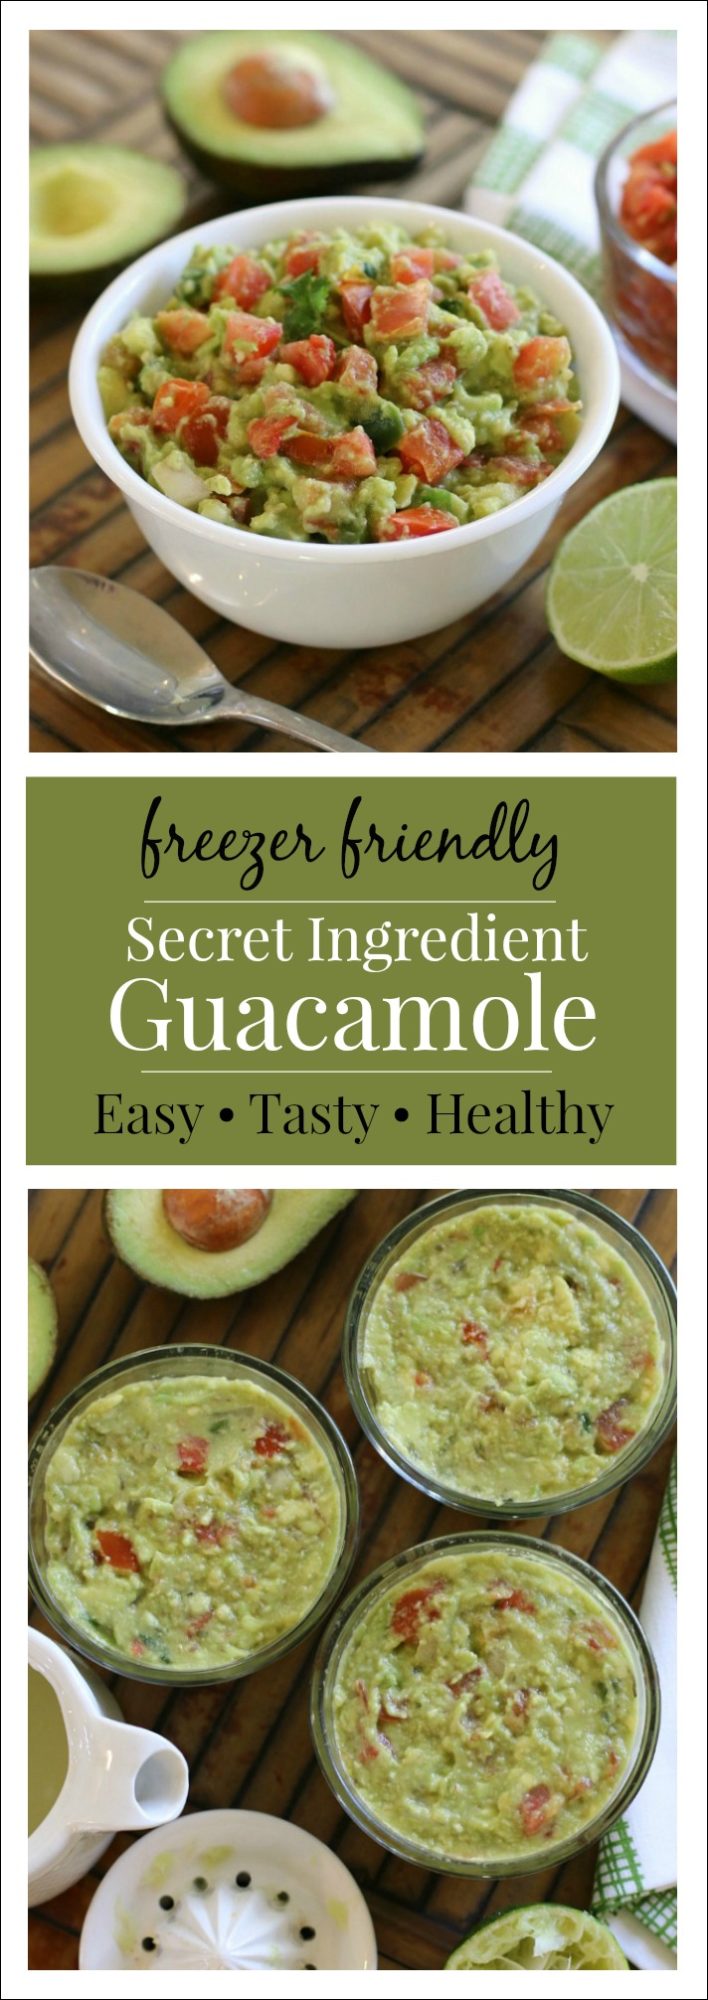
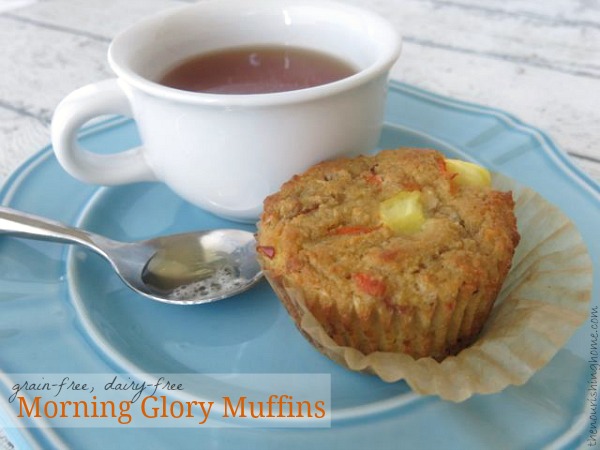
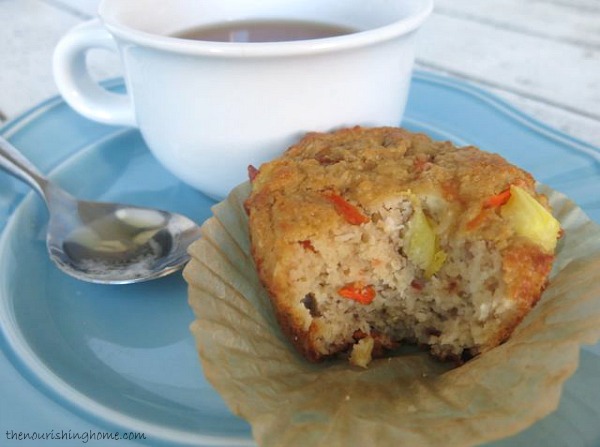
Muffins make such a tasty and nutritious breakfast-on-the-go option, especially when they’re filled with wholesome fruits and veggies like these scrumptious Morning Glory Muffins!

You might be wondering (or not) why these little treats are named morning glory? Is that just something I made up, or is there a reason for the name?

Glad you asked (or are hopefully wondering now that I mentioned it) … One of my latest passions is to research the history of traditional and regional recipes. It might sound strange, but I absolutely get jazzed about learning the stories behind some of our favorite classic foods, like these hodge-podge muffins.

Morning Glory take a bite

I’m sharing this delectable recipe and a little about its history over at Honeyville Farms today. So please pop over to get the recipe and learn just a little about how these tasty treats came about. Nothing fancy, just a little fun fact that may come in handy if you’re ever on Jeopardy or playing Trivial Pursuit. (Does anyone do that anymore?). Or of course, if you’re a food nerd like me.

You Might Also Like:

Lemon Poppy Mini-Muffins (GF)
GF Baking Christmas Stocking Stuffer Giveaway!
Almond Flour Biscuits (GF, DF)

Filed Under: Muffins/Breads/Biscuits ·

Secret Ingredient Guacamole: Easy, Tasty & Freezer-Friendly!

By Kelly · 16 Comments

How do I say this without sounding boastful? Maybe by first admitting that there are many things I completely fail at, but one thing’s for sure, my guac ROCKS! It’s true. I’m continually asked to make it for virtually every festivity we’re invited to and it’s rare that the bowl isn’t nearly licked clean.

Why is it so good? What’s my secret? Well … I’m finally going to spill the beans, and share that there’s three key ingredients (one of which is a tasty little secret I learned) to making the best guac in town!

1) Homemade Pico de Gallo is the ultimate guaranteed way to make some killer guac! It isn’t rocket science to make, but taking a few minutes to make fresh pico de gallo with vine-ripe tomatoes is key to making the fastest, tastiest guac in town!

2) Perfectly Ripe Avocados may seem like a “no, duh!” ingredient to mention. But how many times have you squeezed an avocado in the market and thought it was perfect, only to discover big-ole brown spots once you cut it open. Boo! That’s such a bummer! Good news – there’s actually a very easy way to tell if an avocado is perfectly ripe, here’s how.

3) A Pinch of Oregano. (Shh! It’s our little secret!) I learned this tasty tip the chef at our favorite local Mexican restaurant. It’s amazing how something as simple as the addition of a fragrant herb can create such a stunning undertone of flavor to a recipe – such is the case with oregano. Just a big pinch of oregano (per avocado) rubbed between your fingers to release its oils will add a beautiful savory flavor to your guacamole that will make it a memorable standout!

P.S. I’ve got another delicious “secret” for you …
It’s my favorite method for freezing guac so you always have it on hand for adding a tasty boost of healthy fats and flavor to your favorite whole food dishes!

My Secret for Making Freezer-Friendly Guacamole!
Since we love homemade guacamole, I have two simple ways you can make it even easier to make next time around…

As shown above, one of my favorite time-saving strategies is to simply make a huge batch of guac and freeze it! Just divide the guacamole into freezer-safe containers. Even out the top of the guac with the back of a spoon. Then, top with a good drizzle of fresh lime juice. Cover and place the containers in freezer. When ready to serve, thaw in fridge overnight! Once thawed, stir well to incorporate the lime juice into the guac. Enjoy!

Another favorite method is to simply freeze avocado halves when they’re at the peak of ripeness. Like bananas, a bunch of avocados left together seem to always ripen all at the same time, and then of course, quickly become over-ripe. So to keep them from going to waste, if I’m not able to make a huge batch of guac, I simply halve them and freeze them on a baking sheet. Once they are frozen solid, I can transfer them to a freezer bag or container for use in making guac or other recipes. Just take out however many frozen avocado halves you need and allow to thaw at room temp! Yay!

Print
Secret Ingredient Guacamole (GF, DF)

Yield: 2 3/4 cups

Ingredients

  • 4 ripe avocados (see tip #2 above on how to select a perfectly ripe avocado)
  • 3/4 cups homemade pico de gallo
  • 1 Tbsp fresh lime juice
  • 1/4 tsp dried oregano
  • 1/4 tsp garlic powder
  • Sea salt to taste

Instructions

  1. Make a fresh batch of pico de gallo and refrigerate for at least two hours (or overnight) to allow the flavors to meld.
  2. In a large bowl, add the avocado and mash to the texture you desire. I find it easiest to use a potato masher or a pastry cutter to mash avocado.
  3. Add the pico de gallo, lime juice, oregano and garlic powder to the bowl of mashed avocado. Stir well to combine. Add sea salt to taste.
  4. Refrigerate until ready to serve. Best enjoyed within a few hours of making it. To help prevent browning, add an avocado pit to the top of the guacamole and cover with plastic wrap before placing in the fridge.

Notes

Freezer-Friendly Tip: Divide the guac into one-cup freezer-safe containers. Even out the top of the guac with the back of a spoon. Then top with a teaspoon of fresh lime juice. Cover and place in freezer. When ready to serve, thaw in fridge overnight. Once thawed, stir well to incorporate the lime juice into the guac. Enjoy!

3.1
https://thenourishinghome.com/2014/05/secret-ingredient-guacamole/


You Might Also Like:

Savory Cottage Pie {Whole30 option}
Veggie Confetti Cauliflower Rice
Healthier French Fries (GF)

Filed Under: Dips/Dressings, Sides, Whole30 ·

Fruit & Nut Grain-Free Bars

By Kelly · 36 Comments

How to Make KIND Fruit & Nut Bars (Grain Free).jpg

Inspired by my affinity for KIND Fruit & Nut Bars, this honey-sweetened, grain-free version is less expensive to make than purchasing its namesake. And even better, you can customize the recipe to make a wide variety of flavor-combinations based on your own personal taste preferences (and your kids too)!

These fruit & nut grain-free bars make a great health lunchbox addition for kids and adults alike, and are also the perfect snack bar for healthy eating on-the-go or anytime you need a quick energy boost!

Fruit & Nut Mock KIND Bars.jpg

Looking for more great bars? Check out these:
• Nut-Free “KIND” Bar – perfect for those with nut-allergies
• Cherry-Chocolate Chip Bar – chocolate chips, need I say more?
• Apricot-Almond Crunch Bar – mildly sweet, tangy & delicious!

EverydayGrainFreeBakingThis delightful recipe is just one of more than 100 irresistible grain-free, dairy-free recipes in my new cookbook – Everyday Grain-Free Baking!

From breads, biscuits and muffins to savory snacks and decadent treats, you’ll find step-by-step instructions, beautiful color photographs and helpful tips & tidbits to make all of your GF baking adventures a delicious success!

Click here to get a SNEAK PEEK of the book!

Print
Fruit & Nut Grain-Free Bars

Yield: 8 bars

Ingredients

  • 1/3 cup pure honey (mild honey such as clover is best)
  • 2 tablespoons coconut flour
  • 1 tablespoon *all-natural almond butter
  • 1/8 teaspoon sea salt
  • 1 1/3 cups chopped whole *nuts
  • 1/2 cup chopped dried fruit
  • 1 cup unsweetened coconut flakes (not finely shredded coconut)

Instructions

  1. Preheat oven to 300 degrees. Trim parchment paper to line an 8×8-inch baking dish, leaving parchment paper to hang over two sides of the dish.
  2. In a large bowl, add the honey, coconut flour, all-natural nut butter and salt. Use a spoon to stir until well combined.
  3. On a large cutting board, coarse-chop a couple of large handfuls of assorted whole nuts (see note below). Measure out 1 1/3 cup of the chopped nuts and add them to the honey mixture.
  4. Next, chop the dried fruit and measure out 1/2 cup and add to the honey mixture.
  5. Finally, measure 1 cup of coconut flakes (not shredded coconut). Place coconut flakes on the cutting board and coarse-chop. Add chopped coconut flakes to honey mixture.
  6. Using a spoon, mix ingredients together making sure they are thoroughly combined.
  7. Place the bar mixture into the parchment-lined baking dish. Fold overlapping flaps down and evenly press the top of the bar mixture firmly to pack-in the ingredients so they hold together better after baking. Then, peel back the parchments flaps from top of bars. (Do not trim, as the flaps make it easier to remove the bars after baking.)
  8. Bake for 20 minutes. Then remove from oven and allow to completely cool on stovetop for approximately one hour (or until bottom of baking dish is room temp).
  9. Place in fridge to continue cooling. (Do not freeze as it makes it impossible to cut the bars without them crumbling.) Once cold, remove dish from refrigerator. Then, run a knife along the two edges without parchment. Using the parchment paper ends, lift the bars from the baking dish and place on a cutting board.
  10. Cut into 8 bars and individually wrap and store in the fridge or freezer. Then you can easily take out what you need and place directly into your child’s lunchbox (or yours) – no need to thaw. However, for best results, bars should be kept cold so they do not become over-sticky. Simply include an ice pack, if placing them in a lunchbox, or taking them on the go.

Notes

*You can use any combination of nuts, such almonds, cashews, pistachios, peanuts, etc. Just be sure to rough-chop the nuts first and then measure out 1 1/3 cups. (Soaked and dehydrated nuts are best, especially for those with digestive issues.)

What nuts do I use? The bars in the photo are made by using 1/2 cup rough-chopped almonds, 1/2 cup rough-chopped cashews and 1/3 cup rough-chopped pistachios.

The same goes for dried fruit – rough-chop any combination of dried fruit you choose and then measure out 1/2 cup. (I use a combination of dried cranberries and dried wild blueberries.)

And finally, you can use any all-natural nut butter you choose, just be sure it’s simply ground nuts (without additives) for best results and nutrition. I use all-natural creamy almond butter.

What if I don't care for coconut? You can omit the coconut flakes and replace with additional chopped nuts and dried fruit. Substitute 1/3 to 1/2 cup of chopped nuts and 1/3 cup of chopped dried fruit. (Please note: If you substitute with an additional whole cup of nuts the bars will be too dry). Also, you can omit the coconut flour as well and replace it with ground flaxseed. Enjoy!

3.1
https://thenourishinghome.com/2014/05/mock-kind-fruit-nut-grain-free-bars/

Disclosure: The above recipe ingredient links are amazon affiliate links. By purchasing via these links The Nourishing Home receives a small percentage of the sale at no additional cost to you. Of course, you are not obligated to use these links to make a purchase, but if you do, please know that it helps to support this site and ministry. Thank you!

You Might Also Like:

It’s a wrap! Sweet & savory roll-ups your whole family will enjoy! (GF Option)
Fruit and Raw Cheese Kabobs (GF)
Apricot-Almond "KIND" Bars (GF)

Filed Under: Savory, Snacks, Sweet ·

  • « Previous Page
  • 1
  • …
  • 48
  • 49
  • 50
  • 51
  • 52
  • …
  • 182
  • Next Page »

My New Cookbook is Here!

Welcome to The Nourishing Home!

I’m so glad you’re here and want you to feel right at home! My heart in creating this blog is to help you by sharing helpful meal planning strategies and nourishing GF recipes that are healthy, easy and delicious with thanksgiving to God! [Read More …]


All content (recipes, photos, posts, etc.) on this site is the creative property of Kelly Smith. You are welcome to share a photo via social media, as long as it contains a link back to the corresponding recipe or post from this site. However, you may not republish a recipe in its entirety in any form. For questions, or for permission to use a photo or recipe, please contact me via email at [email protected]. Thank you!

Please Note: All content (recipes, photos, text, etc.) on this site is the creative property of Kelly Smith of The Nourishing Home. You are welcome to share a photo via social media, as long as it contains a link back to the corresponding recipe from this site. However, re-publishing a recipe in any form is strictly prohibited. Additionally, please refrain from adapting recipes without properly linking back to the original recipe, and keep in mind that simple substitutions do not constitute an adapted or original recipe. For details regarding recipe copyright law, please visit the Food Blog Alliance.
The Nourishing Home is a participant in the Amazon Services LLC Associates Program, an affiliate advertising program designed to provide a means for sites to earn advertising fees by advertising and linking to amazon.com.

Privacy Policy
DMCA.com

Copyright © 2026 · All Rights Reserved · The Nourishing Home · Artwork by Nancy Panaccione · Site Design by Deluxe Designs · Log in