The Nourishing Home

living healthier lives in service to the King!

  • Home
  • About
    • About TNH
    • Contact
  • Meal Planning
  • Health & Wellness
    • Real Food Basics
  • Whole30
  • GF Recipes
    • Whole30
    • Breakfast
    • Lunch
    • Entrées
    • Slow Cooker
    • Soups & Stews
    • Sides & Salads
    • Snacks
    • Desserts
    • Kids in the Kitchen
  • My Cookbook
  • Subscribe

Healthy Ambrosia Salad with Toasted Coconut

By Kelly · 7 Comments

Ambrosia Yogurt with Toasted Coconut

If you’re from the South, chances are you’ve been to many a potluck where ambrosia salad graced the table. In fact, at any given church fellowship, there might even be two or three versions of it!

Funny thing, I checked into the history of ambrosia and realized I’m a little lax on my knowledge of Greek mythology. I had no idea that the word ambrosia is the name of the magically delicious food that helped the Greek gods maintain their immortality. (Now, that’s what I call a pretty serious health claim!)

Yet, I can’t help but find it a bit ironic that this dish named after a mythological superfood has so many health faux pas with its processed marshmallows, red-dye laden maraschino cherries, and oftentimes cool whip. Ouch!

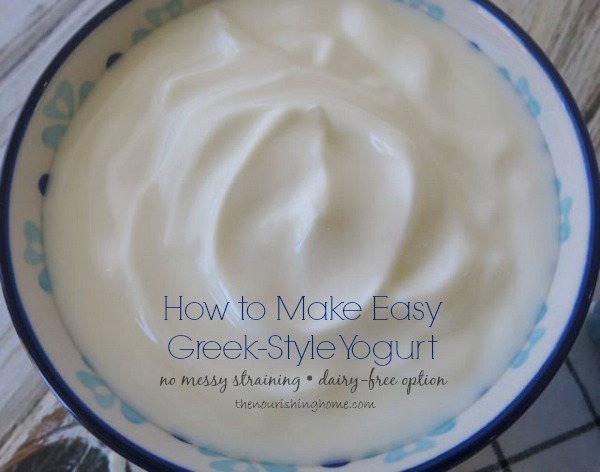
The good news … you can create a healthier version using homemade dairy or non-dairy Greek-style yogurt combined with wholesome fresh fruits and unsweetened coconut.

Of course, there’s only one food that can truly bring eternal life (John 6:35-69). Thank you, Lord!

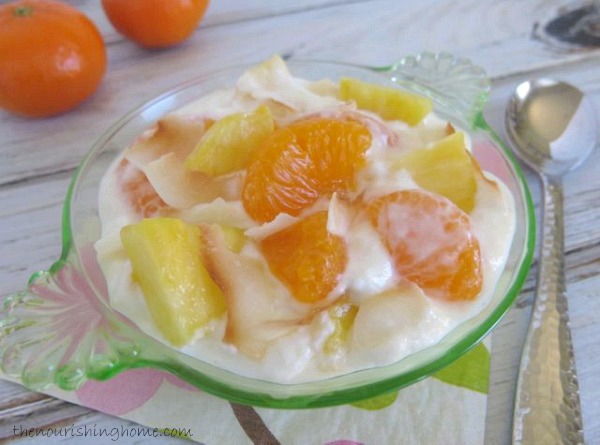
When it simply comes to enjoying the familiar taste of Southern-style ambrosia, this real food version is a satisfying treat that provides a great dose of probiotics, as well as a healthy boost of nutrition!

Ambrosia Yogurt Close Up

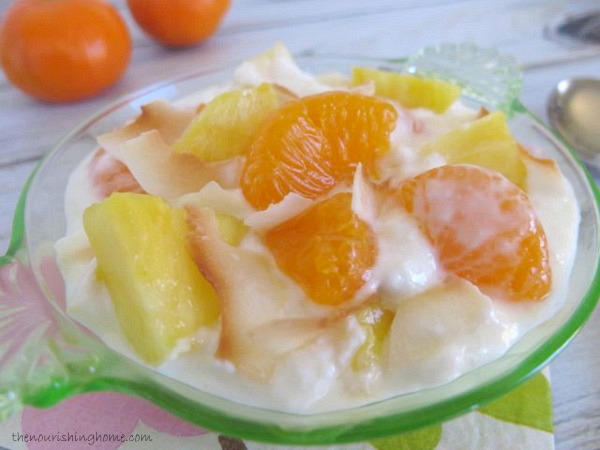
This healthy ambrosia salad yogurt parfait, can easily be transformed in an ambrosia fruit salad by simply doubling or tripling the ingredients as described in the recipe below. Enjoy!

Print
Ambrosia Salad with Toasted Coconut (GF)

Yield: 2 servings

Ingredients

  • 1 cup homemade dairy or non-dairy Greek yogurt
  • 1 tbsp honey
  • 1/2 tsp pure vanilla extract
  • 1 cup mandarin orange sections (learn how to section an orange)
  • 1 cup fresh diced pineapple
  • 2 tbsp unsweetened shredded coconut
  • Optional: 1 tbsp crispy walnuts or pecans
  • Optional: 1-2 tbsp unsweetened coconut flakes for garnish

Instructions

  1. If desired, toast 1-2 tablespoons of unsweetened coconut flakes to use as garnish.
  2. In a small bowl, whisk together the yogurt, honey and vanilla. Set aside.
  3. In a medium bowl, add the orange sections, pineapple, shredded coconut and nuts, if desired. Toss to combine.
  4. Fold the yogurt into the fruit and top with toasted coconut flakes. Absolutely delicious!

Notes

Recipe Variation: For a classic ambrosia-style fruit salad, double or triple the amount of fruit in this recipe, but keep the yogurt, honey and vanilla measurements the same. This will result in a delicious creamy fruit salad perfect for summer entertaining!

P.S. Feel free to add or substitute fruits, as desired. Some delicious options include: Kiwi, red grapes, cherries, etc.

3.1
https://thenourishinghome.com/2014/06/healthy-ambrosia-salad/


Disclosure: The above recipe ingredient links are amazon affiliate links. By purchasing via these links The Nourishing Home receives a small percentage of the sale at no additional cost to you. Of course, you are not obligated to use these links to make a purchase, but if you do, please know that it helps to support this site and ministry. Thank you!

You Might Also Like:

New Twist on Caprese
Caribbean Carrot Salad (GF)
Strawberry Feta Salad (GF)

Filed Under: Salads ·

One Simple Tip for Saving Money and Fitting Real Foods Into a Busy Schedule

By Kelly · 14 Comments

One Simple Tip Cover_cover2

One of the reasons I love blogging is the ability to help other people in areas where they struggle.  When readers sign up for my “Don’t Waste the Crumbs” newsletter, they’re asked to fill out a short survey that asks a very important question:  What’s your biggest challenge today?

I get quite the variety of answers, but one issue that keeps popping up over and over is this: Fitting real foods into a busy schedule – where should I spend my time?

I addressed this particular question in The Crumbs newsletter last week, and many readers found it helpful, so I thought I’d share this simple strategy with you all here at The Nourishing Home as well.

In order to make best use of your time in the kitchen, determine your Most Important Tasks (MITs).

Not sure what I mean?  Consider this:  There are 24 hours in each day and you have a to-do list that’s a mile long.  You know it’s absolutely impossible to complete the entire list without losing your sanity (or driving your family nuts), so you choose just a few of the “must-do’s.”  They won’t take up too much time, yet will help you make it through the week without the house falling apart and make a big impact in your schedule in the long run.

Use the same approach when it comes to the time you spend in the kitchen.  What food-related tasks can you accomplish that will give you the most bang for your buck, yet won’t keep you locked in the kitchen all day?

The answer to this question will be different for everyone.  Some say making butter is a top priority while others would say spending some time turning freshly picked berries into homemade jam is worth every minute, and every penny.

I can’t answer the question for you, but I can share what my own top 3 MIT’s are!

How to Make Greek-Style Yogurt {no straining, DF option}

1.  Homemade Yogurt

We drink smoothies on a daily basis, and they almost always have yogurt in them (when they don’t have yogurt, they have kefir).  In terms of meals, we use yogurt for homemade blue cheese dressing, for soaking oats and as a substitute for most recipes that call for sour cream.  Regular yogurt is delicious as is, but lately I’ve been straining it to make homemade Greek yogurt and whey.  I then use the whey to soak the flour in soaked whole wheat bread to break down the phytase and get as many nutrients as I can out of the grains!

Personally, I prefer making yogurt with a heating pad, but that’s just one of many ways to make it.  Here are a few other methods for making yogurt from fellow real food bloggers:

  • simple homemade yogurt with a heating pad
  • creamy yogurt from raw milk
  • yogurt in a slow cooker
  • awesome homemade yogurt troubleshooting guide
  • for the dairy-free folks, coconut yogurt
  • homemade Greek yogurt without straining
  • flavored drinkable yogurt in a slow cooker
  • yogurt incubated in a cooler

With all the different ways we eat yogurt, we go through an average of one gallon each month.  My total cost is $9.72 for a gallon of organic whole milk and Greek yogurt (as a starter).  It would cost at least $16 to buy a gallon of Greek yogurt from the store, and it wouldn’t even be organic!


Slow Cooker Bone Broth

2.  Homemade Chicken Stock

We keep our grocery bill low by having soup several times each month, but that wouldn’t do us any good if we were paying for chicken stock!  We’re already buying two whole chickens each month and using them for several meals.  Why not keep the bones and create nutrient-rich and delicious homemade stock?  The most basic chicken stock recipe uses just chicken bones, water and apple cider vinegar and can be made in just two minutes.  Depending on what you have in the kitchen though, you can really amp up the flavor!

  • Kelly’s slow cooker bone broth
  • homemade stock in a slow cooker
  • traditional stock with feet
  • 10 tips for better chicken stock

With soup at least three times a month, we go through anywhere between four to eight quarts of chicken stock each month.  Local stores carry organic chicken stock for $1.99 per quart, which means we’d be paying nearly $16 for chicken stock during the colder winter months.  Homemade chicken stock costs only 13¢ per quart when you take into account the cost of the three basic ingredients and electricity.  This one task alone saves us up to $15 each month – well worth those two minutes!

Bread Overhead

3.  Homemade Bread

Now you’re probably thinking, “But homemade bread takes HOURS to make.  Is it REALLY worth all the time?”  Absolutely!

You all know that Kelly is gluten-free, so my favorite whole grain bread recipe certainly wouldn’t be on her MIT list, but not all of you guys follow a gluten-free diet.  If this is the case, allow me to explain why homemade whole grain bread is one of my own personal MIT’s.

First, I control the ingredients.  I know exactly what goes into my soaked whole wheat bread.  Store-bought bread often contains high fructose corn syrup, flour enriched with synthetic vitamins and preservatives to keep it fresh while it makes it way from manufacturer to store shelves.  Correct me if I’m wrong, but it doesn’t sound that any of those are really helping the cause of healthy food in my house.

Second, it doesn’t take any more time when I’m already home.  Common sense should dictate not to bake bread when you’re spending the day at the beach.  Instead, bake it on a day you know you’re going to be home or at least in town.  Thursday is bread day in the Crumbs house, which was strategically planned to be the same day to catch up on laundry and house cleaning.  I simply set the timer in the kitchen and tend to the bread when the timer goes off.

It’s not quite as easy when school is in session, but creative scheduling means kneading, rising and baking is planned around trips to the library and errands around town on busier days.  Because baking bread is one of my MIT’s, I make time to get it done!

Finally, homemade bread costs less than half of the store-bought counterpart.  Whatever you pay for bread, whether it’s whole grain or sprouted with nine-seeds, take the cost and divide it in half.  That’s how much homemade bread costs.  Sure, $1 or $2 might not seem like much, but at the average rate of two loaves a week, once again we save $16 every month!

Are you gluten-free?  Think this doesn’t apply to you?  Au contraire mon frere!  This savings goes for you too!  Gluten-free ingredients can be very affordable when you buy them in bulk and Kelly’s brown bread recipe will turn you into a homemade bread convert too!

Have you been keeping tally of how much just these three tasks can save?  In just four hours, these three tasks alone save me almost $40 off my grocery budget!

So regardless of how busy my week is, or full my to-do list is, I always make time to do these three MIT’s.

How do you get the most bang for your buck in terms of time and energy in the kitchen?  What are you MIT’s?  Share them in the comments for others to see!

Note from Kelly: I love Tiffany’s weekly newsletter and am sure you will too!  In fact, when you subscribe to the Don’t Waste the Crumbs newsletter, Tiffany is offering a free eBook “22 Days to a Fresh Start.” PLUS, five pages worth of printables to help you get your grocery budget under control.  If you struggle with eating real food on a budget, I encourage you to subscribe to Tiffany’s newsletter to get these freebies.  You’ll also get the same survey she mentioned above. And you never know – your biggest challenge could be addressed in a future issue of her newsletter!  Click HERE to subscribe to Don’t Waste the Crumbs today! 

You Might Also Like:

Why is my body turning against me?
Super Green Guacamole (GF)
Merry CHRISTmas to you and your family!

Filed Under: Uncategorized ·

Baked Chicken Parmesan with Zoodles (GF)

By Kelly · 2 Comments

Chicken Parmesan with Zoodles

As summer comes to a close, there’s no better time to take advantage of the abundant surplus of zucchini than to break out our handy-dandy spiralizers and create lots of simple delicious recipes. These tasty veggie noodles are not only perfect for those living gluten-free or grain-free, but they’re also an easy way to get more veggies on your family’s plate since almost everyone enjoys zoodles!

This quick and easy recipe is a real family favorite, especially with kids. That’s because this version of baked chicken parmesan is essentially Italian-seasoned chicken tenders with just a touch of cheese (optional). I typically serve them atop a big mound of lightly steamed zoodles topped with our favorite homemade marinara sauce. I make this tasty sauce in big batches and freeze it, which makes this an especially quick meal. Or in a pinch, I use a healthy jarred marinara sauce.

Chicken Parm wZoodles

Another time-saver is to make an extra batch of these tasty parmesan chicken tenders to serve solo (rather than on top of the zoodles). They go great with sliced raw veggies and a side of creamy ranch dressing for delicious dipping!

Looking for more Zoodle Recipes?
This spring, I shared a new spiralizer recipe each week as part of my Oodles of Zoodles Spiralizer Series. You can find each of the delicious veggie-packed recipes here:
• Turkey Bolognese with Zoodles
• Fresh Caprese with Zoodles
• Veggie Sauté with Zoodle Ribbons
• Veggie Stir Fry with Zoodles

Print
Chicken Parmesan with Zoodles (GF)

Yield: 4 servings

Ingredients

  • 3 large organic zucchini (or yellow summer squash)
  • 1 lb boneless, skinless organic chicken breasts
  • 1 large egg
  • 1 cup homemade GF breadcrumbs
  • 1/2 cup fresh grated Parmesan cheese
  • 1/4 tsp sea salt
  • 1/4 tsp dried Italian herb seasoning
  • 1 1/2 cups organic marinara sauce
  • Shredded mozzarella cheese, if desired

Instructions

  1. Using a spiralizer with the small-hole blade attachment, make zucchini noodles; set aside. For step-by-step instructions on how to make zoodles, be sure to check out my How to Spiralize in 3 Easy Steps Photo Tutorial.)
  2. Preheat oven to 400 degrees. Line a baking sheet with parchment paper; set aside.
  3. In a wide shallow bowl or dish, whisk egg until slightly foamy. Cut chicken breasts into strips.
  4. On a large plate, combine breadcrumbs, Parmesan cheese, salt and Italian seasoning.
  5. Dip chicken into egg wash, one piece at a time, and dredge through the breadcrumb mixture, making sure to thoroughly coat each side.
  6. Place chicken tenders on prepared baking sheet and sprinkle with a pinch of salt.
  7. Bake approximately 15-18 minutes, until breadcrumbs are lightly browned and chicken is cooked through. Sprinkle top with mozzarella cheese, if desired, and return to oven for just a minute or two to melt the cheese.
  8. While Parmesan chicken tenders are baking, warm the marinara sauce. Then, just before you're ready to serve, steam the zucchini noodles about 2-3 minutes until desired texture is reached. (Do not overcook, as zucchini noodles are best al dente, not mushy.)
  9. Use tongs to divide zucchini noodles among four plates. Top with marinara sauce and 2-3 parmesan chicken strips. Easy and delicious!
3.1
https://thenourishinghome.com/2014/06/baked-chicken-parmesan-zoodles-gf/


Disclosure: The above recipe ingredient links are amazon affiliate links. By purchasing via these links The Nourishing Home receives a small percentage of the sale at no additional cost to you. Of course, you are not obligated to use these links to make a purchase, but if you do, please know that it helps to support this site and ministry. Thank you!

You Might Also Like:

A Simply Delicious Gluten-Free Thanksgiving Day Menu
Slow Cooker Buffalo Chicken Sliders {Whole30, GF, DF}
One-Skillet Savory Chicken & Veggies {Whole30}

Filed Under: Poultry ·

  • « Previous Page
  • 1
  • …
  • 45
  • 46
  • 47
  • 48
  • 49
  • …
  • 182
  • Next Page »

My New Cookbook is Here!

Welcome to The Nourishing Home!

I’m so glad you’re here and want you to feel right at home! My heart in creating this blog is to help you by sharing helpful meal planning strategies and nourishing GF recipes that are healthy, easy and delicious with thanksgiving to God! [Read More …]


All content (recipes, photos, posts, etc.) on this site is the creative property of Kelly Smith. You are welcome to share a photo via social media, as long as it contains a link back to the corresponding recipe or post from this site. However, you may not republish a recipe in its entirety in any form. For questions, or for permission to use a photo or recipe, please contact me via email at [email protected]. Thank you!

Please Note: All content (recipes, photos, text, etc.) on this site is the creative property of Kelly Smith of The Nourishing Home. You are welcome to share a photo via social media, as long as it contains a link back to the corresponding recipe from this site. However, re-publishing a recipe in any form is strictly prohibited. Additionally, please refrain from adapting recipes without properly linking back to the original recipe, and keep in mind that simple substitutions do not constitute an adapted or original recipe. For details regarding recipe copyright law, please visit the Food Blog Alliance.
The Nourishing Home is a participant in the Amazon Services LLC Associates Program, an affiliate advertising program designed to provide a means for sites to earn advertising fees by advertising and linking to amazon.com.

Privacy Policy
DMCA.com

Copyright © 2026 · All Rights Reserved · The Nourishing Home · Artwork by Nancy Panaccione · Site Design by Deluxe Designs · Log in