The Nourishing Home

living healthier lives in service to the King!

  • Home
  • About
    • About TNH
    • Contact
  • Meal Planning
  • Health & Wellness
    • Real Food Basics
  • Whole30
  • GF Recipes
    • Whole30
    • Breakfast
    • Lunch
    • Entrées
    • Slow Cooker
    • Soups & Stews
    • Sides & Salads
    • Snacks
    • Desserts
    • Kids in the Kitchen
  • My Cookbook
  • Subscribe

Homemade Vanilla Bean Ice Cream {and Exciting News!}

By Kelly · 23 Comments

Throw a fun ice cream sundae party featuring this naturally-sweetened, homemade vanilla bean ice cream recipe. You and your kids (and their friends) will love it!

I’m thrilled to share some exciting news with you … I recently joined the KitchenAid contributor team as a featured blogger at their beautiful recipe site – Kitchenthusiast. What an honor!

As a huge fan of KitchenAid appliances, it’s such a privilege to be able to join some of my favorite bloggers to share delicious seasonal recipes that highlight a few of my favorite KitchenAid products.

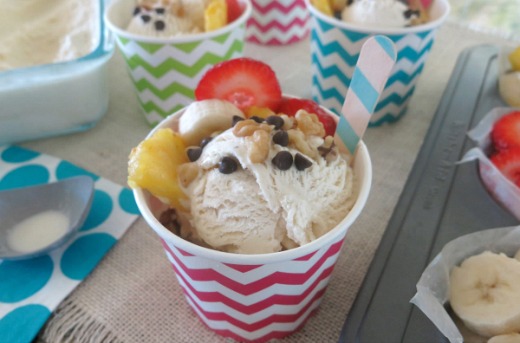
Since summer is finally here, I thought it would be fun to celebrate this exciting news with an Ice Cream Sundae Party featuring my family’s favorite naturally-sweetened homemade vanilla bean ice cream recipe.

Throw a fun ice cream sundae party featuring this naturally-sweetened, homemade vanilla bean ice cream recipe. You and your kids (and their friends) will love it!

So join the party and come visit me over at KitchenAid today where I’m sharing a super simple recipe to beat the heat of summer and have a lot of fun in the process!

P.S. These absolutely adorable chevron-stripe ice cream cups make any party fun! Another party-friendly serving tip – use muffin tins to serve toppings for ice cream parties, burrito or taco night, make-your-own pizza night and MORE! (aff.links)

Disclosure: As a contributor for KitchenAid’s blog, I occasionally receive free products, as well as a small stipend for writing posts for Kitchenthusiast. This in no way impacts my review of their products. All opinions given are my honest thoughts after testing and using their products on a regular basis. Thank you!


You Might Also Like:

Banana Split Pop (GF, DF Option)
Healthy Fruit & Cream Bars!
Happy-Happy Grain Free Ice Cream Cake (GF, DF option)

Filed Under: Frozen Treats ·

Grain-Free Chocolate Cake with Fudge Icing

By Kelly · 49 Comments

Grain-Free Chocolate Cake from Live Simply

Special Guest Post by Kristin at Live Simply

I’ve been an avid reader and fan of The Nourishing Home since Kelly first began writing.  Kelly’s grace and practical wisdom for real food and healthy living are always an inspiration. I’m honored to stop by The Nourishing Home today, and share one of my favorite grain-free sweet treats.

[Note from Kelly (blushing): Such kind words from a dear friend! I couldn’t be more thrilled to have Kristin visiting with us! Her beautiful blog –Live Simply– is a true inspiration with her encouraging wisdom, passion for real food, healthy living and meal planning. And speaking of passion – her passion for chocolate is one I’m sure most of us share. So thank you, Kristin, for being too good to us in sharing this decadent treat! Just one bite of this rich chocolate cake and you’ll know what I mean!]

I have a number of passions in life. I believe learning a person’s passion(s) is often the best way to connect and understand what makes them “tick.” My faith in Jesus, my family, and a quest for simplicity are a few of my greatest passions.  Add a pinch of: backyard chickens, beets, and chocolate – and you get Kristin, a simple and passionate gal.

With Mother’s Day fast approaching, let’s talk about one of my passions, chocolate.

Four years ago, when our family made the switch to real food, I had an addiction to all things chocolate: candy bars, cake, pastries, and cookies, anything with the slightest hint of chocolate taste. All my favorite treats were highly processed and so they had to go.

A few months after purging our house of everything processed and feeling a bit discouraged, I discovered the beauty of real food. When applied with grace, this real food lifestyle can be incredibly liberating, inspiring, and out-of-this world delicious.  I soon realized real food was about more than just kale and spinach.  Real food also includes decadent chocolate in moderation. Hallelujah!

I happily stock a share of good quality chocolate in my real food pantry. My stockpile no longer consists of chocolate bars and processed cookies, but instead two simple ingredients: unsweetened cocoa and minimally processed chocolate chips.  With real chocolate ingredients, the possibilities for making homemade treats are endless.  A few of my favorites include: raw brownie bites and “the best ever” brownie.  Yummy real food treats our family enjoys creating together and sharing.

Grain Free Chocolate Cake CloseUp.jpg

And so, with Mother’s Day almost here and my passion for chocolate, I created a decadent real food chocolate cake to share with you.  This cake is made with two of my favorite baking ingredients – blanched almond flour and coconut flour. These simple grain-free flours create perfectly moist muffins, bread, and cake. They also add nutritional benefits, such as protein and healthy fat.

This grain-free chocolate cake is delightfully sweetened with honey and melted semi-sweet chocolate chips. Topped with a simple homemade fudge icing, and if desired a scoop (or two) of homemade vanilla bean ice cream.  A rich chocolate dessert that says, “Mom, I love you,” in one little bite.

Passion can be incredibly delicious and rewarding, so let’s not delay another minute. Break out the bowls, whisk, butter, and chocolate – we have a cake to make, just in time for Mom’s big day.

Chocolate Cake Ingredients

Print
Grain-Free Chocolate Cake with Fudge Icing

Yield: One 9-inch Cake

Ingredients

    Grain-Free Chocolate Cake:
  • 1 cup allergy-friendly chocolate chips
  • 1 cup butter (or 1/2 cup palm shortening, plus 1/2 cup coconut oil)
  • 1 cup honey
  • 5 large eggs
  • 1 1/2 cups blanched almond flour
  • 1/2 cup coconut flour
  • 1/2 tsp baking soda
  • 1/4 tsp salt
  • 1 tsp vanilla extract
  • Fudge Icing:
  • 1/2 cup coconut cream (*see recipe note below)
  • 1/2 cup allergy-friendly chocolate chips
  • 1 tsp vanilla extract
  • 2 TB honey
  • 1 tsp arrowroot powder

Instructions

    For the Cake:
  1. Preheat the oven to 325F. Grease a 9-inch spring-form pan with a little coconut oil. Or lightly grease a 9x13-inch baking dish to make my special happy-happy ice cream cake.
  2. In a saucepan over low heat, melt the butter and chocolate chips. As the ingredients melt, stir frequently. Once melted, remove the pan from the heat and allow the mixture to slightly cool.
  3. While the chocolate cools, whisk together the almond and coconut flours, baking soda, and salt in a medium bowl. Set aside.
  4. In a stand-mixer fitted with a whisk attachment (this can also be done with lots of muscle, a bowl, and whisk, or an electric hand mixer), whisk together the honey and eggs for 1 minute on medium speed. Add in the vanilla, whisk for 1 minute.
  5. Add the flour to the honey mixture and whisk for 1 minute. Slowly add the melted chocolate, with the mixer on medium speed. Whisk for 2 minutes, until thoroughly combined.
  6. Pour the batter into the prepared 9-inch spring-form pan and bake for 55-60 minutes. (If using a 9x13-inch baking dish, bake the cake approximately 45-55 minutes, just until a toothpick inserted into the center comes out clean.)
  7. For the Icing:
  8. In a saucepan, melt the chocolate chips and coconut cream (*see recipe note below), stirring frequently.
  9. Bring the chocolate mixture to a simmer, and then add the honey. Simmer the ingredients together for 1 minute.
  10. Add the vanilla extract and arrowroot powder, whisk for a minute. The icing will begin to thicken. Remove from the heat and cool.
  11. Once the cake has cooled, remove from the spring-form pan. Spread the icing evenly over the cake. Enjoy!

Notes

* What is Coconut Cream? Coconut cream refers to the cream that rises and solidifies in a can of pure coconut milk. To obtain coconut cream, simply place a can of unsweetened pure coconut milk into the fridge for at least 10-12 hours. By chilling the can of coconut milk, the coconut cream will rise to the top of the can and become solid. You can then measure out 1/2 cup of coconut cream for this recipe. Reserve the remainder for another use.

3.1
https://thenourishinghome.com/2014/05/grain-free-chocolate-cake-fudge-icing/

Please be sure to visit Kristin at Live Simply and thank her for sharing this wonderful recipe with us! It truly is the BEST chocolate cake. EVER!

Grain Free Chocolate Cake Bite.jpg

meKristin is a stay-at-home mom of two children, Piper (4) and Londyn (2). She loves to share her real food tips, ideas, and recipes for feeding the entire family nourishing whole foods. She is passionate about encouraging moms on this journey of simple, natural living and traditional, real food. Kristin is a professional blogger and the creator of Live Simply.

You Might Also Like:

Strawberry Shortcake Biscuits
Coconut Flour Brownie Cake (GF, DF Option)
3 Favorite Frostings!

Filed Under: Cakes/Cupcakes ·

Raspberry Crumble Bars {from Everyday Grain-Free Baking}

By Kelly · 4 Comments

Raspberry Crumble Bars

In Southern California, fresh ripe raspberries arrive as early as May, which means it’s the perfect time to start stockpiling these delectable treats (as well as other delicious berry favorites, like organic strawberries and blueberries).

Once berry season is in full gear, we enjoy almost daily doses of fresh-from-the-field berries in homemade yogurt parfaits and atop grain-free granola. Of course, as the berries become overripe, they’re perfect for freezing and for making wonderful homemade preserves – both of which can be enjoyed year-round.

In celebration of berry season, I’m this special recipe from my cookbook, Everyday Grain-Free Baking. These delightful Raspberry Crumble Bars, with their slightly sweetened cookie crust, really highlight the sweet-n-tangy flavor of raspberries! (By the way, they’re absolutely delightful with any fruit preserves of choice! Feel free to substitute with apricot, strawberry, or mixed berry preserves.)

Raspberry Crumble Bars Close Up

Although there are several steps, these bars come to together quick-n-easy, making them a fun recipe for cooking with kids. They also freeze well, if you can resist the temptation of eating them all in one sitting

Book Cover EverydayGrainFreeBaking copy
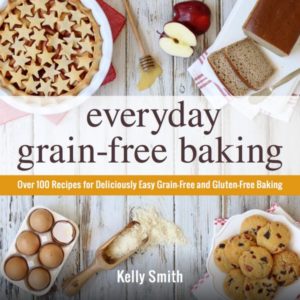
This delightful recipe is just one of more than 100 irresistible grain-free, dairy-free recipes in my new cookbook – Everyday Grain-Free Baking!

From breads, biscuits and muffins to savory snacks and decadent treats, you’ll find step-by-step instructions, beautiful color photographs and helpful tips & tidbits to make all of your GF baking adventures a delicious success!

Click here to get a SNEAK PEEK of the book!

Print
Raspberry Crumble Bars

Yield: 12-16 bars

Ingredients

    For the Crust:
  • 1 1/2 cups blanched almond flour
  • 1/2 tsp baking soda
  • 1/4 tsp sea salt
  • 1/4 cup butter (or coconut oil), melted
  • 1 Tbsp pure honey
  • 1 tsp pure vanilla extract
  • 1 Tbsp coconut flour
  • 1/2 cup homemade raspberry preserves (or your favorite all-fruit preserves)
  • For the Topping:
  • 1/3 Tbsp butter (or coconut oil), melted
  • 1 tsp pure honey
  • 3/4 cup blanched almond flour
  • 1/2 cup unsweetened finely shredded coconut
  • 1/4 cup sliced almonds

Instructions

  1. Preheat the oven to 325ºF.. Lightly oil an 8x8-inch baking dish with coconut oil. Line the bottom with two pieces of parchment paper, making sure the paper extends over two sides of the dish. (This will allow you to lift the bars out of the dish once baked and cooled.)
  2. Make the crust: In a small bowl, combine the almond flour, baking soda and salt. In a medium mixing bowl, whisk together the melted butter (or coconut oil), honey and vanilla. Then whisk in the coconut flour. Stir in the blanched almond flour mixture to the butter mixture, until well combined. (The dough will be crumbly, but should be moist enough that it sticks together when you pinch it.)
  3. Spoon the dough into the prepared baking dish, and press it evenly along the bottom to form the crust. Bake the crust for 5-6 minutes, just until it rises a bit. Remove from oven.
  4. Spoon the preserves over the hot crust and spread evenly making sure to leave about 1/4-inch of bare crust on all sides. This prevents the preserves from seeping under the crust.
  5. Make the topping: In the same bowl you used for the crust, whisk together the melted butter (or coconut oil) and honey. Using a spoon, stir in the blanched almond flour and shredded coconut until incorporated but still a bit crumbly.
  6. Using your fingers, evenly crumble the coconut topping over the top of the preserves. Then evenly scatter the sliced almond across the top. Gently press the almonds into the crumble topping a bit.
  7. Bake the bars for 18-20 minutes, until the crumble topping is lightly golden brown. Cool completely When the bars are completely cool cover and transfer to the refrigerator to chill, about 2-3 hours.
  8. Once bars are cold, remove from fridge and run a knife along the two sides without parchment. Using the parchment, gently lift the bar flat out of the dish and place on a cutting board. Cut into bars and enjoy!

Notes

Be sure to wait to cut the bars until they are cold. Otherwise, they will be quite crumbly and not hold together well. Wrap any leftover bars and store in the fridge or freezer.

*Also note, you can use any homemade or all-fruit preserves you’d like to create these delicious cookie bars. Some of our other favorites are apricot, mixed berry and strawberry. Enjoy!

3.1
https://thenourishinghome.com/2014/03/raspberry-crumble-bars-gf/

You Might Also Like:

Cranberry Orange Cookies
Cinnamon-Walnut Buttons (GF)
Luscious Lemon Bars (GF)

Filed Under: Cookies/Bars/Brownies ·

  • « Previous Page
  • 1
  • …
  • 7
  • 8
  • 9
  • 10
  • 11
  • …
  • 27
  • Next Page »

My New Cookbook is Here!

Welcome to The Nourishing Home!

I’m so glad you’re here and want you to feel right at home! My heart in creating this blog is to help you by sharing helpful meal planning strategies and nourishing GF recipes that are healthy, easy and delicious with thanksgiving to God! [Read More …]


All content (recipes, photos, posts, etc.) on this site is the creative property of Kelly Smith. You are welcome to share a photo via social media, as long as it contains a link back to the corresponding recipe or post from this site. However, you may not republish a recipe in its entirety in any form. For questions, or for permission to use a photo or recipe, please contact me via email at [email protected]. Thank you!

Please Note: All content (recipes, photos, text, etc.) on this site is the creative property of Kelly Smith of The Nourishing Home. You are welcome to share a photo via social media, as long as it contains a link back to the corresponding recipe from this site. However, re-publishing a recipe in any form is strictly prohibited. Additionally, please refrain from adapting recipes without properly linking back to the original recipe, and keep in mind that simple substitutions do not constitute an adapted or original recipe. For details regarding recipe copyright law, please visit the Food Blog Alliance.
The Nourishing Home is a participant in the Amazon Services LLC Associates Program, an affiliate advertising program designed to provide a means for sites to earn advertising fees by advertising and linking to amazon.com.

Privacy Policy
DMCA.com

Copyright © 2026 · All Rights Reserved · The Nourishing Home · Artwork by Nancy Panaccione · Site Design by Deluxe Designs · Log in