The Nourishing Home

living healthier lives in service to the King!

  • Home
  • About
    • About TNH
    • Contact
  • Meal Planning
  • Health & Wellness
    • Essential Oils for Your Health
    • Real Food Basics
  • Whole30
  • GF Recipes
    • Whole30
    • Breakfast
    • Lunch
    • Entrées
    • Slow Cooker
    • Soups & Stews
    • Sides & Salads
    • Snacks
    • Desserts
    • Kids in the Kitchen
  • My Cookbook
  • Subscribe

Chocolate Éclair Cupcakes {GF, DF Option}

By Kelly · 6 Comments

Simple, yet decadent – one creamy, luscious bite of these delectable grain-free and dairy free Chocolate Eclair Cupcakes is all it takes to fall in love!

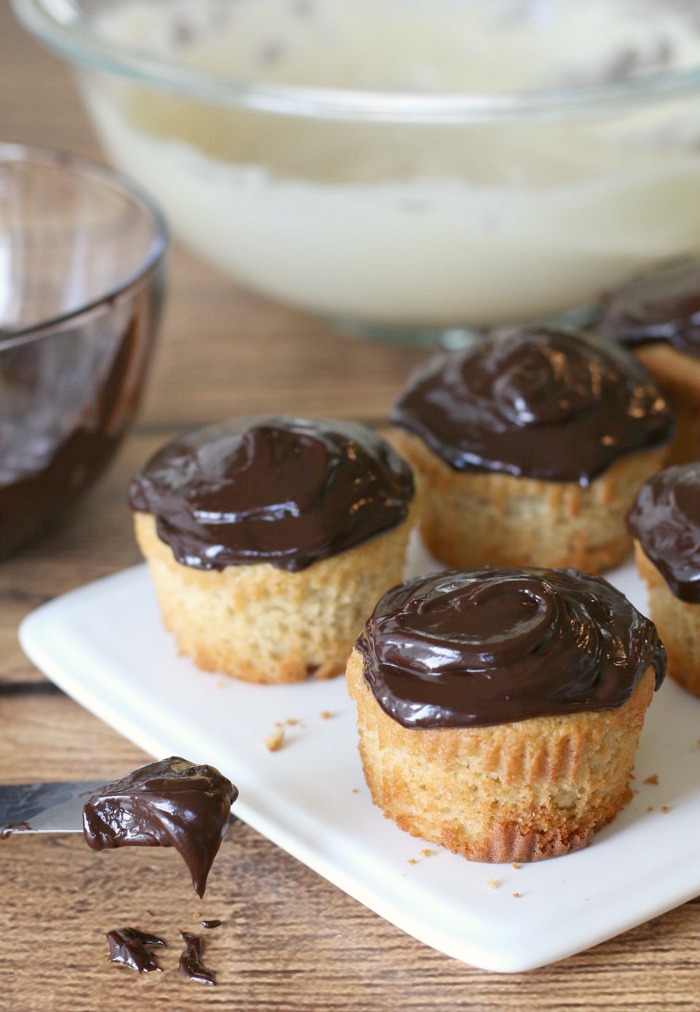
Decadent chocolate ganache tops a moist vanilla cupcake with a sweet-n-creamy surprise center for the ultimate grain-free treat … Chocolate Éclair Cupcakes!

As a gluten-free girl living in a house full of grain-lovin’ guys, I’m passionate about creating delicious gluten-free, grain-free recipes that everyone will enjoy whether they’re living a GF lifestyle or not.

And these scrumptious cupcakes are definitely a dream come true! They’re so incredibly delicious with their delectable combination of rich, decadent flavors reminiscent of a classic favorite – chocolate éclairs!

Simple, yet decadent – one creamy, luscious bite of these delectable grain-free and dairy free Chocolate Eclair Cupcakes is all it takes to fall in love!

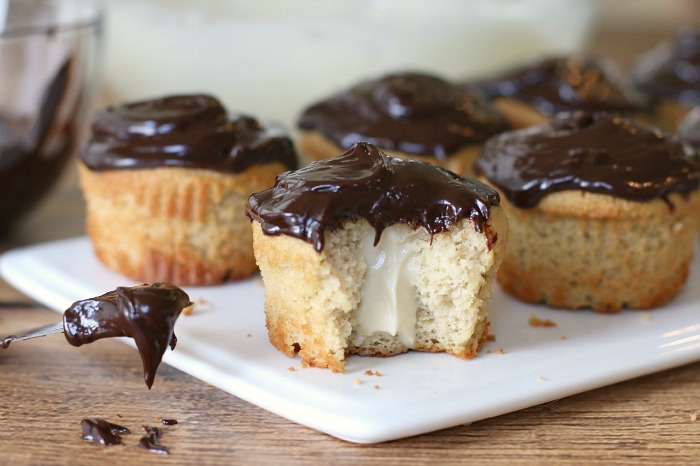
One creamy, luscious bite of these decadent chocolate-glazed cupcakes is all it takes to fall in love!

These beauties are a tasty little spin on the Boston Cream Pie recipe from my published cookbook, Everyday Grain-Free Baking. And although these exquisite little treats may appear to be a bit time-consuming to make, let me assure you, they’re actually fairly quick and simple to put together.

Trust me, this scrumptious labor of love is worth every second! {Plus, I have a little reward just for you when you’ve finished making them! Keep reading …} 

Filling & Frosting Chocolate Éclair Cupcakes

These beautiful Chocolate Éclair Cupcakes are as easy to put together as they are delicious! This simple photo tutorial will show you just how easy it is to fill and frost these decadent little treats.

Simple, yet decadent – one creamy, luscious bite of these delectable grain-free and dairy free Chocolate Eclair Cupcakes is all it takes to fall in love!

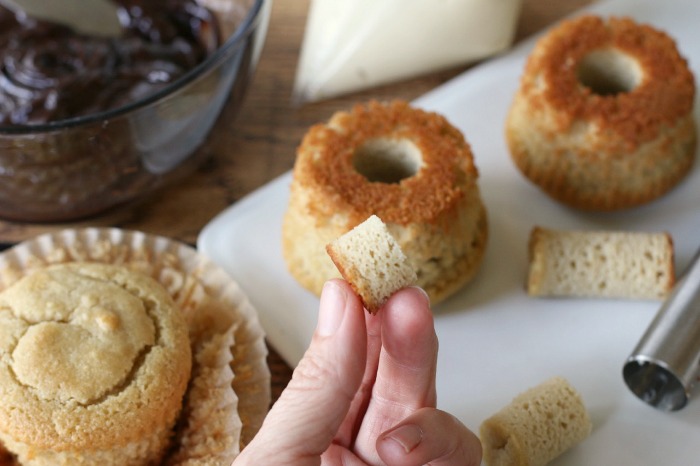
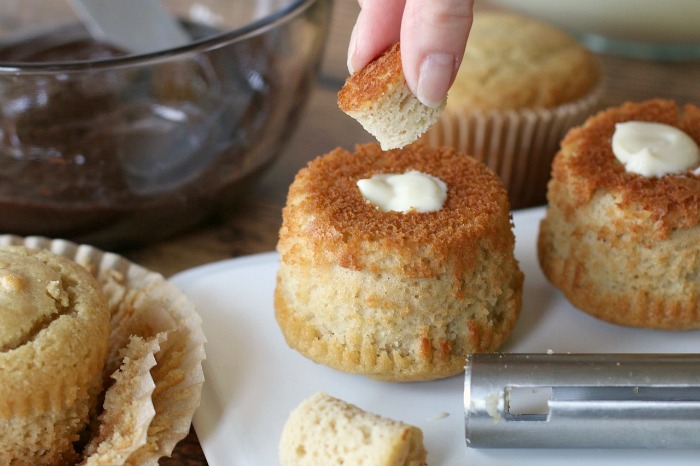
Step One: Remove cupcake liners from completely cooled cupcakes. Using an apple corerSimple, yet decadent – one creamy, luscious bite of these delectable grain-free and dairy free Chocolate Eclair Cupcakes is all it takes to fall in love!, cut out the center of the cupcake as shown above. You will use these little cake plugs to create tiny corks to hold the pastry cream inside the cupcakes.

Once you’ve cored the cupcakes, cut the top of each cake plug to create a half-inch cork for the top of the cupcakes. Insert the top-corks into the top of each cupcake. Then, turn the cupcakes upside down as shown above.

Next, cut the bottom of each cake plug to create a half-inch cork for the bottom of the cupcakes. Set those aside. The bottom corks will be used in step three below.

Take the remaining centers of the cake plugs and place them into a small bowl. (I know it’s hard, but try to resist the urge to eat all of them right now.)

P.S. If you don’t have an apple corer, it will take a little more time, but you can use a pairing knifeSimple, yet decadent – one creamy, luscious bite of these delectable grain-free and dairy free Chocolate Eclair Cupcakes is all it takes to fall in love! to remove a small portion of cake from the center of each cupcake. 

Simple, yet decadent – one creamy, luscious bite of these delectable grain-free and dairy free Chocolate Eclair Cupcakes is all it takes to fall in love!

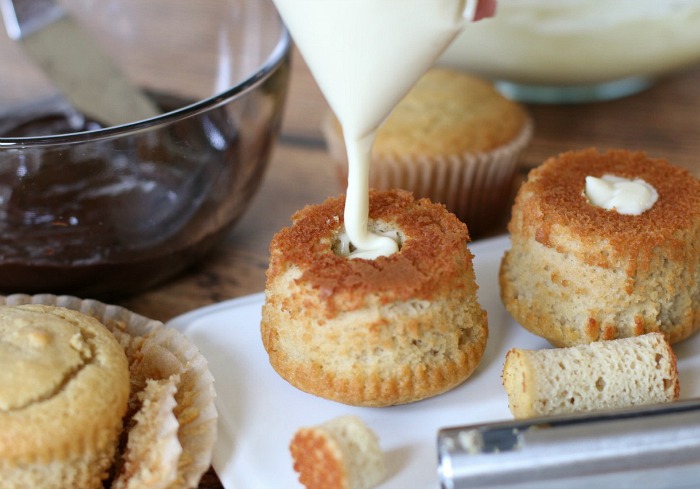
Step Two: Place the completely chilled pastry cream into a pastry bag, or use a plastic baggie with the tip cut off. Pipe the pastry cream into the center of each cupcake making sure to leave a little room to insert the bottom cake plug.

Once all of the cupcakes are filled, drizzle the remaining pastry cream over those leftover cake plug centers you’ve hopefully saved in a bowl. (Can you see where I’m going with this … you’re going to have a tasty little reward to enjoy, once you’re done filling and frosting these beauties!)

Simple, yet decadent – one creamy, luscious bite of these delectable grain-free and dairy free Chocolate Eclair Cupcakes is all it takes to fall in love!

Step Three: Place the bottom cake plugs into the bottom of each cupcake as shown above. Then, carefully turn each cupcake over, back to its upright position. Now we’re ready for frosting …

Simple, yet decadent – one creamy, luscious bite of these delectable grain-free and dairy free Chocolate Eclair Cupcakes is all it takes to fall in love!

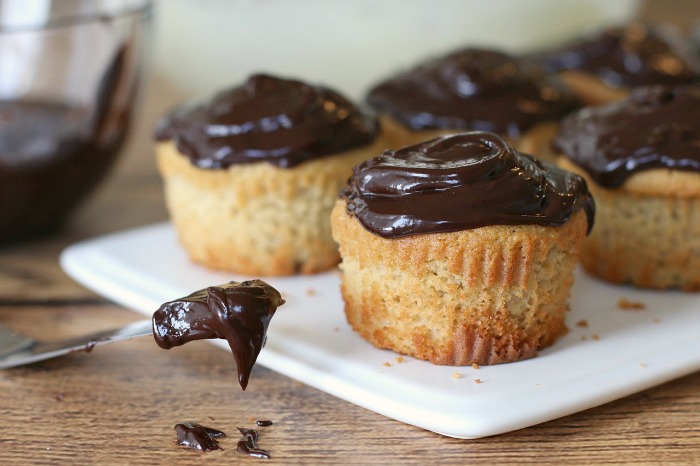
Step Four: Using the Chocolate Ganache Icing, frost the top of each cupcake using an offset spatula.

Add a spoonful or two of the leftover ganache to that little bowl of leftover cake plugs and pastry cream you’ve been saving. It’s time to reward yourself for all the love you’ve poured into creating these scrumptious cupcakes. Yum!

P.S. One of my favorite ways to use leftover ganache is to make chocolate-covered strawberries. Just dip fresh ripe strawberries into the ganache and place on a parchment-lined platter. Place in fridge to cool. Ganache will become firm when refrigerated. 

Simple, yet decadent – one creamy, luscious bite of these delectable grain-free and dairy free Chocolate Eclair Cupcakes is all it takes to fall in love!

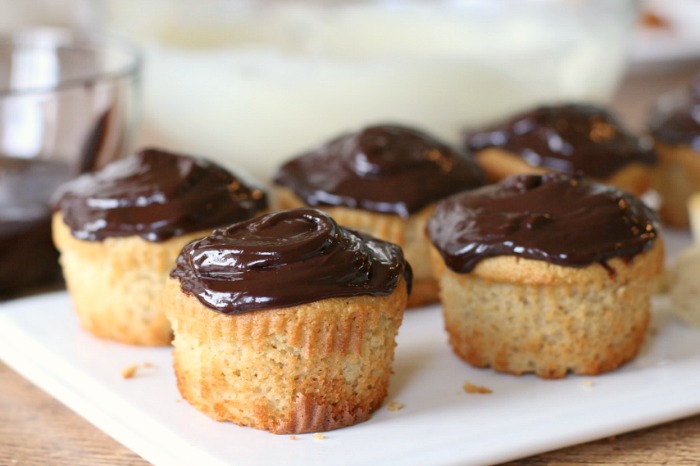
Ready to enjoy! These decadent cupcakes are the perfect treat for any holiday or celebration (or just because)! So be prepared for lots of “ooo’s” and “ahhh’s!” These scrumptious little chocolate-glazed, cream-filled cupcakes are always a huge hit!

Simple, yet decadent – one creamy, luscious bite of these delectable grain-free and dairy free Chocolate Eclair Cupcakes is all it takes to fall in love!

Print
Chocolate Eclair Cupcakes {Grain-Free, Dairy-Free Option}

Yield: 8 cupcakes

Ingredients

    For the pastry cream:
  • 1 cup pure coconut milk
  • 3/4 tsp unflavored gelatin, preferably grass-fed
  • 2 large egg yolks
  • 2 Tbsp honey (mild clover honey is best)
  • 1/2 tsp pure vanilla extract
  • For the cupcakes:
  • 1 3/4 cups blanched almond flour
  • 2 Tbsp coconut flour
  • 1/2 tsp baking soda
  • 1/4 tsp salt
  • 1/4 cup honey (mild clover honey is best)
  • 1 Tbsp butter, melted (if DF, use ghee or palm shortening)
  • 1/3 cup pure coconut milk
  • 1 Tbsp pure vanilla extract
  • 1 tsp apple cider vinegar
  • 2 large eggs, plus 1 egg white
  • For the frosting:
  • Make 1 batch of Chocolate Ganache Icing

Instructions

  1. For the Pastry Cream: (Can be made up to 3 days in advance.) In a small saucepan, add the coconut milk. Sprinkle the gelatin on the top of the milk. Allow the gelatin to bloom (soften) about 5 minutes.
  2. Meanwhile, in a small bowl, whisk together the egg yolks, honey, and vanilla. Set aside.
  3. Once gelatin has softened, place saucepan over medium heat. Whisk constantly until the milk and gelatin are well combined and milk is warm.
  4. Very slowly add 1/2 cup of the warm milk to the yolks, whisking constantly to combine. Slowly pour the yolk mixture into the saucepan and whisk thoroughly.
  5. While whisking, bring the mixture to a gentle simmer. Once simmering, continue to whisk for 2–3 minutes until slightly thickened. Then pour the custard through a fine mesh strainer into a shallow dish to cool.
  6. Once cool, cover and refrigerate for at least 10 hours, or up to 3 days. Once pastry cream is cold and set, transfer it to a pastry bag or plastic baggie to use for piping into the cupcakes.
  7. For the Cupcakes: (Best when baked fresh the day you'll be enjoying them.) Preheat oven to 325°F. Place 8 parchment paper liners into a 12-cup muffin tin; set aside.
  8. In a food processor, combine the almond flour, coconut flour, baking soda, and salt.
  9. Add all of the remaining ingredients except the eggs and egg white to the top of the dry ingredients in the order given.
  10. Cover and pulse a few times to combine. Then process on low until the batter is smooth and creamy (about 10 seconds).
  11. Use a thin spatula to scrape down sides, and add the eggs and egg white. Cover and pulse a few times to combine. Then process on low about 20 seconds to thoroughly blend the eggs into the batter. (Use spatula as needed to scrape down the sides.)
  12. Carefully spoon the cupcake batter into the lined muffin cups. Lightly tap the muffin tin on a kitchen towel on the counter to even out the tops.
  13. Bake 18–20 minutes until golden brown along edges and a toothpick inserted into center comes out clean. Allow cupcakes to cool in muffin tin about 5 minutes, then transfer to a wire rack to finish cooling.
  14. For the frosting: (Can be made in advance, see recipe for details.) While the cupcakes are baking, make the Chocolate Ganache Icing and leave at room temperature to cool completely.
  15. To fill and frost the cupcakes: Follow the photo tutorial in post above for simple step-by-step instructions on how to fill and frost these incredibly delicious treats! Enjoy!

Notes

See photo tutorial above for simple step-by-step instructions on how easy it is to fill and frost these delectable Chocolate Éclair Cupcakes. Enjoy!

3.1
https://thenourishinghome.com/2017/04/chocolate-eclair-cupcakes-gf-df/

You Might Also Like:

Easy Chocolate Ganache Icing (DF Option)
Banana Pudding Cake {grain-free, dairy-free}
3 Favorite Frostings!

Filed Under: Cakes/Cupcakes ·

Lemon Poppy Seed Muffins {GF, DF}

By Kelly · 12 Comments

Flecked with crunchy poppy seeds and bursting with sweet lemony goodness, these grain free and dairy free lemon poppy seed muffins are lemon-poppy perfection!

Bright fragrant lemons with their tangy citrusy flavor are like an edible ray of sunshine. They’re a delight to the senses and add an unmistakable fresh zip of flavor to almost any dish.

Classic lemon treats are one of life’s simple pleasures and are one of my favorite ways to enjoy fresh lemons. Lately, I’d been missing those big beautiful Lemon Poppy Seed Muffins that always make an appearance at brunches and afternoon teas. So I put on my apron and went to work!

Flecked with crunchy poppy seeds and bursting with sweet lemony goodness, these grain free and dairy free lemon poppy seed muffins are lemon-poppy perfection!

Ta-da! I’m excited to unveil The Ultimate Lemon Poppy Seed Muffin – that also just so happens to be gluten-free, grain-free and dairy-free. {I just love transforming familiar favorites into healthier fare that everyone can enjoy!}

Flecked with crunchy poppy seeds and bursting with sweet lemony goodness, these delightful muffins are lemon-poppy perfection! The muffin’s texture is so moist and tender, yet rich and satisfying, almost like pound cake.

The secret to achieving the perfect balance of bright lemon flavor with the subtle sweetness of pure honey is the addition of pure almond extractFlecked with crunchy poppy seeds and bursting with sweet lemony goodness, these grain free and dairy free lemon poppy seed muffins are lemon-poppy perfection!. I’m surprised that so few lemon poppy seed muffin recipes take advantage of this powerful all-natural flavoring agent.

Almond extract beautifully complements fresh lemon flavor, while subtly turning up the dial on the natural sweetness of almond flour. It’s a delicious combination that will make your taste buds dance with delight!

Flecked with crunchy poppy seeds and bursting with sweet lemony goodness, these grain free and dairy free lemon poppy seed muffins are lemon-poppy perfection!

So pour a cup of tea and enjoy this scrumptious treat baked with lemons and love! These delightful lemon poppy seed muffins are certain to brighten your day with every delicious bite!

Print
Lemon Poppy Seed Muffins {GF, DF}

Ingredients

  • 2 cups blanched almond flour
  • 1 1/2 tsp poppy seeds
  • 1/2 tsp baking soda
  • 1/4 tsp fine ground sea salt
  • 1 Tbsp (heaping) lemon zest
  • 3 Tbsp fresh-squeezed lemon juice
  • 3 Tbsp pure coconut milk
  • 1/4 cup honey (mild clover honey is best)
  • 1/2 tsp pure almond extract
  • 1 Tbsp coconut flour
  • 2 large eggs

Instructions

  1. Preheat oven to 315°F. (Not a typo, 315 allows muffins to cook through without burning the bottoms.) For Regular Muffins: Place 8 parchment paper liners in a 12-cup muffin tin. (For Jumbo Muffins: Place 4 jumbo parchment paper liners in a 6-cup jumbo muffin tin.) Set aside.
  2. In a small bowl, mix together the blanched almond flour, poppy seeds, baking soda and salt.
  3. Using a microplane grater, zest 2 medium lemons and then juice them. Measure 1 heaping tablespoon of lemon zest and 3 tablespoons of lemon juice. Add to a large mixing bowl.
  4. Next, add the coconut milk, honey, almond extract and coconut flour. Whisk thoroughly, until well blended. Then, whisk in the eggs until well combined.
  5. Add the dry mixture to the wet and gently whisk, just until combined. Using a spoon, evenly distribute the muffin batter into each of the lined muffin cups.
  6. For regular size muffins, bake 22-25 minutes, until edges are golden brown and a toothpick placed in the center comes out clean. (For jumbo muffins, bake 28-30 minutes.) Allow muffins to cool in the pan for 2-3 minutes, then transfer to a serving platter. Enjoy with your favorite cup of tea!
3.1
https://thenourishinghome.com/2017/04/lemon-poppy-seed-muffins/

Flecked with crunchy poppy seeds and bursting with sweet lemony goodness, these grain free and dairy free lemon poppy seed muffins are lemon-poppy perfection!

You Might Also Like:

Pumpkin Praline Coffee Cake
Cherry Chocolate Chip "KIND" Bars (GF)
How to Make Grain Free Granola {Step-by-Step}

Filed Under: Cakes/Cupcakes, Muffins/Breads/Biscuits, Sweet ·

Chocolate Ohs! Sandwich Cookies

By Kelly · 2 Comments

The sweet sandwich everyone loves!

Love chocolate sandwich cookies? Try this healthier real food version that everyone can enjoy guilt-free, whether they’re living gluten-free or not.

Feeling a bit nostalgic about those popular chocolate sandwich cookies that most of us grew up eating, I decided to create a healthier whole food version that everyone can enjoy guilt-free, whether they’re living gluten-free or not.

In fact, “Oh my goodness, these are amazing!” is a common exclamation you’ll hear when sharing these delightful little grain-free treats with family and friends. That’s why I’ve affectionately named them “Chocolate Ohs!”

Options are always a good thing, so there are lots of ways you can create tasty sandwich cookies using this simple recipe. For the holidays, I love making “Peppermint Pattie” Sandwich Cookies. I just add a few of drops of pure peppermint essential oil (or peppermint extract) to my Sweet Vanilla Icing for a festive minty-sandwich cookie everyone loves!

Love chocolate sandwich cookies? Try this healthier real food version that everyone can enjoy guilt-free, whether they’re living gluten-free or not.

These little cookies are also scrumptious with a creamy dollop of tasty Nut Butter Filling (see the recipe notes below). And for the chocoholics out there, you can go big with a heaping helping of my Chocolate Ganache sandwiched between two of these little cookies. Wowie! So good!

Love chocolate sandwich cookies? Try this healthier real food version that everyone can enjoy guilt-free, whether they’re living gluten-free or not.This delightful recipe is just one of more than 100 irresistible grain-free, dairy-free recipes in my new cookbook – Everyday Grain-Free Baking!

From breads, biscuits and muffins to savory snacks and decadent treats, you’ll find step-by-step instructions, beautiful color photographs and helpful tips & tidbits to make all of your GF baking adventures a delicious success!

Click here to get a SNEAK PEEK of the book!

Print
Chocolate Ohs Sandwich Cookies (grain-free, dairy-free option)

Yield: 1 dozen sandwich cookies

Ingredients

  • 1 1/2 cups blanched almond flour
  • 1/4 tsp baking soda
  • 1/8 tsp sea salt
  • 1/4 cup unsalted butter, softened (or palm shortening)
  • 2 Tbsp coconut oil, melted
  • 1/2 cup, plus 1 Tbsp coconut sugar
  • 1/4 cup unsweetened cocoa powder
  • 1 tsp pure vanilla extract
  • 1 large egg white

Instructions

  1. In a small bowl, combine the almond flour, baking soda, and salt.
  2. In a large mixing bowl, add the softened butter (or palm shortening), melted coconut oil, coconut sugar, cocoa powder and vanilla.
  3. Using a stand mixer or electric hand mixer, blend together until smooth and creamy. Then mix in the egg white until well incorporated.
  4. Add the dry ingredients to the wet and mix well to combine. Chill the dough for 30 minutes in the fridge.
  5. While the dough is chilling, preheat oven to 350°F. Line a baking sheet with parchment paper.
  6. Once the dough is chilled, scoop out 1 rounded tablespoon and roll it into a ball. Place each dough ball onto the parchment-lined baking sheet two-inches apart. Use the palm of your hand to slightly flatten each cookie into a circle.
  7. Bake for 8–10 minutes, until lightly browned along edges. Allow the cookies to cool on the cookie sheet for 5 minutes, then transfer to a wire rack to finish cooling.
  8. Once the cookies are completely cool, place filling of your choice (see ideas below) between 2 of the chocolate cookies to form a cookie sandwich. Enjoy!

Notes

To create Vanilla Cream-Filled Sandwich Cookies, use my dairy-free Sweet Vanilla Icing to fill the cookies. If you’d like to create Peppermint Pattie Cookies, simply add a few drops of pure peppermint essential oil (or peppermint extract) to the vanilla icing before filling the cookies. For a firmer cookie filling, place cookie sandwiches on a serving plate. Cover and place in fridge so the filling can further harden.

To create a scrumptious Nut Butter Filling, combine 1/3 cup of roasted nut butter of your choice with 1/4 cup honey and 2 tablespoons of coconut flour. Some nut butters contain more oil than others, so if the mixture doesn’t form a stiff dough, continue to add 1 teaspoon of coconut flour at a time until the mixture comes together like cookie dough. Then, pull off a little piece of the dough, roll into a ball and press it between 2 cookies to create a nut butter sandwich cookie. Yum!

3.1
https://thenourishinghome.com/2016/12/grain-free-chocolate-sandwich-cookies/

You Might Also Like:

Cinnamon-Walnut Buttons (GF)
Double Chocolate Banana Bars
Almost Oatmeal Cookies (Grain-Free, Egg-Free, Dairy-Free Option)

Filed Under: Cookies/Bars/Brownies ·

  • 1
  • 2
  • 3
  • …
  • 27
  • Next Page »

My New Cookbook is Here!

Welcome to The Nourishing Home!

I’m so glad you’re here and want you to feel right at home! My heart in creating this blog is to help you by sharing helpful meal planning strategies and nourishing GF recipes that are healthy, easy and delicious with thanksgiving to God! [Read More …]


All content (recipes, photos, posts, etc.) on this site is the creative property of Kelly Smith. You are welcome to share a photo via social media, as long as it contains a link back to the corresponding recipe or post from this site. However, you may not republish a recipe in its entirety in any form. For questions, or for permission to use a photo or recipe, please contact me via email at [email protected] Thank you!

Please Note: All content (recipes, photos, text, etc.) on this site is the creative property of Kelly Smith of The Nourishing Home. You are welcome to share a photo via social media, as long as it contains a link back to the corresponding recipe from this site. However, re-publishing a recipe in any form is strictly prohibited. Additionally, please refrain from adapting recipes without properly linking back to the original recipe, and keep in mind that simple substitutions do not constitute an adapted or original recipe. For details regarding recipe copyright law, please visit the Food Blog Alliance.
The Nourishing Home is a participant in the Amazon Services LLC Associates Program, an affiliate advertising program designed to provide a means for sites to earn advertising fees by advertising and linking to amazon.com.

Privacy Policy
DMCA.com

Copyright © 2021 · All Rights Reserved · The Nourishing Home · Artwork by Nancy Panaccione · Site Design by Deluxe Designs · Log in