The Nourishing Home

living healthier lives in service to the King!

  • Home
  • About
    • About TNH
    • Contact
  • Meal Planning
  • Health & Wellness
    • Real Food Basics
  • Whole30
  • GF Recipes
    • Whole30
    • Breakfast
    • Lunch
    • Entrées
    • Slow Cooker
    • Soups & Stews
    • Sides & Salads
    • Snacks
    • Desserts
    • Kids in the Kitchen
  • My Cookbook
  • Subscribe

Grain-Free Chocolate Cake with Fudge Icing

By Kelly · 49 Comments

Grain-Free Chocolate Cake from Live Simply

Special Guest Post by Kristin at Live Simply

I’ve been an avid reader and fan of The Nourishing Home since Kelly first began writing.  Kelly’s grace and practical wisdom for real food and healthy living are always an inspiration. I’m honored to stop by The Nourishing Home today, and share one of my favorite grain-free sweet treats.

[Note from Kelly (blushing): Such kind words from a dear friend! I couldn’t be more thrilled to have Kristin visiting with us! Her beautiful blog –Live Simply– is a true inspiration with her encouraging wisdom, passion for real food, healthy living and meal planning. And speaking of passion – her passion for chocolate is one I’m sure most of us share. So thank you, Kristin, for being too good to us in sharing this decadent treat! Just one bite of this rich chocolate cake and you’ll know what I mean!]

I have a number of passions in life. I believe learning a person’s passion(s) is often the best way to connect and understand what makes them “tick.” My faith in Jesus, my family, and a quest for simplicity are a few of my greatest passions.  Add a pinch of: backyard chickens, beets, and chocolate – and you get Kristin, a simple and passionate gal.

With Mother’s Day fast approaching, let’s talk about one of my passions, chocolate.

Four years ago, when our family made the switch to real food, I had an addiction to all things chocolate: candy bars, cake, pastries, and cookies, anything with the slightest hint of chocolate taste. All my favorite treats were highly processed and so they had to go.

A few months after purging our house of everything processed and feeling a bit discouraged, I discovered the beauty of real food. When applied with grace, this real food lifestyle can be incredibly liberating, inspiring, and out-of-this world delicious.  I soon realized real food was about more than just kale and spinach.  Real food also includes decadent chocolate in moderation. Hallelujah!

I happily stock a share of good quality chocolate in my real food pantry. My stockpile no longer consists of chocolate bars and processed cookies, but instead two simple ingredients: unsweetened cocoa and minimally processed chocolate chips.  With real chocolate ingredients, the possibilities for making homemade treats are endless.  A few of my favorites include: raw brownie bites and “the best ever” brownie.  Yummy real food treats our family enjoys creating together and sharing.

Grain Free Chocolate Cake CloseUp.jpg

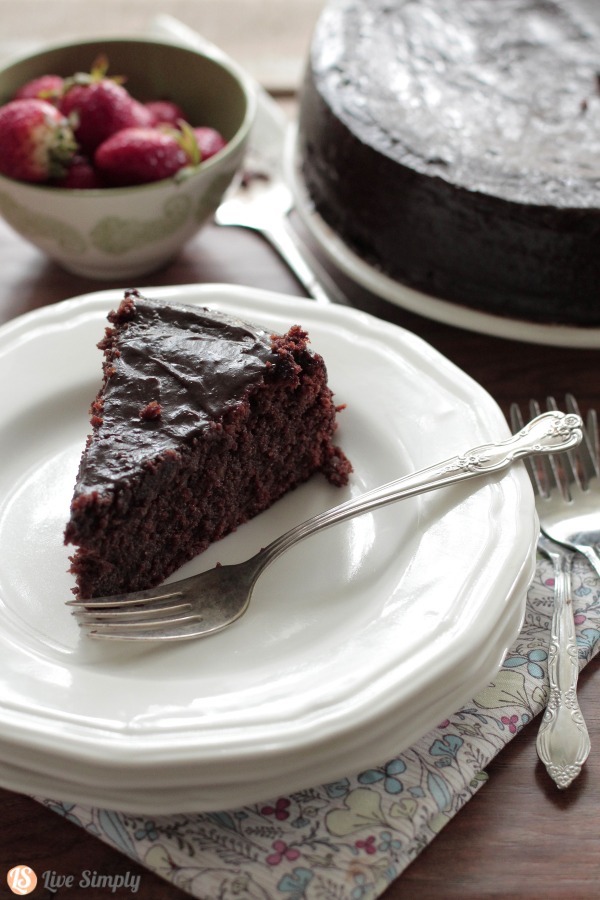
And so, with Mother’s Day almost here and my passion for chocolate, I created a decadent real food chocolate cake to share with you.  This cake is made with two of my favorite baking ingredients – blanched almond flour and coconut flour. These simple grain-free flours create perfectly moist muffins, bread, and cake. They also add nutritional benefits, such as protein and healthy fat.

This grain-free chocolate cake is delightfully sweetened with honey and melted semi-sweet chocolate chips. Topped with a simple homemade fudge icing, and if desired a scoop (or two) of homemade vanilla bean ice cream.  A rich chocolate dessert that says, “Mom, I love you,” in one little bite.

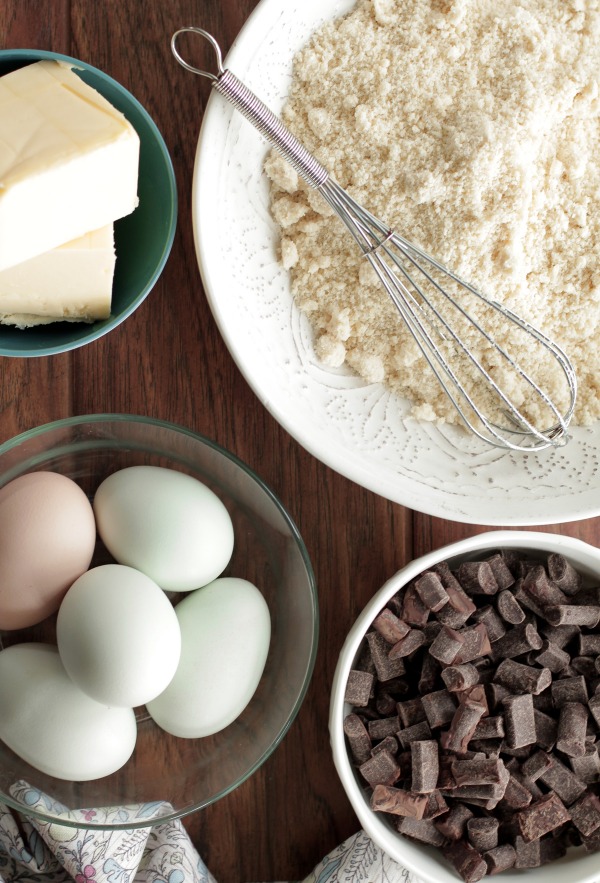
Passion can be incredibly delicious and rewarding, so let’s not delay another minute. Break out the bowls, whisk, butter, and chocolate – we have a cake to make, just in time for Mom’s big day.

Chocolate Cake Ingredients

Print
Grain-Free Chocolate Cake with Fudge Icing

Yield: One 9-inch Cake

Ingredients

    Grain-Free Chocolate Cake:
  • 1 cup allergy-friendly chocolate chips
  • 1 cup butter (or 1/2 cup palm shortening, plus 1/2 cup coconut oil)
  • 1 cup honey
  • 5 large eggs
  • 1 1/2 cups blanched almond flour
  • 1/2 cup coconut flour
  • 1/2 tsp baking soda
  • 1/4 tsp salt
  • 1 tsp vanilla extract
  • Fudge Icing:
  • 1/2 cup coconut cream (*see recipe note below)
  • 1/2 cup allergy-friendly chocolate chips
  • 1 tsp vanilla extract
  • 2 TB honey
  • 1 tsp arrowroot powder

Instructions

    For the Cake:
  1. Preheat the oven to 325F. Grease a 9-inch spring-form pan with a little coconut oil. Or lightly grease a 9x13-inch baking dish to make my special happy-happy ice cream cake.
  2. In a saucepan over low heat, melt the butter and chocolate chips. As the ingredients melt, stir frequently. Once melted, remove the pan from the heat and allow the mixture to slightly cool.
  3. While the chocolate cools, whisk together the almond and coconut flours, baking soda, and salt in a medium bowl. Set aside.
  4. In a stand-mixer fitted with a whisk attachment (this can also be done with lots of muscle, a bowl, and whisk, or an electric hand mixer), whisk together the honey and eggs for 1 minute on medium speed. Add in the vanilla, whisk for 1 minute.
  5. Add the flour to the honey mixture and whisk for 1 minute. Slowly add the melted chocolate, with the mixer on medium speed. Whisk for 2 minutes, until thoroughly combined.
  6. Pour the batter into the prepared 9-inch spring-form pan and bake for 55-60 minutes. (If using a 9x13-inch baking dish, bake the cake approximately 45-55 minutes, just until a toothpick inserted into the center comes out clean.)
  7. For the Icing:
  8. In a saucepan, melt the chocolate chips and coconut cream (*see recipe note below), stirring frequently.
  9. Bring the chocolate mixture to a simmer, and then add the honey. Simmer the ingredients together for 1 minute.
  10. Add the vanilla extract and arrowroot powder, whisk for a minute. The icing will begin to thicken. Remove from the heat and cool.
  11. Once the cake has cooled, remove from the spring-form pan. Spread the icing evenly over the cake. Enjoy!

Notes

* What is Coconut Cream? Coconut cream refers to the cream that rises and solidifies in a can of pure coconut milk. To obtain coconut cream, simply place a can of unsweetened pure coconut milk into the fridge for at least 10-12 hours. By chilling the can of coconut milk, the coconut cream will rise to the top of the can and become solid. You can then measure out 1/2 cup of coconut cream for this recipe. Reserve the remainder for another use.

3.1
https://thenourishinghome.com/2014/05/grain-free-chocolate-cake-fudge-icing/

Please be sure to visit Kristin at Live Simply and thank her for sharing this wonderful recipe with us! It truly is the BEST chocolate cake. EVER!

Grain Free Chocolate Cake Bite.jpg

meKristin is a stay-at-home mom of two children, Piper (4) and Londyn (2). She loves to share her real food tips, ideas, and recipes for feeding the entire family nourishing whole foods. She is passionate about encouraging moms on this journey of simple, natural living and traditional, real food. Kristin is a professional blogger and the creator of Live Simply.

You Might Also Like:

Chocolate Éclair Cupcakes {GF, DF Option}
Lemondrop Cupcakes with Creamy Lemon Frosting (GF)
Coconut Flour Chocolate Cake & Cupcakes (GF)

Filed Under: Cakes/Cupcakes ·

18 Frugal Dips for Outdoor Parties

By Kelly · 5 Comments

Frugal Dips

When it comes to bringing a dish to a pot-luck, I always get stuck on what to bring.  It’s important to me that we bring a healthy dish, since you never know what type of foods will be served at the party.  I’ve been to my fair share of gatherings where my dish was the only vegetable on the table!

Whatever we bring MUST be budget-friendly, since our budget isn’t very big to begin with.  Plus with warmer weather approaching, there’s bound to be more outdoor parties, and the cost of bringing pricey dishes to each party can add up quickly.

Food safety also concerns me, and I don’t want to assume the host has space in the fridge for my dish, so I prefer to bring something that can be served at room temperature.  No heating or cooling required, plus no chance of forgetting that my dish was in the freezer!

Finally, the dish should be something I can make using ingredients I already have in the house.  This way, I’m not tempted to make any last minute trips to the store for convenience-type foods.  This seems to be what usually happens when we get a last-minute invite to an impromptu BBQ party, but those foods are over-priced and full of additives and preservatives making them far from healthy!

This short list seems like a tall order, which is why I struggled for a really long time to come up with a solution!  Then one day it hit me:  Bring a healthy and delicious frugal dip! 

Everyone loves a delicious dip, and they’re the one sure-fire way you can ensure fruits and vegetables will get eaten, especially when it comes to kids.  Even if there is a HUGE mound of dip on a carrot, they’re still eating a carrot!

The best part about dips is that you can create one using the ingredients you already have in your kitchen.  This goes for both the dip AND the dippers!

Here’s a simple process for creating your next perfect pot-luck or outdoor party dish:

  1. Start by taking stock of what you have in the kitchen to serve with your dip.  Lots of carrots?  Plenty of apples?  A little bit of several items?  Got a few minutes to make some crackers?
  2. Then browse the appropriate dip category to match-up a recipe with your dippers.  Browse the ingredients of the recipe to ensure you have everything needed.
  3. Substitute ingredients as needed using the “money saving ideas” at the end of this post.

Use this method the next time you’re invited to a party, and save time and money without sacrificing nutrition!

Favorite Frugal Dips for Outdoor Parties

Apple-Dip

Fruit Dips

Great fruits for dipping:  Apple slices, banana chunks, blueberries, cantaloupe, peeled clementines, grapes, honeydew, kiwi, mango, peaches, pears, pineapple or strawberries.  Fruits that are prone to browning (i.e. apples, bananas, pears, etc.) can be tossed with lemon juice to maintain their pretty appearance.

  • Caramel Apple Dip
  • Chocolate Dip
  • Cream Cheese Fruit Dip
  • Honey-Lime Yogurt Dip

Veggie Dips

Great veggies for dipping:  Asparagus, broccoli, bean pods, bell pepper, carrots, cauliflower, celery, cucumber, radish, tomatoes and zucchini.

  • Avocado Dip
  • Creamy DF Basil Dip
  • Traditional Hummus
  • Creamy Mustard Sauce
  • Super Green Guacamole
  • Homemade Ranch Dressing
  • Confetti Veggie Spread

veggie-dip_600

Homemade Crackers

Here are a few gluten-free/grain-free cracker options that are delicious with any of the above dips!

  • Cheese & Chia Crackers (gluten-free)
  • Multi-seed Crackers (grain-free)
  • Rosemary & Raisin Crackers (grain-free)
  • Simple Herb Crackers (grain-free)
  • Baked Cumin Tortilla Chips  (gluten-free)
  • Homemade Graham Crackers (grain-free)

Additional Money Saving Tips for Dips

Beans:  If you have time, make beans from scratch instead of buying canned beans.  Your savings is 70¢ per can.  If you don’t have garbanzo beans on hand, use white beans instead.  The taste will be only slightly different, yet it will still be healthy and delicious!

Citrus:  Bottled citrus juice (lemon or lime) is a fine substitute for fresh citrus juice if you don’t have the fruit.  The opposite switch works too if you have the fruit, but not the juice.  If you need lemon juice, but only have lime, make the switch!  The slight flavor difference is hardly noticeable in most dishes.

Cream:  Heavy cream can often be substituted with half & half in a 1:1 ratio.  If the dip is thick, cut back on another liquid to maintain consistency.  If you don’t have half & half, try thinning 1/4 cup sour cream with 1-2 Tbsp milk.

Garlic:  Fresh garlic is interchangeable for powdered garlic, and the opposite is true as well. Substitute 1 tsp of garlic powder for 1 garlic clove, minced or crushed.

Mayonnaise:  Sour cream, Greek yogurt and mayonnaise are often interchangeable in recipes.  Use what you have on-hand and add a bit of lemon juice, if the dip needs more tang.

Mustard:  All mustards can be used interchangeably:  brown, yellow, deli, honey or spicy.  The recipe will change slightly in flavor, but you’ll still get that signature mustard tang.

Oils:  If you don’t have an oil but have the seed (ex: you have sesame seeds but no tahini, or flax seeds but no flax seed oil), add 1 Tbsp of the seed to the recipe with 1/2 tsp olive oil and blend as usual.  Another option is to substitute olive oil for the oil called for in the recipe.

Finally, don’t feel pressured to bring a certain amount of any one particular vegetable, or even the typical dipping veggie.  Often, having a mixed/matched variety is the most appealing!

What’s your favorite dip to bring to parties?  Do you prefer a sweet dessert dip with fruit, or a savory dip with veggies?  Share your ideas in the comments below.

Note from Kelly: Don’t miss all of the other great budgeting posts that Tiffany has shared here. Simply click here and keep scrolling through to see her many helpful posts on how to save money on your food budget.

You Might Also Like:

Fruit and Raw Cheese Kabobs (GF)
Healthy Snacking for Kids of All Ages!
It’s a wrap! Sweet & savory roll-ups your whole family will enjoy! (GF Option)

Filed Under: Dips/Dressings, Savory, Snacks, Sweet ·

Mango Chicken Lettuce Wraps from “Happy Mom, Healthy Family Cookbook”

By Kelly · 2 Comments

Mango Chicken Wrap from Happy Mom, Healthy Family

Finding simple healthy meals that the whole family can enjoy makes it so much easier for moms to get a nourishing meal on the table without a lot of time or stress. That’s why, I so appreciate Lisa Byrne’s fabulous “Happy Mom, Healthy Family Cookbook.” (aff.link)

I can see why she calls it the happy mom cookbook, as it contains 80+ easy nutritious recipes, plus a free online meal planning course. Wow! Thankfully, Lisa was more than gracious to allow me to share one of the delicious recipes from her wonderful eBook – these Mango Chicken Lettuce Wraps (see recipe below).

Mango Chicken Wrap Close Up

These simple wraps are not only delicious, but they’re also a great way to repurpose leftover roasted chicken meat for a super quick and easy meal.

And for those macho-men in your home, you can easily substitute the lettuce wrap for a more filling (and manly, so I’m told) GF tortilla. Either way, this recipe’s a keeper!

Print
Mango Chicken Lettuce Wraps(GF)

Yield: 4 servings

Reprinted with permission from the “Happy Mom, Healthy Family Cookbook”

Ingredients

  • 2 cups precooked, shredded roasted chicken
  • 1 large ripe mango, cut into 1/2” chunks
  • 1/3 cup carrots cut into matchsticks
  • 1/3 cup red pepper, thinly sliced
  • 1/4 cup green onions, sliced
  • 2 tbsp fresh-squeezed lime juice (1 large lime)
  • 2 tbsp olive oil
  • 1/2 tsp Dijon mustard
  • 1/2 tsp honey (omit for Whole30)
  • Sea salt & pepper to taste
  • Bibb or romaine lettuce leaves (or GF tortillas, if preferred)
  • Optional: 1/4 cup cashews, chopped

Instructions

  1. Clean and pat dry the lettuce leaves. (You'll need 2-3 large leaves per person.)
  2. Place the chicken, mangos, carrot sticks, red pepper and green onions in a large mixing bowl. Stir together to combine.
  3. In a separate bowl, whisk together the lime juice, olive oil, mustard and honey, if using.
  4. Add the olive oil mixture to the chicken mixture and stir until well combined. (Taste and add salt and pepper, if desired.)
  5. To assemble the wraps, add a couple of heaping spoonfuls of the chicken mixture to each lettuce leaf, or to each tortilla. Top with a sprinkling of cashews, if desired. Serve with a side of herbed cauliflower rice. Enjoy!

Notes

I like to make double the vinaigrette, so I can serve some on the side for my family to drizzle on the top of the wraps/tortillas as well. Yum!

3.1
https://thenourishinghome.com/2014/04/mango-chicken-lettuce-wraps-happy-mom-healthy-family-cookbook/

You Might Also Like:

How to Plan Healthy Lunches Kids LOVE!
It’s a wrap! Sweet & savory roll-ups your whole family will enjoy! (GF Option)
Healthy Homemade "Lunchables"

Filed Under: Lunch ·

  • « Previous Page
  • 1
  • …
  • 50
  • 51
  • 52
  • 53
  • 54
  • …
  • 182
  • Next Page »

My New Cookbook is Here!

Welcome to The Nourishing Home!

I’m so glad you’re here and want you to feel right at home! My heart in creating this blog is to help you by sharing helpful meal planning strategies and nourishing GF recipes that are healthy, easy and delicious with thanksgiving to God! [Read More …]


All content (recipes, photos, posts, etc.) on this site is the creative property of Kelly Smith. You are welcome to share a photo via social media, as long as it contains a link back to the corresponding recipe or post from this site. However, you may not republish a recipe in its entirety in any form. For questions, or for permission to use a photo or recipe, please contact me via email at [email protected]. Thank you!

Please Note: All content (recipes, photos, text, etc.) on this site is the creative property of Kelly Smith of The Nourishing Home. You are welcome to share a photo via social media, as long as it contains a link back to the corresponding recipe from this site. However, re-publishing a recipe in any form is strictly prohibited. Additionally, please refrain from adapting recipes without properly linking back to the original recipe, and keep in mind that simple substitutions do not constitute an adapted or original recipe. For details regarding recipe copyright law, please visit the Food Blog Alliance.
The Nourishing Home is a participant in the Amazon Services LLC Associates Program, an affiliate advertising program designed to provide a means for sites to earn advertising fees by advertising and linking to amazon.com.

Privacy Policy
DMCA.com

Copyright © 2026 · All Rights Reserved · The Nourishing Home · Artwork by Nancy Panaccione · Site Design by Deluxe Designs · Log in