The Nourishing Home

living healthier lives in service to the King!

  • Home
  • About
    • About TNH
    • Contact
  • Meal Planning
  • Health & Wellness
    • Real Food Basics
  • Whole30
  • GF Recipes
    • Whole30
    • Breakfast
    • Lunch
    • Entrées
    • Slow Cooker
    • Soups & Stews
    • Sides & Salads
    • Snacks
    • Desserts
    • Kids in the Kitchen
  • My Cookbook
  • Subscribe

Sautéed Greens with Bacon {Whole30}

By Kelly · 4 Comments

When it comes to getting more greens on your plate, the best bet is to make sauteed greens more appetizing than to add a little bacon to the mix!

Green is such a beautiful color! But often when it comes to healthy eating, instead of it signaling us to GO, GO, GO and gobble up these nutrient-dense delights, for many kids (and adults), it’s more like a red flag that stops them in their tracks.

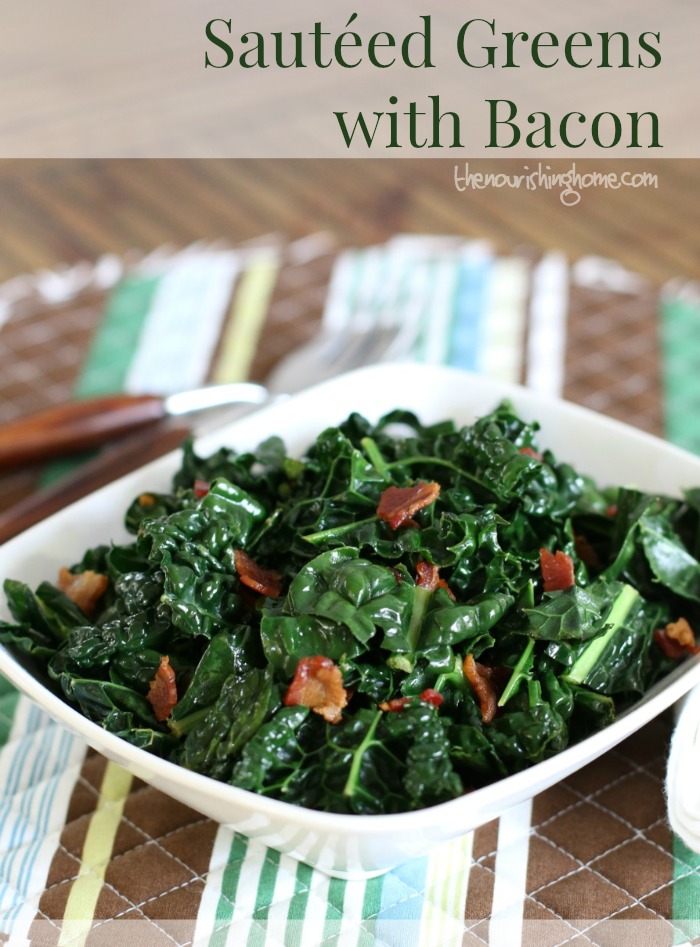
So how can we encourage picky eaters to give greens a chance? The best bet is to prepare them in the most delicious ways possible. And frankly, I can’t think of a better way to make greens more appetizing than to add a little bacon to the mix. Our grandmas know best! Especially if you grew up in the South, you know that bacon or ham is a must-have addition when cooking-up greens – and for good reason, it results in remarkable flavor that’s hard to resist!

When it comes to getting more greens on your plate, the best bet is to make sauteed greens more appetizing than to add a little bacon to the mix!

Of course, there will still be those that turn up their nose, but that just means more for those of us who appreciate a healthy-dose of green goodness. And, there’s always the option of sneaking in some greens by using the leftovers in soups, quiches, or even in pasta sauces (see recipe notes below).

Personally, I’ve found that continually encouraging healthy eating by providing lots of delicious opportunities to partake in its goodness, eventually leads picky eaters to expand their culinary horizons slowly, but surely!

When it comes to getting more greens on your plate, the best bet is to make sauteed greens more appetizing than to add a little bacon to the mix!

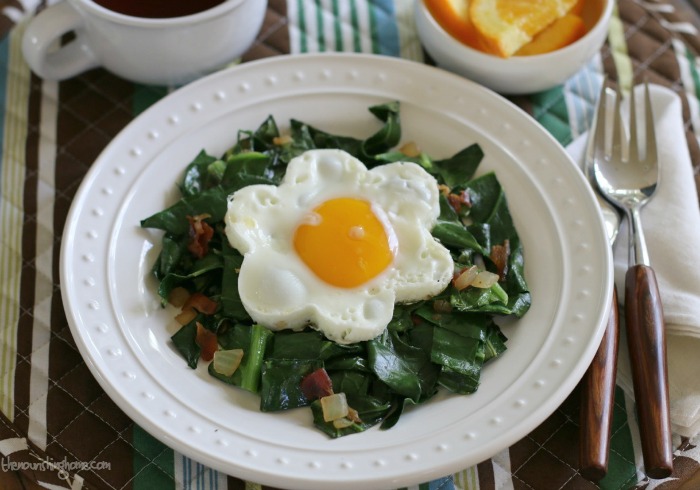
Plus … a quick and easy breakfast!
Leftover sautéed also make a nutritious way to start the day! They’re especially delicious paired with a pastured egg or two. Want to make someone special smile? Use a cute cookie cutter to create “sunshine on a plate.” Simply crack an egg in a small prep bowl. Then, butter a cookie cutter and a preheated skillet. Place the cookie cutter on a preheated and well-buttered skillet so it lays completely flat. Gently pour in the egg and allow it to cook until set. Yummy and FUN!

Print
Sautéed Greens with Bacon

6 servings

Ingredients

  • 2 large bunches of mild-flavor greens (such as Swiss chard or kale)
  • 4 slices of uncured bacon, cut into 1/2-inch pieces
  • 1/3 cup fine diced sweet onion
  • 2 cloves garlic, minced
  • 1/4 cup homemade bone broth
  • Sea salt and pepper to taste

Instructions

  1. In a large stock pot, cook bacon over medium-high heat, stirring occasionally, until crisp. Then transfer with a slotted spoon to paper towels to drain.
  2. Reduce heat to medium, add the onion and cook until softened (about 2-3 minutes). Then add the garlic and cook until fragrant (about 30 seconds).
  3. Next, add the greens, cooking while turning with tongs, until wilted and bright green (about 2-3 minutes).
  4. Then, add the bone broth and continue to turn the greens with tongs, just until greens are tender (about 3-5 minutes).
  5. Toss with bacon and season to taste with salt and pepper. Yum!

Notes

Leftover greens are great for adding to egg scrambles, quiches, soups and it also makes a delicious topping for a tasty grain-free pizza! Yum!

3.1
https://thenourishinghome.com/2016/09/sauteed-greens-bacon/

You Might Also Like:

One-Skillet Savory Chicken & Veggies {Whole30}
Summer Veggies Brown Rice Risotto (Gluten-Free)
How to Make Simple Seasoned Cauliflower Rice

Filed Under: Sides, Whole30 ·

Banana Pudding Cake {grain-free, dairy-free}

By Kelly · 16 Comments

When life goes bananas, make Banana Pudding Cake! So creamy, dreamy and full of lightly sweet banana goodness, it's certain to make your family smile! Bonus that it's grain free and dairy free!

“When life goes bananas, make banana pudding cake!” Of course, I know that’s not how the old expression goes, but it fits. So I’m going with it!

As many of you dear friends know, this summer has been more than just a little bananas around here! (That’s why I had to take an unexpected sabbatical from blogging this summer.) Yet, despite chaotic circumstances, the Lord is faithful and good in filling us with grace, peace and joy when we keep our eyes fixed on Him.

I’m rejoicing in all He’s doing to heal my heart and sustain my health through this trial. And I’m especially rejoicing to get back to serving Him, my family, church and precious friends like you!

And that’s where this scrumptious Banana Pudding Cake comes in – so creamy, dreamy and full of lightly sweet banana goodness, it’s certain to make your family smile!

When life goes bananas, make Banana Pudding Cake! So creamy, dreamy and full of lightly sweet banana goodness, it's certain to make your family smile! Bonus that it's grain free and dairy free!

Of course, I’m not one to suggest that anyone should indulge in sweets to lift their spirits, but I think we can all agree that sometimes, a tasty treat helps us to remember to appreciate life’s simple pleasures. It’s especially uplifting when we share a special treat with family and friends! In this case, going bananas couldn’t be more enjoyable!

How to Make Banana Pudding Cake

Step One: Bake a loaf of my yummy grain-free banana bread. Allow it to cool completely, then wrap it and transfer it to the fridge to chill.

Step Two: Follow the recipe below to make my delectable dairy-free banana pudding (which is from my Banana Cream Tart recipe in my cookbook). Then, place the pudding in the fridge to set. Once it’s cold and set, you’re ready to have fun putting this simply delicious banana pudding cake together.

When life goes bananas, make Banana Pudding Cake! So creamy, dreamy and full of lightly sweet banana goodness, it's certain to make your family smile! Bonus that it's grain free and dairy free!

Step Three: Remove the chilled banana bread from the fridge. Slice the bread into 12 slices. Arrange the slices evenly along the bottom of a 9×9-inch baking dish. (As shown above, you may need to cut the slices into smaller pieces in order to cover the bottom of the dish.)

Next, cut the bananas into thick slices and layer them evenly across the top of the banana bread. This ensures there’s a delicious creamy banana in every scrumptious bite!

When life goes bananas, make Banana Pudding Cake! So creamy, dreamy and full of lightly sweet banana goodness, it's certain to make your family smile! Bonus that it's grain free and dairy free!

Step Four: Now you’re ready for the grand finale! Spoon the creamy banana pudding over the banana slices and use a spatula to even out the top. (If you have any extra pudding leftover, go ahead and enjoy it all by yourself. I won’t tell!)

Refrigerate the cake for one hour, then slice and enjoy! Mmm! So delicious! You’re family and friends are certain to go bananas over this simply delectable dessert!

When life goes bananas, make Banana Pudding Cake! So creamy, dreamy and full of lightly sweet banana goodness, it's certain to make your family smile! Bonus that it's grain free and dairy free!

Print
Banana Pudding Cake {grain-free, dairy-free}

Yield: 9-12 servings

Ingredients

  • 1 loaf GF banana bread (try my Ultimate Banana Bread recipe)
  • 3 large bananas, divided
  • 2 (13.5 oz) cans pure coconut milk
  • 2 1/2 tsp unflavored gelatin (preferably grassfed gelatin)
  • 6 large egg yolks
  • 1/3 cup, plus 1 Tbsp honey (I prefer mild flavor honey, such as clover or sage)
  • 2 tsp vanilla extract

Instructions

  1. Bake one loaf of banana bread. Allow the bread to cool completely on the stovetop. Then, remove the bread from the loaf pan and wrap it. Transfer to the fridge until ready to use to make the cake.
  2. Next, mash one banana to baby food consistency and measure out a 1/2 cup. Set aside.
  3. In a medium saucepan, add the coconut milk. Sprinkle the gelatin on the top of the milk. Allow the gelatin to bloom (soften) about 5–10 minutes.
  4. Meanwhile, in a medium bowl, whisk together the egg yolks, honey and vanilla. Set aside.
  5. Once the gelatin has softened, place the saucepan over medium heat. Add the 1/2 cup of mashed banana and whisk constantly until the milk is warmed.
  6. Very slowly add 1/2 cup of the warm milk to the yolks, whisking constantly to combine. Slowly pour the yolk mixture into the saucepan and whisk thoroughly.
  7. Bring the custard mixture to a gentle simmer while whisking. Then continue to whisk for 3-5 minutes until custard begins to thicken. Once thickened, turn off the heat and pour the custard through a fine mesh strainer into a large glass bowl to cool.
  8. Once the custard is cooled, cover and refrigerate for at least 8 hours, preferably overnight.
  9. When it's cold and set, whisk gently to loosen, so it’s thick and creamy like pudding. Set aside.
  10. Remove the chilled banana bread from the fridge. Slice the bread into 12 slices. Arrange the slices evenly along the bottom of a 9x9-inch baking dish as shown in the photos above. (You may need to cut the slices into smaller pieces in order to cover the bottom of the dish.)
  11. Next, cut the bananas into thick slices and layer the slices evenly across the top of the banana bread as shown in the photos above.
  12. Then, spoon the pudding over the bananas and use an offset spatula to even out the top. Refrigerate the pudding cake for one hour, then slice and enjoy! Mmm! So delicious!

Notes

To ensure your pudding sets properly, be sure to use pure (canned) coconut milk. Or if you are not dairy-free, you may substitute with whole milk. In addition, the pudding will separate over time, so it's best to enjoy this scrumptious dessert within 24 hours of making it. Enjoy!

3.1
https://thenourishinghome.com/2016/08/grain-free-banana-pudding-cake/

You Might Also Like:

Pumpkin Praline Coffee Cake
Cinnamon Crumb Coffee Cake from Everyday Grain-Free Baking
Cranberry-Orange Christmas Cake (GF, DF)

Filed Under: Cakes/Cupcakes ·

Celebrate July 4th with an Easy & Healthy Patriotic BBQ Menu

By Kelly · Leave a Comment

berry-cheese-flag

July 4th Weekend is the perfect time to fire-up the grill and enjoy some fun in the sun over a delicious, healthy meal with family and friends.

Whether you’ll be enjoying the holiday with a cookout at the beach, picnic in the park, or a simple gathering at home, this easy holiday menu will help you spend more time with your family and friends, and less time in the kitchen! That’s because you can make many of these recipes in advance. That way, you can quickly pull it all together for a stress-free, delicious holiday meal!

And let’s not forget to take time to celebrate the real reason for this holiday – a time to be thankful for our country, pray for our soldiers, fly the flag, and remember those who’ve given their lives for the freedoms we enjoy! Happy July 4th!

Easy & Festive Memorial Day BBQ Menu

Patriotic Appetizers

berry-cheese-flag

Red, White & Blue Berries & Cheese Tray
(Simply cut fresh organic strawberries and grass-fed cheese into cubes. If you’re dairy-free, substitute the cheese with pineapple or banana chunks. Then arrange with fresh organic blueberries and raspberries, as shown above.)

Watermelon Salsa Plantain Chips

Watermelon Salsa
(A party is simply not a party without a terrific chip and dip. I promise, this sweet and spicy watermelon salsa rocks! If you’re grain-free and wondering what to dip? Try plantain chips. Seriously, they are amazing!)

Memorable Main Dish

Watermelon Salsa plated CU

Grilled Shrimp & Veggie Kebobs
(These flavorful kebobs can easily be made ahead and kept in fridge 1-2 days in advance, then pop on the grill when ready to serve.)

Sensational Sides

Grain-Free Chile Cheese Cornbread close up

Chile-Cheese Grain-Free “Corn”bread Muffins
(These tasty muffins can be baked the morning of your party for a delicious side dish that compliments your favorite BBQ dishes!)

Cultured Potato Salad
(This probiotic-rich potato salad actually tastes better when you make it ahead of time, and allow the flavors to meld in the fridge for 12-24 hours.)

Festive & Fun Dessert

Flag cupcakes

“Old Glory” Mini Cupcakes
(The perfect finale to your patriotic holiday celebration! These festive mini-cupcakes can be made up to two days in advance. Then top with fresh fruit about an hour or so before serving.)

You Might Also Like:

A Day in the Life of a Homeschooler: Real Food Edition
Banana Nut Bread
The Best Soaked Granola (Gluten-Free Option)

Filed Under: Uncategorized ·

  • « Previous Page
  • 1
  • …
  • 14
  • 15
  • 16
  • 17
  • 18
  • …
  • 182
  • Next Page »

My New Cookbook is Here!

Welcome to The Nourishing Home!

I’m so glad you’re here and want you to feel right at home! My heart in creating this blog is to help you by sharing helpful meal planning strategies and nourishing GF recipes that are healthy, easy and delicious with thanksgiving to God! [Read More …]


All content (recipes, photos, posts, etc.) on this site is the creative property of Kelly Smith. You are welcome to share a photo via social media, as long as it contains a link back to the corresponding recipe or post from this site. However, you may not republish a recipe in its entirety in any form. For questions, or for permission to use a photo or recipe, please contact me via email at [email protected]. Thank you!

Please Note: All content (recipes, photos, text, etc.) on this site is the creative property of Kelly Smith of The Nourishing Home. You are welcome to share a photo via social media, as long as it contains a link back to the corresponding recipe from this site. However, re-publishing a recipe in any form is strictly prohibited. Additionally, please refrain from adapting recipes without properly linking back to the original recipe, and keep in mind that simple substitutions do not constitute an adapted or original recipe. For details regarding recipe copyright law, please visit the Food Blog Alliance.
The Nourishing Home is a participant in the Amazon Services LLC Associates Program, an affiliate advertising program designed to provide a means for sites to earn advertising fees by advertising and linking to amazon.com.

Privacy Policy
DMCA.com

Copyright © 2026 · All Rights Reserved · The Nourishing Home · Artwork by Nancy Panaccione · Site Design by Deluxe Designs · Log in