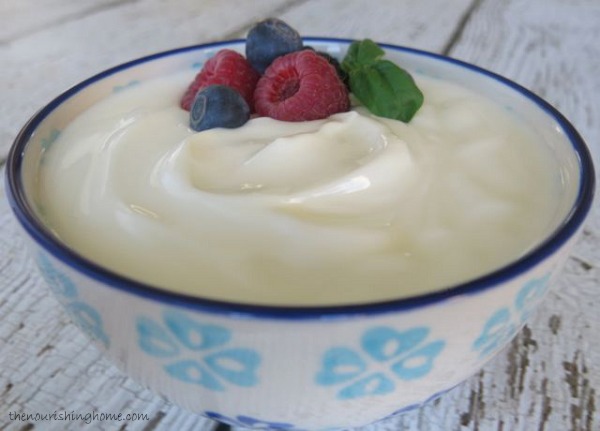
Thick.creamy.delicious! Three words that definitely describe Greek Yogurt, which is why so many of us are huge fans of this custard-like probiotic treat.
Yet, each time I attempted to make it, I found myself frustrated by the straining process required to achieve its classic thick texture. My frugal tendencies cringed at how much yogurt was wasted in the straining process, and my neat-nick alarms were blaring over the mess of cleaning out the yogurt-laden strainer.
Of course, I don’t want my issues to rain on anyone’s Greek yogurt making parade, so if you love straining yogurt, then don’t let me stop you.
But as for me and my yogurt-devouring family, there just had to be an easier way to achieve a thick, creamy yogurt without all the extra effort and fuss.
Thankfully, my dreams came true as I found out from a few real foodie friends THE SECRET … you can indeed bypass the pain of the strain, thanks to handy dandy plain gelatin.
Basic Dairy and Non-Dairy Recipes for Making Greek-Style Yogurt
Since this is intended to be a visual step-by-step tutorial, the two recipes below (for dairy and non-dairy Greek-Style Yogurt No Straining Required) provide the list of ingredients and some important instructions, but please do be sure to follow the photo tutorial below for easy step-by-step instructions.
Ingredients
- 1 quart (4 cups) *pasteurized organic whole milk
- 1 1/2 teaspoons unflavored gelatin
- 1/4 cup plain organic Greek yogurt (or 1 yogurt starter packet)
Instructions
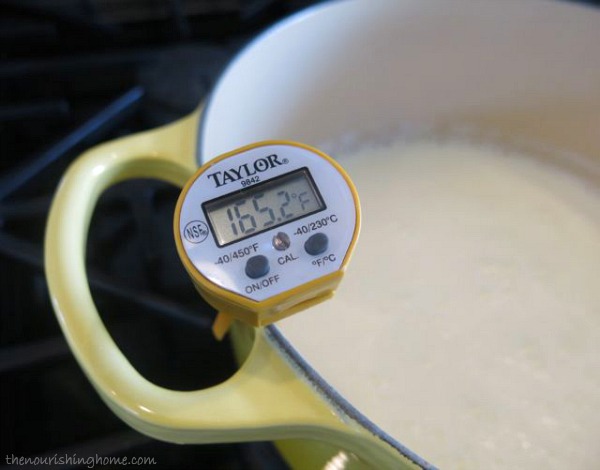
- Heat the milk over medium to medium-high heat until it reaches 165 degrees, making sure to stir the milk constantly. Do not allow the milk to come to a boil.
- Once the milk comes to temp, turn off the burner and place the pan on a cooler area on the stovetop. Allow milk to cool to 110 degrees. (Or you can use a cold water bath method to more quickly cool the milk – see the photo tutorial for details.)
- When milk reaches 110 degrees, thoroughly whisk in the gelatin for about one minute.
- Then add the yogurt starter and continue to whisk until thoroughly combined, about one minute.
- Place the yogurt mixture into a yogurt maker, or use another reliable incubation method as outlined in the photo tutorial.
- Allow yogurt to culture for 8-12 hours, depending on taste preference. The longer you culture, the more tangy the taste. (If making SCD yogurt be sure to culture for 24 hours.) Then give it a good whisking to re-blend, and transfer it to the refrigerator to cool completely. Once chilled, you can transfer the yogurt to individual serving containers, if desired.
- Or use your homemade yogurt to make delicious Fruit & Yogurt Parfaits, Yogurt Banana Splits, Fruit-on-the-Bottom Yogurt Cups and Homemade Flavored Yogurt.
Notes
* Be sure to use pasteurized milk only for this recipe. Yogurt experts do not recommend using ultra-pasteurized milk to make yogurt. UHT milk is actually cooked at high temps making it unsuitable for culturing.
Also note: I do not recommend using this recipe to make raw milk yogurt, as it requires a different heating process. See Cultures for Health for details.
P.S. It's normal to see small gelatinous clumps of yellow liquid when using gelatin to thicken yogurt. It is the whey that has separated from the milk solids. Simply use a whisk to gently blend it back into the yogurt.
Ingredients
- Two 13.5 oz cans pure coconut milk
- 1 1/2 teaspoons unflavored gelatin
- 1 packet of non-dairy yogurt starter or 1 good quality probiotic capsule
Instructions
- Heat the coconut milk over medium to medium-high heat until it reaches 115 degrees, making sure to stir the milk constantly. Do not allow the milk to come to a boil.
- Once the coconut milk comes to temp, turn off the burner and move the saucepan to a cooler area on the stovetop.
- Allow milk to cool to 110 degrees. (This won't take long, since it's such a small temperature difference.) When milk reaches 110 degrees, thoroughly whisk in the gelatin for about one minute. And then add the non-dairy yogurt starter and continue to whisk until thoroughly combined, about one minute.
- Place the yogurt mixture into a yogurt maker, or use another reliable incubation method as outlined in the photo tutorial.
- Allow yogurt to culture for 10-18 hours. The longer you culture, the more tangy the taste.
- Then give it a good whisking to re-blend, and transfer it to the refrigerator to cool completely.
- Once chilled, thoroughly whisk the yogurt again to blend it together, since separation commonly occurs. Cover and store in fridge. Or transfer the yogurt to individual serving containers, if desired.
- Use your homemade coconut milk yogurt to make delicious Fruit & Yogurt Parfaits, Yogurt Banana Splits, Fruit-on-the-Bottom Yogurt Cups and Homemade Flavored Yogurt.
Notes
Almond Milk Yogurt: Several have asked if this recipe will work with almond milk substituted for the coconut milk. You can substitute with almond milk, but do note that the yogurt will be quite runny without an added starch, such as arrowroot powder or tapioca starch. For details on making almond milk yogurt, I recommend checking out Lexie's Kitchen.
Photo Tutorial:
How to Make Greek-Style Yogurt in 5 Easy Steps!
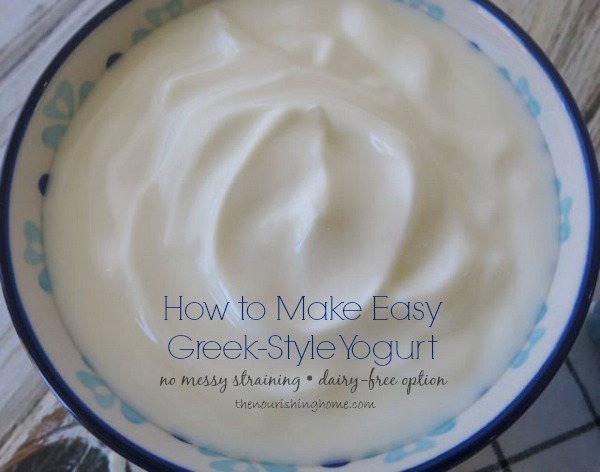
Making Greek -Style Yogurt is not only easy, it’s also a great way to save money and avoid the unhealthy additives found in many commercial brands. And if you’re not a fan of straining either, just follow these simple steps below, and you’ll soon be enjoying your own healthy homemade thick-n-creamy Greek-Style Yogurt! Yum!
Here’s What You’ll Need to Get Started!
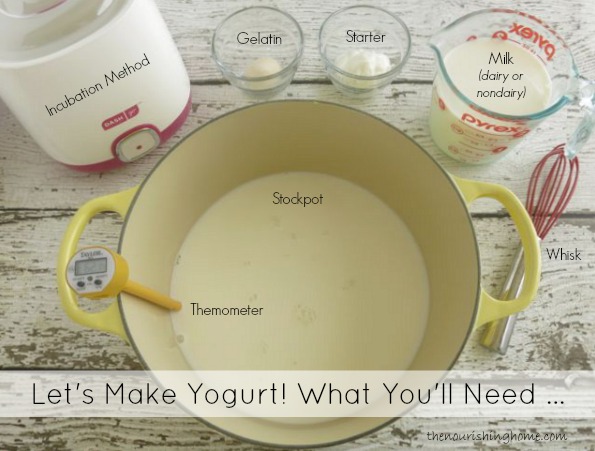
Making homemade yogurt doesn’t require a lot of expensive gadgets, but you will need to purchase a yogurt starter (details below) and a waterproof thermometer, if you don’t already own one.
It’s much more convenient to have a yogurt maker, but it’s not an absolute must. There are several other methods for incubating yogurt, which are outlined below.
Step One: Heating the Milk
The temperature you’ll need to heat the milk depends on the type of milk and cultures used. In this post, I am covering how to make whole milk Greek-Style Yogurt using either pasteurized whole milk, or pure coconut milk. If you would like to make raw milk yogurt, I recommend checking out the instructions provided at Cultures for Health for best results.
Heating Whole Milk
In general, you’ll want to heat pasteurized whole milk between 160–165 degrees, if using Greek-style yogurt cultures. Or 180–185 degrees, if using traditional yogurt cultures. (Note: If purchasing a powdered yogurt starter, be sure to follow the instructions provided.)
Heating Coconut Milk
If you’d like to make an easy and tasty non-dairy yogurt, I recommend using pure coconut milk, not “light” coconut milk. I find it to be the most consistent in achieving a thicker coconut milk yogurt with a pleasant tangy flavor. (Note: Do not use coconut milk beverages as they will not work.) Simply heat the pure coconut milk to 115 degrees and then proceed to step two below.
Step Two: Cooling the Milk
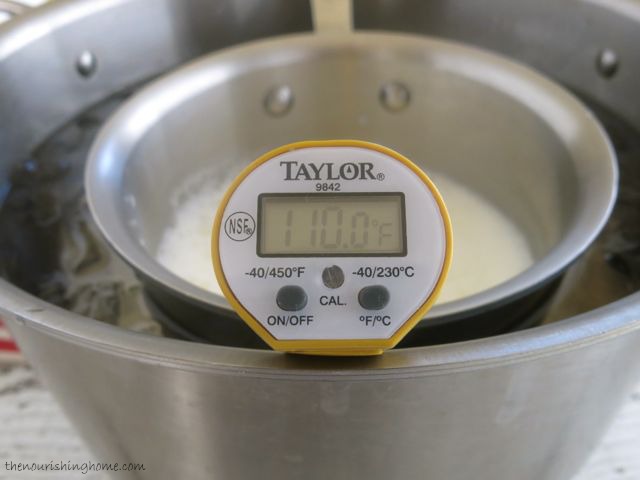
Whether you’re making dairy or non-dairy yogurt, 110 degrees is the magic number! When the milk reaches 110 degrees, that’s the time you’ll add the gelatin and the starter (see details in step three below).
Time-Saving Tip: A simple method for cooling the milk faster is to create a cold water bath. Simply fill a large stockpot with water until it reaches halfway up the saucepan of hot milk. Then add a little ice. Slowly whisk the milk until it reaches 110 degrees. Then remove the pan of milk from the cold water and move on to step three below. (Note: If using ceramic cookware, it’s important to know that going from one temperature extreme to another may cause it to crack or break. To be safe, transfer the hot milk to a stainless steel saucepan or bowl instead.)
Step Three: Adding the Gelatin and Starter
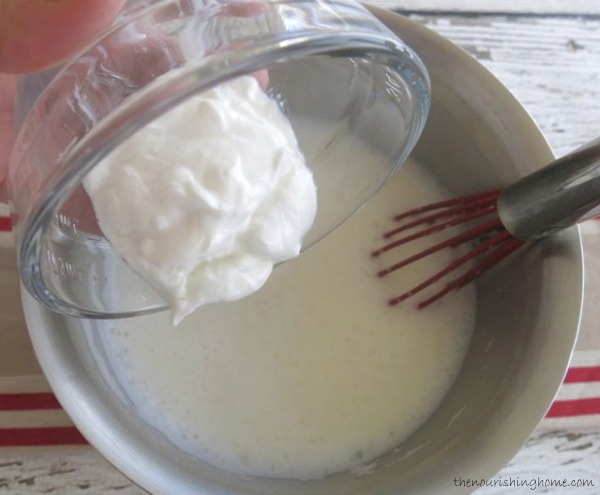
As previously mentioned, gelatin is the secret ingredient to making a thick, custard-like yogurt without the need for messy straining. I personally like Great Lakes brand, because it’s pure gelatin made from grassfed cows. Just add the gelatin to the warm milk and whisk thoroughly for at least one minute. Then, add your starter and whisk again for an additional minute to ensure the mixture is well combined.
Choosing the Right Starter
The term “starter” refers to the live cultures that turn ordinary milk into that thick-n-tangy probiotic treat we all love. You have several options when it comes to yogurt starters. The simplest is to use a good quality, plain organic store-bought Greek-Style yogurt, such as Straus or Wallaby. Just make sure that the Greek yogurt you select as your starter has live and active cultures in it, and does not contain unwanted additives.
Another option is to purchase powdered starters, such as those available at Cultures for Health. If you’re dairy-free, you’ll want to be sure to use a starter that is dairy-free such as Belle & Bella or Cultures for Health’s Vegan Starter. A tip I learned in Danielle’s book Against All Grain is that you can also use a probiotic supplement as a starter for coconut milk yogurt, such as Ultimate Flora.
Does it really matter which starter you choose? Yes. The type of cultures in the starter have an impact on the overall flavor of the yogurt, and the cost of your homemade yogurt too. I found it helpful to experiment a bit by trying different types of cultures, until we found one that we really liked and is budget-friendly.
Of course, once you make your first batch of homemade yogurt, depending upon the cultures used, you can set aside a little of your homemade batch to use as starter for your next one. Keep in mind, it’s important to use your reserved starter within 3-4 days for best results. Additionally, after making several batches of yogurt, you may need to start over with a fresh starter (not from your homemade yogurt).
Step Four: Culturing Your Yogurt (a.k.a. Incubation)
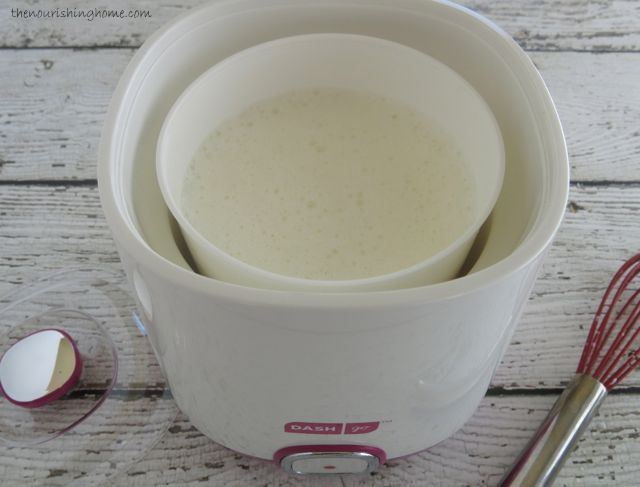
Another important step in the yogurt-making process is incubating the yogurt mixture. The more stable and consistent the temperature remains, the better the taste, texture and culturing of your yogurt.
I personally prefer to use a simple, no-nonsense yogurt maker, since I’m making yogurt at least 1-2 times per week. It was worth the small investment to be able to just pour my yogurt mixture into the yogurt maker, turn it on, set the timer, and go about my day.
However, there are several other incubation methods that can be utilized. The key to each of these methods is ensuring your yogurt mixture remains at a consistent temperature of 110 degrees until it has set, usually about 7-8 hours for whole milk yogurt, and 10-18 hours for coconut milk yogurt.
Step Five: Enjoy!
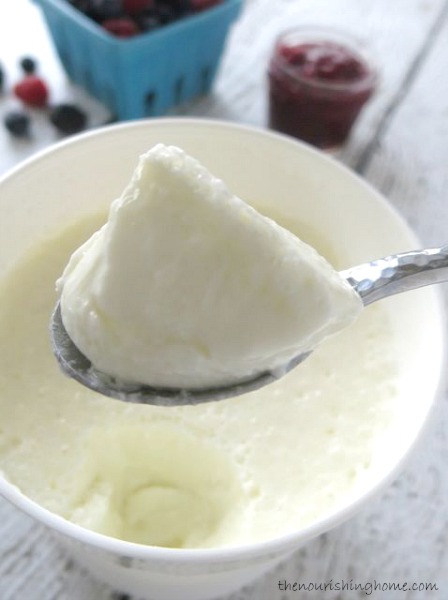
Congratulations! If you’ve followed this recipe tutorial, you’ve just made an incredibly healthy and delicious real food for far less than you would pay for good quality store-bought brands. And there are soooo many ways to enjoy your fresh homemade yogurt.
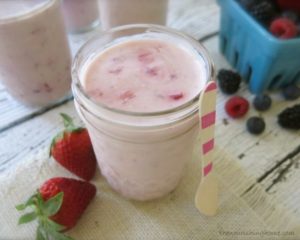 Here are a few of our favorite recipes for enjoying homemade yogurt:
• Fruit & Yogurt Parfaits
• Fruit on the Bottom (and top) Yogurt Cups
• Yogurt Banana Splits
• Peach Crisp Yogurt Cups
• Homemade Flavored Yogurt