The Nourishing Home

living healthier lives in service to the King!

  • Home
  • About
    • About TNH
    • Contact
  • Meal Planning
  • Health & Wellness
    • Real Food Basics
  • Whole30
  • GF Recipes
    • Whole30
    • Breakfast
    • Lunch
    • Entrées
    • Slow Cooker
    • Soups & Stews
    • Sides & Salads
    • Snacks
    • Desserts
    • Kids in the Kitchen
  • My Cookbook
  • Subscribe

Turkey Salad Boats {or Chicken Salad Boats}

A Simply Delicious Thanksgiving Menu

Herb-Stuffed Roasted Spatchcock Turkey

Grilled Ribeye Steak with Cilantro Lime Chimichurri {Whole30}

By Kelly · 2 Comments

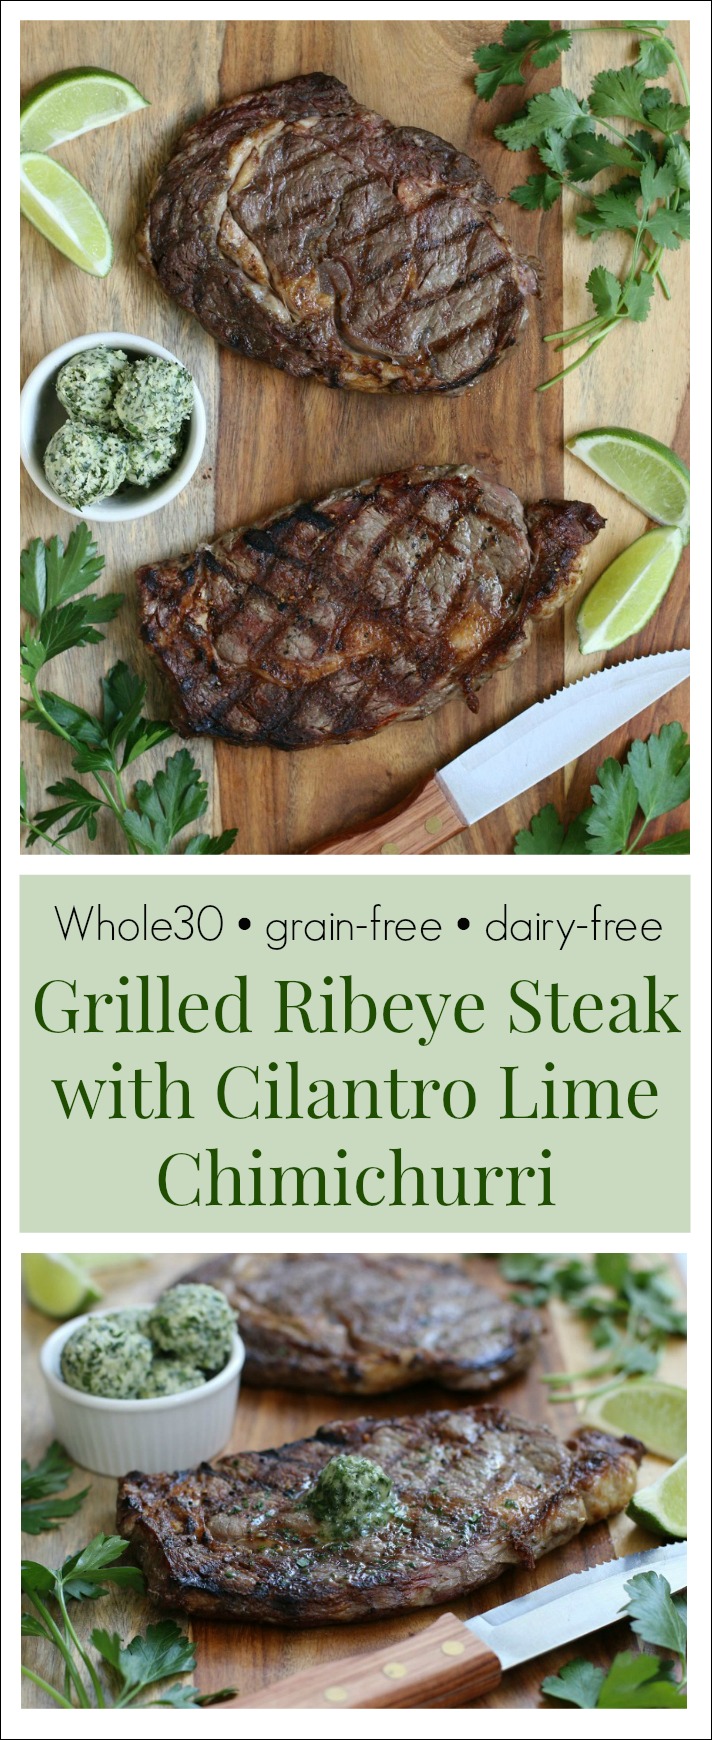
Fire-up the grill for an amazing 30-minute meal! This sensational Grilled Ribeye Steak with Cilantro Lime Chimichurri is as easy as it is delicious! 

This Grilled Ribeye Steak with Cilantro Lime Chimichurri only takes 30-minutes to make, and will have everyone raving about it with each delicious bite! Bonus points for being a delicious option for Whole30!

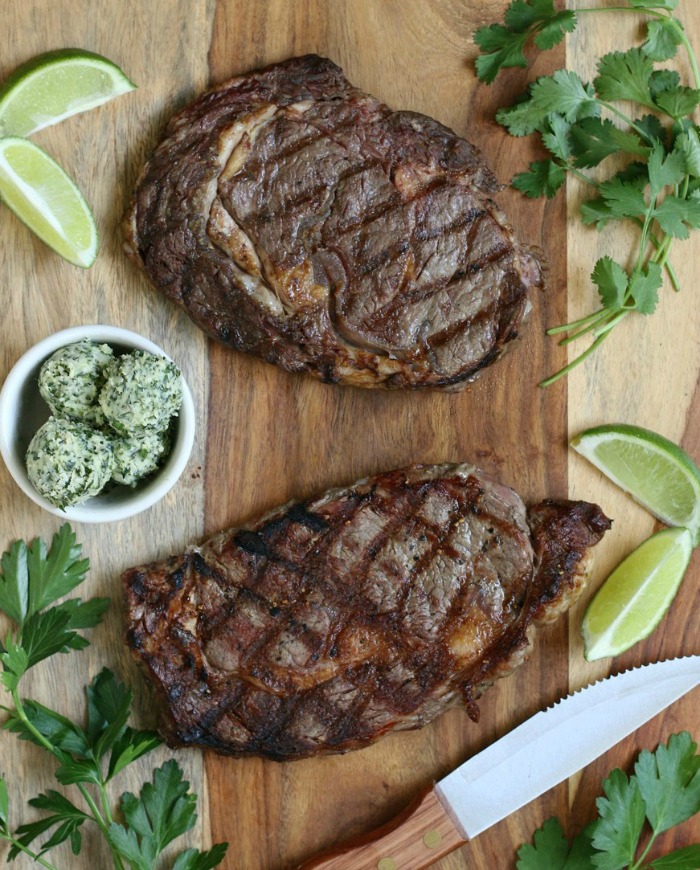
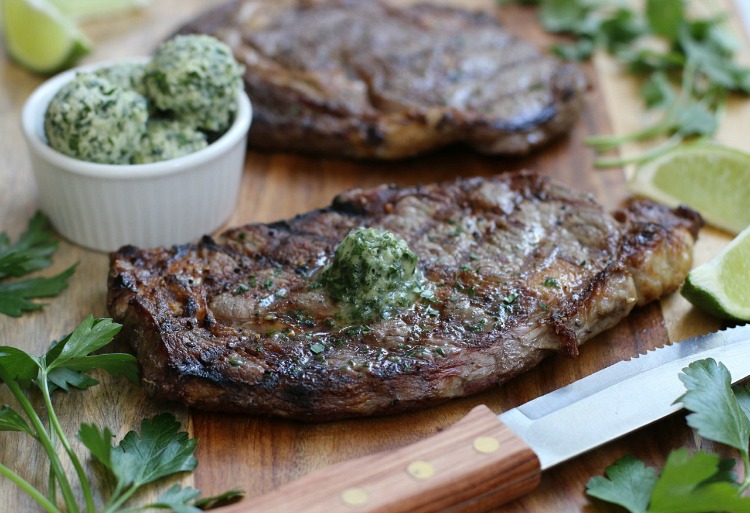
Let me just start by saying this Cilantro Lime Chimichurri “Butter” is crazy good! How’s that for an intro?! Seriously, we’re completely smitten with this savory combination of fresh herbs and zesty lime blended together in rich, grassfed ghee that we’ve been slathering it on everything!

Whether you’ve decided to Join Us for the Whole30 or not, delicious compound butters like this one are a real game changer that make you look like a pro, and they can easily be made Whole30-friendly simply by using ghee instead of butter. Yes!

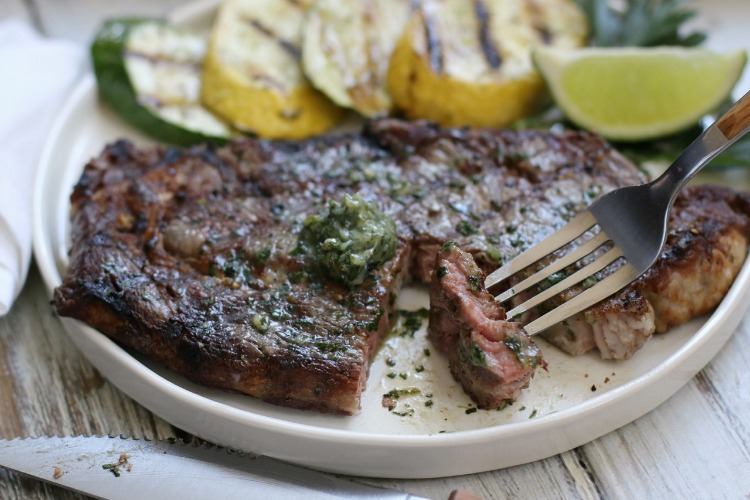
But the real stars of the show are these incredibly savory, grassfed Ribeye Steaks!

This Grilled Ribeye Steak with Cilantro Lime Chimichurri only takes 30-minutes to make, and will have everyone raving about it with each delicious bite! Bonus points for being a delicious option for Whole30!

As you clean-eating, real food lovers know, grassfed beef isn’t just a tastier and more humane option, it also has significant health advantages. Meat from cattle who eat only grass and get plenty of exercise contains less fat, three times the heart healthy Omega 3s, and higher levels of vitamin E, B vitamins, calcium, carotenoids, magnesium, and potassium.

Of course, the key to enjoying an absolutely delicious {and healthy} steak is to find top quality grassfed meat, which I know isn’t always easy. After continually experiencing hit-or-miss availability and quality issues with the local markets in my area, I’ve been on a mission to find a reliable source that everyone can access for consistent quality, 100% grassfed meats straight from farm to table!

This Grilled Ribeye Steak with Cilantro Lime Chimichurri only takes 30-minutes to make, and will have everyone raving about it with each delicious bite! Bonus points for being a delicious option for Whole30!

Hello, ButcherBox!

Good news … The delicious grassfed, boneless Ribeyes featured here are from my new favorite source for quality grassfed meats – ButcherBox! We’ve been so blessed to discover this wonderful family-owned company that I couldn’t wait to share, as I really think you’ll love them too!

ButcherBox partners with a community of family-owned farmers committed to providing humanely-raised, high quality 100% grass-fed {and grass-finished} beef, heritage pork, and pastured chicken. By purchasing meats in large quantities direct from the farmers, they’re able to pass the savings on to us. In fact, their high quality grass-fed meats cost less per serving than those at whole food grocery stores, and it’s delivered right to your door in a convenient subscription box.

It’s always a treat when ButcherBox arrives, and I love how flexible their service is … you can choose to receive an all-beef box, or one of their combo boxes containing a mix of beef, poultry and pork. Or you can opt for my personal favorite – the CustomBox! 

This Grilled Ribeye Steak with Cilantro Lime Chimichurri only takes 30-minutes to make, and will have everyone raving about it with each delicious bite! Bonus points for being a delicious option for Whole30!

The ButcherBox CustomBox is a fantastic new option that allows you to hand-select exactly which cuts of beef, poultry and/or pork that you’d like to receive for a completely customized box of grassfed deliciousness! And they also offer lots of awesome add-on products like additional steaks or chicken … or the hands-down Whole30 favorite … sugar-free uncured bacon! 

Plus you can also select how often you’d like to receive a box, and you’re also able to customize all future orders, so you’re always getting just what you want, when you want it! (And of course, you can cancel anytime.)

And for new customers, ButcherBox has a very special welcome gift of $20 Off your first CustomBox now through Monday, November 6! {Just one more reason why we love this company!}

It’s true! From our very first box, we were hooked! It may sound corny, but it really was love at first bite! My whole family couldn’t stop gushing about the richness of flavor, tenderness, juiciness … Wow! Our taste buds are always impressed with the quality of their meats, which is why we’re huge fans!

This Grilled Ribeye Steak with Cilantro Lime Chimichurri only takes 30-minutes to make, and will have everyone raving about it with each delicious bite! Bonus points for being a delicious option for Whole30!

As you can see, we ALL get a wee bit excited when our ButcherBox arrives. (You know you’re a real foodie when … you can’t wait for a box of grass-fed meat to arrive at your doorstep!)

And this little guy is always by my side to “help” me open the box. Honestly, we all can’t wait to get our paws on this wonderful box of grassfed yumminess!

This Grilled Ribeye Steak with Cilantro Lime Chimichurri only takes 30-minutes to make, and will have everyone raving about it with each delicious bite! Bonus points for being a delicious option for Whole30!

Living in Southern California, the first time we ordered, I was a little concerned about how frozen the meat would actually be when it arrived. But as you can see in the photos above, every single piece of meat stays rock-solid frozen thanks to the well-insulated box and just the right amount of dry ice, which they actually calculate base on the shipping location and time of year. In fact, their unique eco-friendly packaging keeps the meat frozen for a full 12 hours after delivery incase you’re not home. Isn’t that cool?!

What’s in the box?

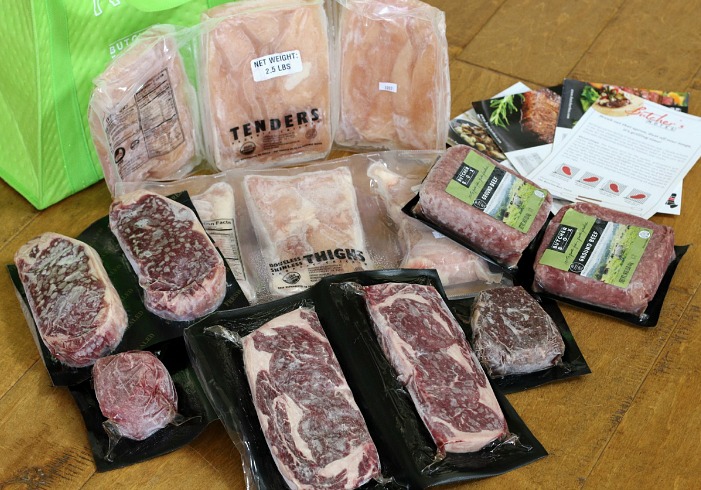
Each ButcherBox contains 8-11 pounds of meat, which is enough for 18-25 servings (at a 6–8oz portion size). This month’s box contained enough meat to feed my family-of-4 for under $5 a serving! And we’re talking “manly” portion sizes. {Did I mention, we have two teen boys who are eating us out of house and home!}

As shown above, here’s what we received:

  • Ground beef (2 x 1 lbs)
  • NY Strip (2 x 10oz)
  • Top Sirloin (4 x 6oz)
  • Boneless Chicken Thighs (3 x 1 lb)
  • Boneless Chicken Breasts (3 x 1 lb)
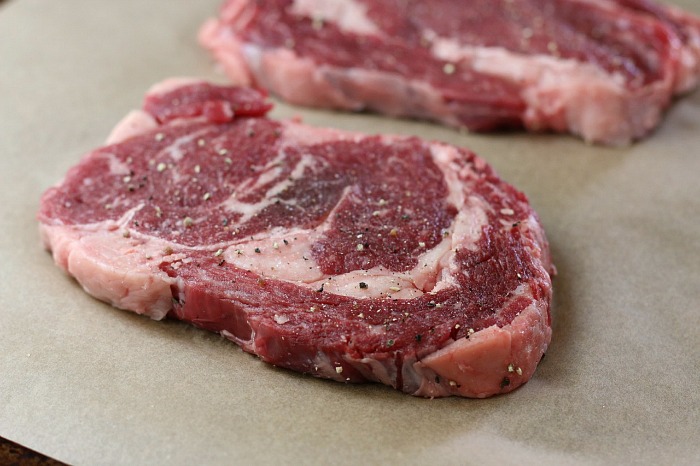
  • Ribeye Steaks (2 x 10oz)
  • Whole30-compliant bacon (1 lb)

All of ButcherBox’s meat is flash frozen for peak freshness, and it’s conveniently packaged so you can easily thaw just what you need. Plus, they provide a set of real food recipe cards with easy instructions for creating quick-n-healthy meals using the meats in the box. These cards also provide helpful info like the taste profile of each cut of meat, as well as lots of helpful cooking tips.

This Grilled Ribeye Steak with Cilantro Lime Chimichurri only takes 30-minutes to make, and will have everyone raving about it with each delicious bite! Bonus points for being a delicious option for Whole30!

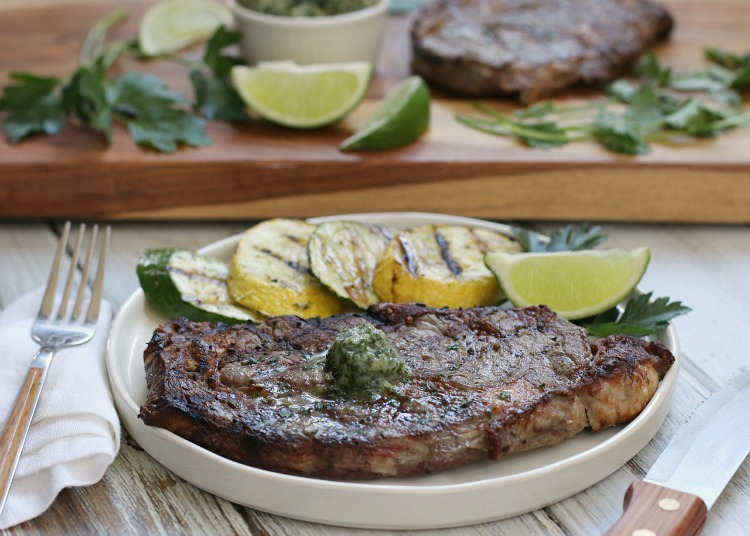
Of all the tasty selections in this month’s box, I decided to put those beautiful Ribeye Steaks on the menu first and created this easy 30-minute meal for all of us to enjoy them!

If you’re ready to enjoy your own box of grassfed goodness, and receive $20 Off your first CustomBox, be sure to order here before 11:59pm, Monday, November 6, 2017.

Then, fire-up your grill and get ready to make a whole host of incredibly easy, and fabulous dinners that everyone will be raving about with each delicious bite!

This Grilled Ribeye Steak with Cilantro Lime Chimichurri only takes 30-minutes to make, and will have everyone raving about it with each delicious bite! Bonus points for being a delicious option for Whole30!

P.S. If you have any questions about ButcherBox, or this recipe, feel free to ask me in the comments below. I’m always happy to help!

Print
Grilled Ribeye Steak with Cilantro Lime Chimichurri {Whole30}

Yield: 2-3 servings

Ingredients

    For the steaks:
  • 2 grassfed ribeye steaks
  • Sea salt and pepper
  • For the chimichurri:
  • 2 Tbsp minced fresh cilantro
  • 1 Tbsp minced fresh flat-leaf parsley
  • 1 tsp lime zest
  • 2 tsp fresh lime juice
  • 1 small clove of garlic, minced
  • 1/4 tsp dried oregano
  • 1/2 tsp red wine vinegar
  • 1/8 tsp fine ground sea salt
  • 1/4 cup grassfed ghee, room temperature

Instructions

  1. Thaw steaks in fridge overnight. Then place on a plate at room temp to rest. Preheat the grill to medium high heat.
  2. For the chimichurri: In a medium bowl, add all of the chimichurri ingredients, except for the ghee. Stir well to combine. Then add the ghee and use a fork to thoroughly combine. Place the chimichurri in the fridge to firm up.
  3. For the steaks: Thoroughly dry both sides of the steaks with paper towels. (This is important for ensuring a beautiful crust.) Then season both sides with sea salt and pepper.
  4. Clean the grill grate with a grill brush. Then oil the grate to prevent the steaks from sticking. (Dip a wad of paper towels into oil, grab the wad with grill tongs, and then brush the grate.)
  5. Sear the steaks, undisturbed, for 2-3 minutes, until a nice brown crust forms. (Using tongs, give the steaks a wiggle: If they don't release easily, leave them alone until they do.)
  6. Sear the second side for another 2-3 minutes depending on your desired level of doneness. Since grassfed beef cooks quicker, it's a good idea to take the steaks off the heat about 5-10 degrees before your desired level of doneness (see recipe note below).
  7. Transfer the steaks to a plate, cover loosely with foil, and let them rest for at least 5 minutes to allow the flavorful juices to redistribute.
  8. Then add a little spoonful (or use a melon baller to form little rounds) of the glorious citrusy-herb chimichurri "butter" to your perfectly grilled grassfed steak and enjoy a symphony of flavors!

Notes

Tips for grilling the perfect steak: Because grassfed beef cooks more quickly, it's important to take it off the grill sooner. Using an instant-read meat thermometer to accurately determine doneness is one of the best investments you can make to ensure all of your meat and poultry is perfectly tender and juicy every time.

Once your grass-fed steak reaches an internal temperature about 10 degrees lower than the desired temperature, remove it from the heat, cover it and allow it to rest. It will continue to cook a bit when removed from the heat.

The ideal internal temperatures for perfectly tender and flavorful grass-fed steaks are: • 120°F Rare • 135°F Medium Well • 125°F Medium Rare • 140°F Well • 130°F Medium

Time-Saving Tip: This citrusy chimichurri “butter” not only compliments the rich flavor of a good grass-fed steak, but also takes chicken, fish and grilled veggies to a whole new level of awesome! And, it’s freezer-friendly which makes it super convenient to enjoy anytime.

Simply place little spoonfuls (I use a melon baller) onto a sheet of parchment paper and place in the freezer. Once frozen, transfer to an airtight container and store in freezer until ready to use. Or roll the mixture into a log in a sheet of plastic wrap and freeze. Then, thaw in fridge, slice and enjoy.

Of course, you don't have to use ghee to make an amazing chimichurri. You can easily substitute your favorite healthy oil like EVOO or avocado oil for the ghee and enjoy a delicious chimichurri sauce instead. Also amazing!

3.1
https://thenourishinghome.com/2017/05/grilled-ribeye-steak-whole30/

This Grilled Ribeye Steak with Cilantro Lime Chimichurri only takes 30-minutes to make, and will have everyone raving about it with each delicious bite! Bonus points for being a delicious option for Whole30!

Whenever it’s helpful, I like to share personal favorites that I think you’ll enjoy too! That’s why I’m excited to share about ButcherBox, a trusted resource for grass-fed meats and poultry. As an affiliate partner, they provided me with free product for the development of this recipe. If you purchase a ButcherBox after clicking one of my links, I receive a small commission (the price you pay will not be affected).  Thank you so much for supporting my site, and rest assured, I only partner with select real food companies whose products and services I personally use and love!

You Might Also Like:

Stir Fry Veggie Zoodles {Recipe Makeover Whole30 Style}
Sautéed Greens with Bacon {Whole30}
Herb-Stuffed Roasted Spatchcock Turkey

Filed Under: Beef/Pork, Whole30 ·

Almond Flour Blueberry Scones {Grain-Free, Dairy-Free Option}

By Kelly · 2 Comments

Say howdy to these delicious, dainty little almond flour blueberry scones! These delectable grain-free treats capture the taste and texture of a classic Southern-style scone, making them the perfect companion at teatime or anytime!

These easy to make grain-free Almond Flour Blueberry Scones are an irresistibly scrumptious treat perfect for breakfast, teatime or anytime!

My first experience with scones was at a little teahouse in London. I darted in after sightseeing all day to enjoy the tradition of afternoon tea. Among the plates of towering treats, I discovered a newfound food love – the majestic scone!

As a scone aficionado, I’ll be the first to admit, developing a grain-free recipe that captures the taste and texture of gluten-flour-based scones was no easy task. But I’m sure you’ll agree that it was well worth the effort, because seriously, no one should miss out on enjoying a delectable scone!

And these little grain-free beauties are everything a scone should be – delicately crispy on the outside with a light & tender crumb within. And, of course, they’re just bursting with naturally sweet & scrumptious blueberry flavor! These are truly irresistible, especially hot from the oven!

How to Create Perfect Grain-Free Scones

As with classic scone recipes, cutting cold butter into the flour is optimal for achieving a tender crumb. Simply work small chunks of butter into the almond flour until you have tiny little bits of butter throughout the almond flour. (Tip: You can use a traditional pastry cutterThese easy to make grain-free Almond Flour Blueberry Scones are an irresistibly scrumptious treat perfect for breakfast, teatime or anytime!, however, using a food processorThese easy to make grain-free Almond Flour Blueberry Scones are an irresistibly scrumptious treat perfect for breakfast, teatime or anytime! makes this task super quick and easy, which is why it’s my preferred method.)

These easy to make grain-free Almond Flour Blueberry Scones are an irresistibly scrumptious treat perfect for breakfast, teatime or anytime!

Another tip for achieving scone perfection is to ensure the dough is perfectly chilled and not too sticky. A light dusting of almond flour helps to reduce stickiness, so you can easily work the dough into a square. From there, cutting the dough into uniform triangles ensures they bake in perfect unison.

Achieving Perfect Triangles: Using a light dusting of almond flour, start by shaping the dough into a six-inch square. Use a chef’s knifeThese easy to make grain-free Almond Flour Blueberry Scones are an irresistibly scrumptious treat perfect for breakfast, teatime or anytime! to cut the dough into four even squares. (Tip: I find it helpful to have a slightly damp kitchen towel nearby to wipe my knife clean after each cut.)

As shown in the photo above, cut each of the four squares in half diagonally to form eight triangle-shaped scones. Place the scones on a parchment-lined baking sheet and pop them in the oven. Soon the aroma of delectable almond flour blueberry scones will fill the air!

These easy to make grain-free Almond Flour Blueberry Scones are an irresistibly scrumptious treat perfect for breakfast, teatime or anytime!

By the way, as much as I love fresh blueberries, when it comes to scones, dried blueberriesThese easy to make grain-free Almond Flour Blueberry Scones are an irresistibly scrumptious treat perfect for breakfast, teatime or anytime! are definitely the way to go! They pack a bigger punch of delicious blueberry flavor! And like all dried fruits, they won’t add excess moisture to the dough. So your scones will bake-up light and tender, just like a scone should be!

With their delicately crisp golden exterior and light, tender centers filled with naturally sweet dried blueberries, these easy-to-make almond flour blueberry scones are an irresistibly scrumptious treat perfect for teatime or anytime!

These easy to make grain-free Almond Flour Blueberry Scones are an irresistibly scrumptious treat perfect for breakfast, teatime or anytime!This delightful recipe is just one of more than 100 irresistible grain-free, dairy-free recipes in my new cookbook – Everyday Grain-Free Baking!

From breads, biscuits and muffins to savory snacks and decadent treats, you’ll find step-by-step instructions, beautiful color photographs and helpful tips & tidbits to make all of your GF baking adventures a delicious success!

Click here to get a SNEAK PEEK of the book!

P.S. Thank you SO much for your support of my cookbook! I was humbled and overjoyed this week to find out that Everyday Grain-Free Baking has achieved the rank of #1 in the Gluten-Free Cookbooks category for Amazon kindle purchases. It’s such a blessing to know that this beautiful cookbook is helping so many families to enjoy the traditions, memories and simple pleasures of delicious grain-free baking – that was truly my heart in creating it!

These easy to make grain-free Almond Flour Blueberry Scones are an irresistibly scrumptious treat perfect for breakfast, teatime or anytime!

Print
Almond Flour Blueberry Lemon Scones {Grain-Free, Dairy-Free Option}

Yield: 8 scones

Ingredients

  • 2 3/4 cups blanched almond flour
  • 1/2 tsp baking soda
  • 1/4 tsp sea salt
  • 2 Tbsp cold unsalted butter (or cold palm shortening)
  • 2 large eggs
  • 2 Tbsp pure coconut milk
  • 1 tsp lemon zest
  • 2 tsp lemon juice
  • 1 Tbsp honey (mild clover honey is best)
  • 1/3 cup dried blueberries
  • Optional: Coconut sugar or maple sugar for sprinkling on top

Instructions

  1. In a food processor, combine the almond flour, baking soda and salt. Pulse in the cold butter (or palm shortening) until butter resembles pea-sized. If you don’t have a food processor, use a pastry cutter to cut the butter (or shortening) into the flour.
  2. In a large bowl, whisk together the eggs, coconut milk, lemon zest and juice, and honey until well combined.
  3. Using a spoon, stir the dry mixture into the wet mixture until thoroughly combined. Then fold in the dried blueberries. Place dough in fridge to chill for 15 minutes.
  4. Preheat oven to 350°F while dough is chilling. Line a baking sheet with parchment paper; set aside. Sprinkle your work surface with a handful of blanched almond flour. Melt one teaspoon of butter or coconut oil for brushing the tops of the scones.
  5. Once dough is chilled, gather it together in a ball and place it on the floured surface. Shape the dough into a square about 6 inches in diameter and 1 inch thick. Then cut the dough sqaure in half twice to form 4 small squares. As shown in the photo above, cut each of the 4 small squares in half diagonally to form 8 small triangles.
  6. Brush the tops of the scones with a little melted butter or coconut oil. Sprinkle tops with a little coconut or maple sugar, if desired.
  7. Using a spatula, carefully place each scone onto the prepared baking sheet. Bake about 16–18 minutes, until scones are slightly golden along the edges. Serve warm with your favorite herbal or green tea.

Notes

Time-Saving Tip: Keeping frozen unbaked scones on hand means you’ll always have a quick teatime treat ready for a special occasion, or just because! Simply place unbaked scone wedges on a parchment-lined baking sheet and place in the freezer. Once frozen, wrap scones individually (or in groups) and return to the freezer for up to 3 weeks. When ready to enjoy, remove desired number of scones from freezer. Place on a parchment-lined baking sheet to thaw (about 15-20 minutes). Bake thawed scones in a preheated oven as directed above. Yum!

Entertaining Tip: I love bringing mini-scones to girly get-togethers like brunches, bridal or baby showers! They are always a huge hit! To make mini-scones, simply cut each of the 8 unbaked scone triangles in half to form 16 mini-scones. Fun and delicious!

3.1
https://thenourishinghome.com/2017/05/almond-flour-blueberry-scones/

You Might Also Like:

Nut-Free "KIND" Bars (GF)
Raw Cookie Dough Bites (GF)
Easy Slow Cooker "Apple Pie" Sauce

Filed Under: Muffins/Breads/Biscuits, Sweet ·

Strawberry Chia Jam {5 ingredients, just 15 minutes!}

By Kelly · 4 Comments

Strawberry Chia Jam! With 5 wholesome ingredients and just 15 minutes time, you can create a healthier fruit spread full of fresh strawberry flavor!

Making delicious homemade jam is easy with chia! With 5 wholesome ingredients and just 15 minutes, you can create a delightful, healthier fruit spread chock-full of fresh strawberry flavor!

Funny, but true: I can’t say the word chia, without that 1980s jingle going through my head … “Ch, ch, ch chia!” (Tell me I’m not alone!)

Seriously though, chia’s fame has spread from terracotta pets to superfood status, because these tiny little seeds are packed with nutrition … and of course they’re natural gelling power turns any liquid into a thick gel, making them a great option for creating quick, no-fuss jams like this delicious Strawberry Chia Jam.

Oh, Strawberry Chia Jam, how I love you! Let me count the ways …

Strawberry Chia Jam! With 5 wholesome ingredients and just 15 minutes time, you can create a healthier fruit spread full of fresh strawberry flavor!

It’s So Easy!

The beauty of making jam with chia seedsStrawberry Chia Jam! With 5 wholesome ingredients and just 15 minutes time, you can create a healthier fruit spread full of fresh strawberry flavor! is it’s so incredibly easy! There’s no need to spend lots of time cooking down the fruit, and there’s certainly no need for pectin or sugar. Just dice up some fresh, ripe berries, cook them just until their juices release, and then add a couple of tablespoons of chia seeds, and a little honey, if you’d like to enhance the natural sweetness of the berries. The chia will begin absorbing the fruit juices, and thickening as it cools, creating a lighter, fresher-flavored jam.

Strawberry Chia Jam! With 5 wholesome ingredients and just 15 minutes time, you can create a healthier fruit spread full of fresh strawberry flavor!

It’s So Versatile!

You can use chia seedsStrawberry Chia Jam! With 5 wholesome ingredients and just 15 minutes time, you can create a healthier fruit spread full of fresh strawberry flavor! to not only make this delicious strawberry jam, but just about any fresh fruit jam your heart desires. Just follow this simple rule of thumb … For every cup of diced fresh fruit, add 1 tablespoon of chia seeds. (For juicer fruits, you can always add a little more chia for a thicker jam.)

There’s So Many Ways to Enjoy Chia Jam!

Of course you can always spread it on tasty grain-free biscuits or spoon it over a stack of almond flour waffles. But this delectable strawberry chia jam is also absolutely delightful for creating scrumptious Fruit & Yogurt Parfaits, as shown below. Simply layer homemade yogurt with chilled strawberry chia jam. Then, top with fresh fruit and your favorite gluten-free or grain-free granola.

Strawberry Chia Jam! With 5 wholesome ingredients and just 15 minutes time, you can create a healthier fruit spread full of fresh strawberry flavor!

Another favorite is to fold it into a batch of homemade vanilla ice cream to create a luscious strawberry-swirl frozen treat. And I recently I used this lightly sweet jam to create an amazing strawberry-lemon tart (oh my!). I’ll be sharing the recipe soon, I promise! In the meantime, break out those chia seeds and dice up some fresh berries, because this is one delicious fruit spread the whole family will definitely enjoy!

Strawberry Chia Jam! With 5 wholesome ingredients and just 15 minutes time, you can create a healthier fruit spread full of fresh strawberry flavor!

Print
Honey-Sweetened Strawberry Chia Jam

Yield: about 2 cups of jam

Ingredients

  • 2 heaping cups diced fresh strawberries
  • 2-3 Tbsp honey (mild clover honey is best)
  • 1 Tbsp lemon juice
  • 1/4 tsp lemon zest
  • 1/4 tsp pure almond extract (or vanilla extract)
  • 2 Tbsp chia seeds

Instructions

  1. Hull strawberries and dice into small pieces. Add to a medium saucepan over medium heat.
  2. Cook berries until they begin to soften and get syrupy (about 5-8 minutes). Mash the fruit with a wooden spoon (or a potato masher), to desired consistency. We prefer ours chunky (similar to fruit chutney).
  3. Stir in the honey, lemon juice and lemon zest. Then, remove pan from heat and stir in the almond extract and chia seeds. Taste and add additional honey, if desired.
  4. Let the jam cool to room temperature. (You’ll notice jam thickens as it cools.) For a thicker consistency, stir additional chia seeds one teaspoon at a time, keeping in mind that the jam will thicken even more once refrigerated.
  5. Transfer cooled jam to mason jars. Store in the fridge for up to two weeks, or freeze for up to 3 months. Serve with your favorite biscuits, use it as a topping for ice cream, or layer it with yogurt for delicious fruit parfaits. Yum!

Notes

Frozen strawberries can be used to make this delightful jam. Just be sure to thaw them first. You'll notice quite a bit of juice occurs with thawed strawberries. So if you decide to incorporate the juice with the berries to make chia jam, you will need to use more chia seeds and your jam may be a bit looser.

3.1
https://thenourishinghome.com/2017/04/strawberry-chia-jam/

You Might Also Like:

Jumble Berry Jam (GF)
Season's Greetings Gift: All-Purpose Seasoning Mix in a Jar
Crockpot Apple Butter (GF, DF)

Filed Under: Condiments ·

  • « Previous Page
  • 1
  • …
  • 4
  • 5
  • 6
  • 7
  • 8
  • …
  • 182
  • Next Page »

My New Cookbook is Here!

Welcome to The Nourishing Home!

I’m so glad you’re here and want you to feel right at home! My heart in creating this blog is to help you by sharing helpful meal planning strategies and nourishing GF recipes that are healthy, easy and delicious with thanksgiving to God! [Read More …]


All content (recipes, photos, posts, etc.) on this site is the creative property of Kelly Smith. You are welcome to share a photo via social media, as long as it contains a link back to the corresponding recipe or post from this site. However, you may not republish a recipe in its entirety in any form. For questions, or for permission to use a photo or recipe, please contact me via email at [email protected] Thank you!

Please Note: All content (recipes, photos, text, etc.) on this site is the creative property of Kelly Smith of The Nourishing Home. You are welcome to share a photo via social media, as long as it contains a link back to the corresponding recipe from this site. However, re-publishing a recipe in any form is strictly prohibited. Additionally, please refrain from adapting recipes without properly linking back to the original recipe, and keep in mind that simple substitutions do not constitute an adapted or original recipe. For details regarding recipe copyright law, please visit the Food Blog Alliance.
The Nourishing Home is a participant in the Amazon Services LLC Associates Program, an affiliate advertising program designed to provide a means for sites to earn advertising fees by advertising and linking to amazon.com.

Privacy Policy
DMCA.com

Copyright © 2023 · All Rights Reserved · The Nourishing Home · Artwork by Nancy Panaccione · Site Design by Deluxe Designs · Log in