The Nourishing Home

living healthier lives in service to the King!

  • Home
  • About
    • About TNH
    • Contact
  • Meal Planning
  • Health & Wellness
    • Real Food Basics
  • Whole30
  • GF Recipes
    • Whole30
    • Breakfast
    • Lunch
    • Entrées
    • Slow Cooker
    • Soups & Stews
    • Sides & Salads
    • Snacks
    • Desserts
    • Kids in the Kitchen
  • My Cookbook
  • Subscribe

Turkey Salad Boats {or Chicken Salad Boats}

A Simply Delicious Thanksgiving Menu

Herb-Stuffed Roasted Spatchcock Turkey

Sausage Biscuit Nests {Grain-Free, Dairy-Free}

By Kelly · 34 Comments

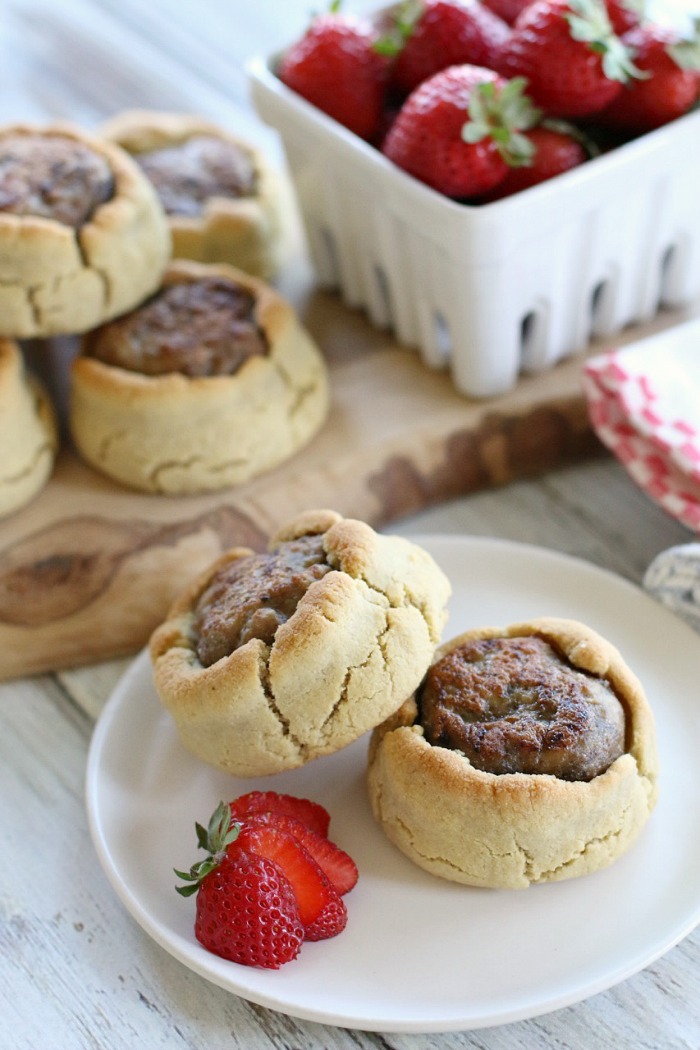
Tasty little sausage patties nestled in delicious grain-free biscuits!

These Sausage Biscuit Nests are a ready-made breakfast sandwich that can easily be enjoyed at the table – or for busy mornings – as breakfast on-the-run}!

Thinking about a fun way to wake-up the sleepy heads in my home, I decided to combine a favorite classic into a ready-made breakfast sandwich that can easily be enjoyed at the table {or for busy mornings, as breakfast on-the-run}! 

The beauty of these adorable little Sausage Biscuit Nests is you can make them using any homemade biscuit dough you fancy! Of course, we’re partial to my popular Almond Flour Biscuits.

Another plus is that they freeze well! So when the crazy back-to-school season arrives, you can bet I’ll be assembling these in bulk and freezing the uncooked nests for future breakfasts. {Just thaw overnight in the fridge and bake in the oven as directed in the recipe below.}

These Sausage Biscuit Nests are a ready-made breakfast sandwich that can easily be enjoyed at the table – or for busy mornings – as breakfast on-the-run}!

If your family enjoys sausage biscuits, they’re certain to find this ready-to-pop-in-your-mouth version even more fun (and delicious)!

How to Make Sausage Biscuit Nests …

Two ingredients is all that’s required – homemade biscuit dough and fully-cooked sausage patties. Then, follow the simple steps below to assemble and bake these adorable little Sausage Biscuit Nests for a perfectly tasty {and healthy} breakfast on the go! Yum!

These Sausage Biscuit Nests are a ready-made breakfast sandwich that can easily be enjoyed at the table – or for busy mornings – as breakfast on-the-run}! 

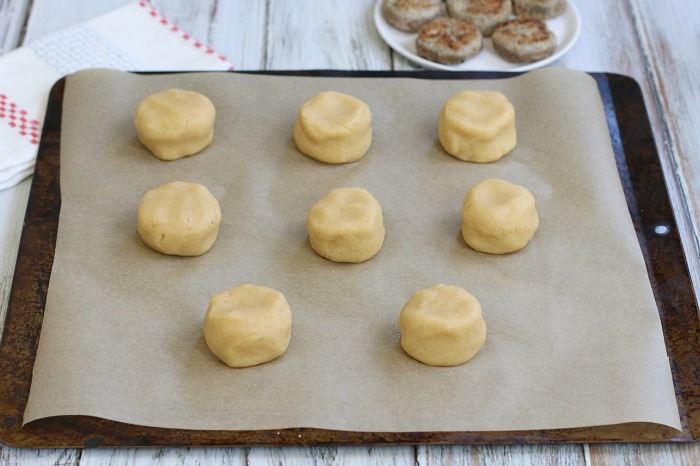
Step One: Make homemade biscuit dough and cook your sausage patties!

The key to making flavorful {and healthy} Sausage Biscuit Nests is using homemade whole food ingredients! As shown in the photos, I love using my scrumptious Almond Flour Biscuit dough from my published cookbook. It’s one of the most popular recipes on the blog. However, you can use any homemade biscuit dough you’d like with great results!

And when it comes to sensational sausage patties, if you haven’t tried my easy Turkey Breakfast Sausage Patties yet, I highly recommend cooking some up. They’re so flavorful and satisfying, I promise your family will love them! {They’re my kids favorite!}

These Sausage Biscuit Nests are a ready-made breakfast sandwich that can easily be enjoyed at the table – or for busy mornings – as breakfast on-the-run}! 

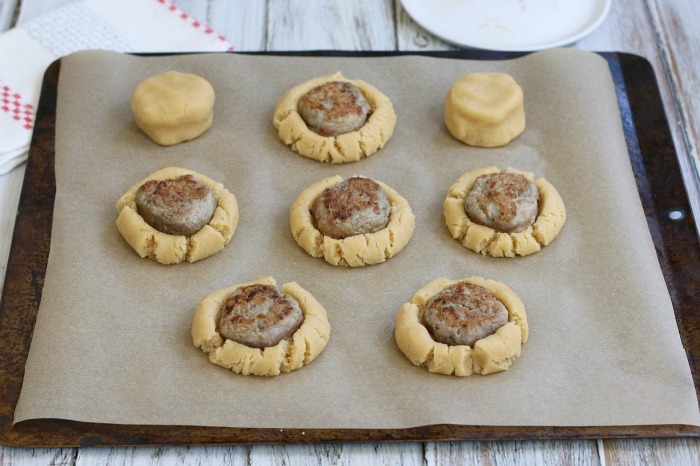
Step Two: Place and press a fully-cooked sausage patty into the center of each biscuit!

It’s important to use fully-cooked sausage patties, as the short time in the oven to cook the biscuits does not allow enough time to cook raw sausage. (Also the excess fat released from the sausage patties during the cooking process would make for a very soggy biscuit.)

Once you’ve cooked your sausage patties (or if using pre-packaged fully-cooked patties), make sure to bring them to room temperature. Also, be sure to use a paper towel to dab off any excess moistness. Then place one fully-cooked sausage patty into the center of each uncooked biscuit dough round, and gentle press them down into the dough, as shown above.

These Sausage Biscuit Nests are a ready-made breakfast sandwich that can easily be enjoyed at the table – or for busy mornings – as breakfast on-the-run}! 

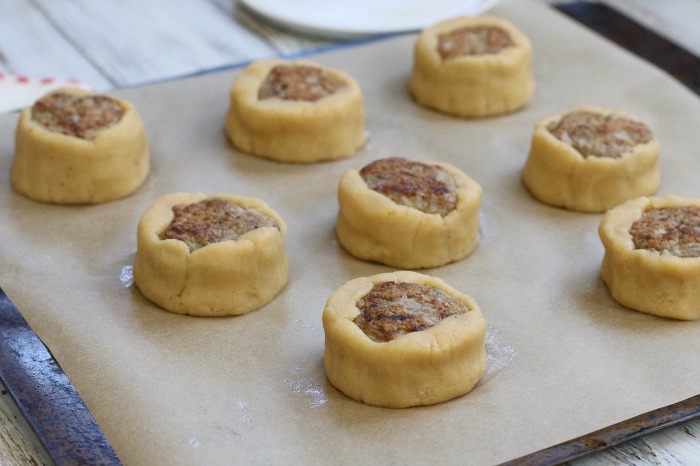
Step Three: Nestle the biscuit dough around the sausage patties

Once you’ve placed and pressed the fully-cooked sausage patties into the biscuit dough, it’s time to nestle the dough around the sausages. Simply use your hands to shape the dough around the sausages.

These Sausage Biscuit Nests are a ready-made breakfast sandwich that can easily be enjoyed at the table – or for busy mornings – as breakfast on-the-run}! 

Step Four: Bake & enjoy!

Bake the Sausage Biscuit Nests according to the instructions in the biscuit recipe you’re using. You may find that you need to bake the biscuits a little longer than the instructions indicate, depending on the biscuit recipe you’re using. You’ll know they’re done when the biscuits are golden brown on top and a toothpick inserted to the side of the sausage patty comes out clean.

These Sausage Biscuit Nests are a ready-made breakfast sandwich that can easily be enjoyed at the table – or for busy mornings – as breakfast on-the-run}! 

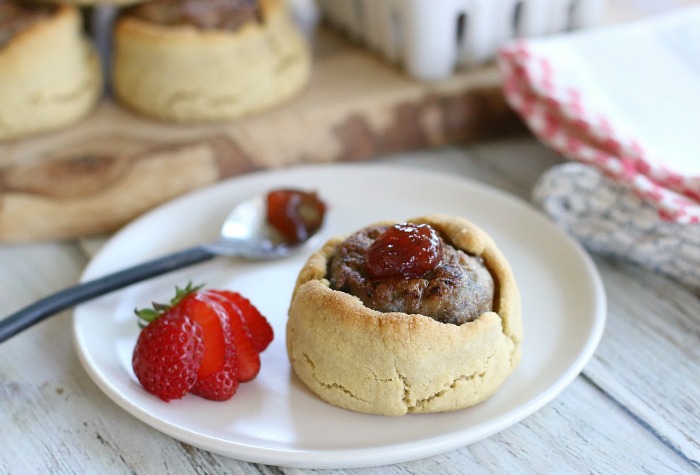
Our favorite way to enjoy these tasty little breakfast sandwiches is with a dollop of Homemade Strawberry Preserves, or quick-n-easy Strawberry Chia Seed Jam. The addition of sweet strawberry jam really complements the savory flavors of these hearty sausage biscuits!

These Sausage Biscuit Nests are a ready-made breakfast sandwich that can easily be enjoyed at the table – or for busy mornings – as breakfast on-the-run}! 

You Might Also Like:

Pumpkin Pie Muffins {Grain-Free, Dairy-Free}
Grain-Free Classic Brown Bread & Rolls (GF, DF)
Peach Cobbler Donuts (& Muffins!)

Filed Under: Muffins/Breads/Biscuits ·

Cinnamon Toast Waffles {Grain-free, Dairy-free}

By Kelly · 4 Comments

These delightful grain-free Cinnamon Toast Waffles pair beautifully with fresh ripe berries and just a drizzle of pure maple syrup!

In celebration of my cookbook reaching the top 10 bestsellers list for gluten-free cookbooks, I’m sharing this tasty-twist on one of the most popular recipes in Everyday Grain-Free Baking … light and fluffy grain-free Cinnamon Toast Waffles!

This decadent spin adds a whole new level of tantalizing flavor with rich cinnamon spice, which pairs beautifully with fresh ripe berries and just a drizzle of pure maple syrup! It’s the ultimate weekend breakfast that the whole family will enjoy, whether they’re GF or not!

These delightful grain-free Cinnamon Toast Waffles pair beautifully with fresh ripe berries and just a drizzle of pure maple syrup!

These delightful Cinnamon Toast Waffles may look fancy, but they’re actually super easy to make since the batter comes together quickly in your blender or food processor. Then, just drizzle the cinnamon waffle batter over the top for a beautiful and tasty burst of rich cinnamon flavor!

But before we break out our waffle irons, if you haven’t picked up a copy of my gluten-free, grain-free baking cookbook yet, I want to encourage you to check it! [Get a peek at what’s in my cookbook here…]

These delightful grain-free Cinnamon Toast Waffles pair beautifully with fresh ripe berries and just a drizzle of pure maple syrup!

P.S. See that beautiful savory bacon on the plate?! That, my friends, is some mighty-fine and FREE! uncured bacon from the wonderful family-owned farmers at ButcherBox! (If you’ve heard me talking about how much my family loves ButcherBox, then you know they’re my favorite source for grassfed beef, free-range organic chicken and heritage pork, shipped right to your door!)

In a nutshell, if you order your first ButcherBox through my partner link, you will get FREE bacon with your order (plus, free shipping)! Their bacon is uncured and free of sugar and nitrates. Plus it’s Whole30 friendly and non-GMO verified, not to mention delicious! [Get the details here…]

With free bacon and my beautiful cookbook in hand, just think of all the healthy & tasty treats you’ll be able to enjoy with your family! Yum!

Print
Cinnamon Toast Waffles {Grain-free, Dairy-free}

Yield: 4-5 waffles

Ingredients

    For the waffle batter
  • 1/3 cup pure coconut milk (room temperature)
  • 2 Tbsp coconut oil, melted (plus extra for oiling waffle iron)
  • 1 Tbsp honey (mild clover honey is best)
  • 1 Tbsp pure vanilla extract
  • 1/4 tsp apple cider vinegar
  • 1 1/4 cups blanched almond flour
  • 2 tsp coconut flour
  • 1/2 tsp baking soda
  • 1/4 tsp fine ground sea salt
  • 3 large eggs (room temperature)
  • For the cinnamon batter
  • 1/4 cup reserved waffle batter (see instructions below)
  • 1 Tbsp maple syrup
  • 1 Tbsp ground cinnamon
  • Pinch of nutmeg

Instructions

  1. Preheat waffle iron. In a small bowl, melt some additional coconut oil for greasing the waffle iron. Set aside.
  2. For the waffle batter: Place all of the liquid ingredients for the waffle batter into a blender or food processor, except for the eggs. Then place all of the dry ingredients on top. Cover and blend on low 10-15 seconds, just until well combined. (Batter will be thick.)
  3. Add the eggs and blend on low about 10 seconds, then increase to high and blend just until eggs are incorporated into the batter.
  4. For the cinnamon batter: Place 1/4 of the waffle batter into a liquid measuring cup. Whisk in the maple syrup, cinnamon and nutmeg. Set aside.
  5. Generously brush waffle iron grids with oil and pour the plain waffle batter evenly into waffle iron, being careful not to overfill. Then drizzle with the top with the cinnamon batter (as shown in the photo above).
  6. Cook about 3-4 minutes, until waffles are lightly brown (see note below). Use a fork to help gently remove the waffles from the waffle iron.
  7. Serve with fresh strawberries and a drizzle of pure maple syrup. For an extra special treat, top with a dollop of Whipped Coconut Cream and an extra sprinkle of cinnamon.

Notes

Since waffle irons come in all shapes and sizes, and some run hotter than others, I recommend cooking one test waffle first. By cooking just one waffle to start, you’ll be able to better determine the perfect cook time based on your particular waffle iron without potentially under- or over-cooking a whole batch.

3.1
https://thenourishinghome.com/2017/07/cinnamon-toast-waffles/

You Might Also Like:

Peach Pancakes
Pumpkin-y Pancakes (GF)
Fluffy Little Almond Flour Pancakes (GF, DF Option)

Filed Under: Pancakes/Waffles ·

Easy Grilled Herb Turkey Breasts {Whole30}

By Kelly · Leave a Comment

These easy Grilled Herb Turkey Breasts offer you & your family a change to the usual chicken dinner. So easy to make for a weeknight dinner!

If there’s Christmas in July, why not Thanksgiving in June? One of my boys’ favorites, these Easy Grilled Herb Turkey Breasts let you enjoy the savory flavors of Thanksgiving anytime – without all the fuss!

That’s because you simply toss these flavorful turkey breasts right onto the grill along with your favorite veggie. And in less than 10 minutes, you’ve got an easy and nutritious meal everyone will be thankful to enjoy!

These easy Grilled Herb Turkey Breasts offer you & your family a change to the usual chicken dinner. So easy to make for a weeknight dinner!

And whether you’re a novice, or veteran griller, be sure to check out my Top 10 Best Grilling Tips for some secrets of success that are certain to take all of your grilled foods to a whole new level of excellence!

These easy Grilled Herb Turkey Breasts offer you & your family a change to the usual chicken dinner. So easy to make for a weeknight dinner!

With bright and beautiful asparagus still in season, it’s a real summer treat to serve these flavorful turkey breasts with a simple side of grilled asparagus seasoned with just a little avocado oil, sea salt and fresh ground pepper. Grilling a few lemon slices also adds a beautiful touch, as well as a burst of tangy flavor when you give them a little squeeze over the warm asparagus. Simply delicious!

These easy Grilled Herb Turkey Breasts offer you & your family a change to the usual chicken dinner. So easy to make for a weeknight dinner!

Print
Grilled Herb Turkey Breasts (GF, DF, Whole30)

Ingredients

  • 1 1/2 pounds boneless, skinless turkey breasts
  • 3 Tbsp avocado oil (or olive oil)
  • 2 Tbsp finely minced fresh sage
  • 2 Tbsp fresh thyme (leaves only)
  • 1/2 tsp sea salt
  • 1/4 tsp freshly ground black pepper
  • 1/4 tsp garlic powder

Instructions

  1. Place turkey breasts side by side in a large plate or baking dish.
  2. In a small bowl, whisk together the olive oil, sage, thyme, salt, pepper and garlic powder. Pour over turkey.
  3. Using your hands, rub the marinade evenly over the turkey. Cover and refrigerate at least one hour or up to 24 hours. (Or freeze until ready to use, then thaw overnight in fridge.)
  4. Heat grill on high heat. When grill reaches 400 degrees, add turkey and cook about 3-4 minutes, then flip and cook another 2-3 minutes, until instant-read meat thermometer registers 160°F degrees.
  5. Transfer to a platter and cover; allow meat to rest 5-10 minutes before serving. Enjoy!
3.1
https://thenourishinghome.com/2017/06/easy-grilled-herb-turkey-breasts/

You Might Also Like:

Baked Chicken Parmesan with Zoodles (GF)
Slow Cooker Meatballs with Zesty Marinara Sauce {Whole30 Guest Post}
Turkey-Veggie Burgers (GF)

Filed Under: Poultry, Whole30 ·

  • « Previous Page
  • 1
  • 2
  • 3
  • 4
  • 5
  • 6
  • …
  • 182
  • Next Page »

My New Cookbook is Here!

Welcome to The Nourishing Home!

I’m so glad you’re here and want you to feel right at home! My heart in creating this blog is to help you by sharing helpful meal planning strategies and nourishing GF recipes that are healthy, easy and delicious with thanksgiving to God! [Read More …]


All content (recipes, photos, posts, etc.) on this site is the creative property of Kelly Smith. You are welcome to share a photo via social media, as long as it contains a link back to the corresponding recipe or post from this site. However, you may not republish a recipe in its entirety in any form. For questions, or for permission to use a photo or recipe, please contact me via email at [email protected] Thank you!

Please Note: All content (recipes, photos, text, etc.) on this site is the creative property of Kelly Smith of The Nourishing Home. You are welcome to share a photo via social media, as long as it contains a link back to the corresponding recipe from this site. However, re-publishing a recipe in any form is strictly prohibited. Additionally, please refrain from adapting recipes without properly linking back to the original recipe, and keep in mind that simple substitutions do not constitute an adapted or original recipe. For details regarding recipe copyright law, please visit the Food Blog Alliance.
The Nourishing Home is a participant in the Amazon Services LLC Associates Program, an affiliate advertising program designed to provide a means for sites to earn advertising fees by advertising and linking to amazon.com.

Privacy Policy
DMCA.com

Copyright © 2023 · All Rights Reserved · The Nourishing Home · Artwork by Nancy Panaccione · Site Design by Deluxe Designs · Log in