The Nourishing Home

living healthier lives in service to the King!

  • Home
  • About
    • About TNH
    • Contact
  • Meal Planning
  • Health & Wellness
    • Real Food Basics
  • Whole30
  • GF Recipes
    • Whole30
    • Breakfast
    • Lunch
    • Entrées
    • Slow Cooker
    • Soups & Stews
    • Sides & Salads
    • Snacks
    • Desserts
    • Kids in the Kitchen
  • My Cookbook
  • Subscribe

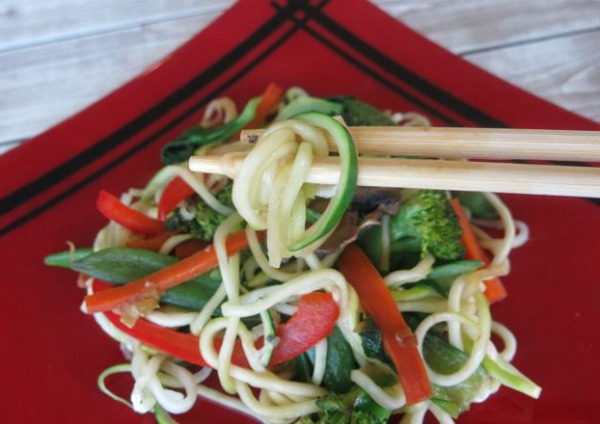
Stir Fry Veggie Zoodles {Recipe Makeover Whole30 Style}

By Kelly · 6 Comments

StirfryZoodles

The final segment in our Oodles of Zoodles Spiralizer Series has arrived … And I’ve been saving the best for last!

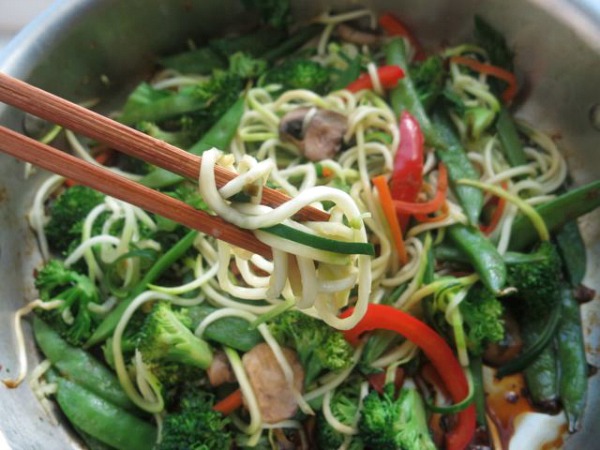
Well, I guess that’s certainly subjective? But seriously, what could be better than a delicious Veggie Stir Fry with tons of harmonious flavors tossed together with zoodles for an extra touch of texture that makes you feel just like your slurping soba noodles. Yum!

Of course, the men in the house prefer it when I add some leftover grilled herb chicken (or grilled steak) to the mix. And I have to be honest, I like the extra flavor and protein kick that comes with tossing in some leftover chicken or beef too, especially when I’m taking The Whole30 Challenge!

Like so many of the zoodle recipes I’ve shared, this one’s equally good as leftovers. In fact, I’ll tell you a little secret … my favorite way to enjoy the leftovers is to barely warm them for breakfast and add a poached egg on top. Oh my, it’s good!
Veggie Stirfry Closeup.jpg

How to Spiralize in 3 Easy Steps!
If you’re just now joining us for the Oodles of Zoodles Series … it started off with “How to Spiralize in 3 Easy Steps” (a helpful photo tutorial), followed by several delicious recipes. Here they are for easy reference:

• Meet Ali from Inspiralized and try her delicious recipe for Turkey Bolognese (Whole30-friendly)
• Pan Seared Balsamic Chicken with Pesto Zoodles (Whole30-friendly)
• Veggie Sauté with Zoodle Ribbons (Whole30-friendly)
• If you’re not dairy-free try: Fresh Caprese with Zoodles and Skillet Lasagna with Zoodles
• BONUS! Learn to spiralize with my fun photo tutorial: How to Spiralizer in 3 Easy Steps!

P.S. Don’t worry spiralizer fans. Although this post wraps up the Oodles of Zoodles Spiralizer Series, you will most certainly be seeing more spiralizer recipes in the future, since I’m completely smitten with this healthy, helpful kitchen tool.

Print
Stir Fry Veggie Zoodles (Whole30)

Yield: 4 servings

Ingredients

  • 4 large organic zucchini
  • 2 tbsp sesame oil (or olive oil)
  • 5 green onions, diced (include whites and some green parts)
  • 2 cloves garlic, finely minced
  • 2 carrots, peeled and cut into matchsticks
  • 6 oz. organic snap peas
  • 2-3 small heads of bok choy (chop and divide stem from leaves)
  • 2 cups organic broccoli florets
  • 1 red pepper, sliced in strips
  • 1 cup sliced mushrooms
  • 1/2 tsp fresh grated ginger (or 1/8 tsp ground ginger)
  • Coconut aminos (or organic soy sauce)
  • Optional: Leftover grilled balsamic-lime steak or grilled herb chicken (see note below)

Instructions

  1. Using a spiralizer with the small-hole blade attachment, make zucchini noodles; set aside. For step-by-step instructions on how to make zoodles, be sure to check out my How to Spiralize in 3 Easy Steps Photo Tutorial.)
  2. Next cut and slice remaining veggies as noted in ingredients above, making sure to keep the ingredients separate from one another.
  3. Once all of your veggies are ready, heat a wok or large sauté pan over medium-high heat.
  4. Add oil, diced green onions and garlic. Cook until garlic becomes fragrant, about one minute.
  5. Then, add carrots, snap peas and bok choy stems only. Sauté about 2 minutes (stirring constantly) and then cover for about 2 minutes until veggies begin to slightly soften.
  6. Next, add the bok choy leaves, broccoli, red pepper and mushrooms. Sauté uncovered, stirring constantly, until broccoli begins to slightly soften (about 2-3 minutes).
  7. Then add the zucchini noodles and 1-2 tablespoons of soy sauce (or soy-free coconut aminos). Cover the pan to allow the zucchini noodles to steam cook until they reach desired consistency. (We prefer ours al dente, so 2 minutes is generally all it takes.)
  8. Remove cover, season with ginger, and salt and pepper to taste; tossing well to combine. Enjoy!

Notes

You can easily customize this recipe using your favorite veggies. In addition, you can also toss in leftover grilled balsamic-lime steak or grilled herb chicken to create an even heartier and satisfying main dish. Enjoy!

Time-Saving TIp: You can spiralize the zucchini noodles up to 3-4 days in advance. Simply store in an airtight container with a paper towel to absorb excess moisture. Same goes for the other veggies in this dish. That way, you're all ready to go to make a quick and healthy meal!

3.1
https://thenourishinghome.com/2014/04/stir-fry-veggie-zoodles/

Disclosure: The above links to the spiralizer kitchen tool are amazon affiliate links. By purchasing via these links The Nourishing Home receives a small percentage of the sale at no additional cost to you. Of course, you are not obligated to use these links to make a purchase, but if you do, please know that it helps to support this site and ministry. Thank you!

You Might Also Like:

Life After Whole30: How to Evaluate Your Progress and Reintroduce Foods
Introducing ... Whole30 Fast and Easy!
Jumpstart Your Health with Whole30

Filed Under: Meatless, Whole30 ·

How to Spiralize … it’s easy, delicious and nutritious!

By Kelly · 22 Comments

Learn How to Spiralize

I’m smitten with this amazing little kitchen gadget called the “Spiralizer.” Why? Because it’s an easy, delicious and nutritious way add more wholesome veggies to your family’s plate! Plus, these scrumptious little “zoodles” make a healthy grain-free replacement for pasta whether you plan to Join Us for the Whole30 or not.

In fact, in far less time than it takes to boil water and cook pasta, you can spiralize a whole bunch of zucchini noodles, and other delicious veggie noodles, such as butternut squash, sweet potatoes, beets, cucumbers and more.

Let me show you how simple it is to spiralize … and be sure to check out all of the spiralizer recipes I’m sharing by scrolling down to “Cooking Your Spiralizer Veggies” below.

P.S. Personally, I use the Paderno Spiralizer, but there’s lots of spiralizers out there to choose from like these! So it’s easy to find one that matches best with your preferences and budget!

How to Spiralize – Just 3 Easy Steps

Step One: Prep the Veggie

Cut Zucchini Evenly

First, trim the ends off of the zucchini (or veggie you opt to use). It’s important to select veggies that are evenly shaped (like a long even cylinder) and are at least two-inches thick for best results. If you have slightly uneven veggies, cut them into shorter cylinder lengths. You can opt to peel the zucchini or not. However, for some veggies, like butternut squash, peeling is a must.

Step Two: Properly Lining Up & Securing the Veggie

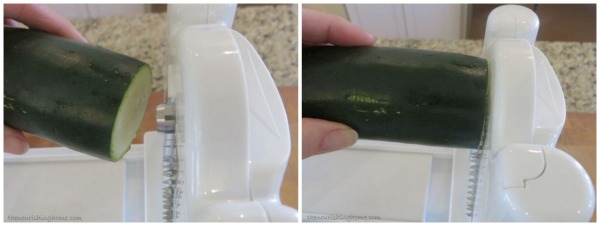
Lining Up Zucchini Collage

Once you have the veggies trimmed, it’s important to properly line up the veggie by placing the thickest end into the hole at the front of the spiralizer. You want to be sure that the hole is lined up in the center of the veggie as shown in the photo collage above.

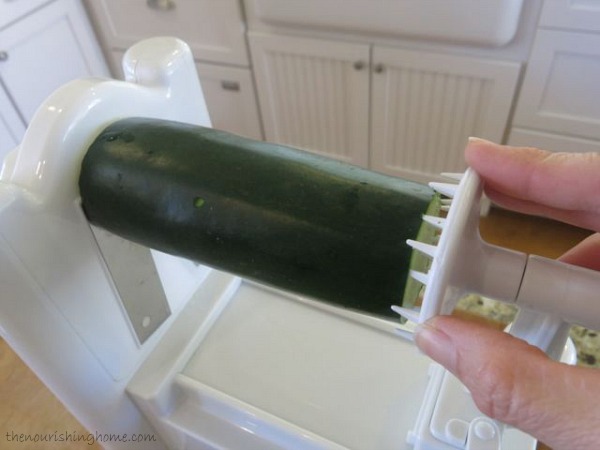
Securing Zucchini

Next, move the sharp gripper to the other end of the veggie and push it securely into place. This will ensure your veggie is centered properly for best results.

It’s also important to be sure the base is secure. So push down on the spiralizer until the suction-cup feet are secure. A flat countertop is best, so ignore my wood cutting board pictures, they’re pretty but not practical as the little feet will more easily lose their grip on a wood surface.

Step Three:  Ready to Spiralize!

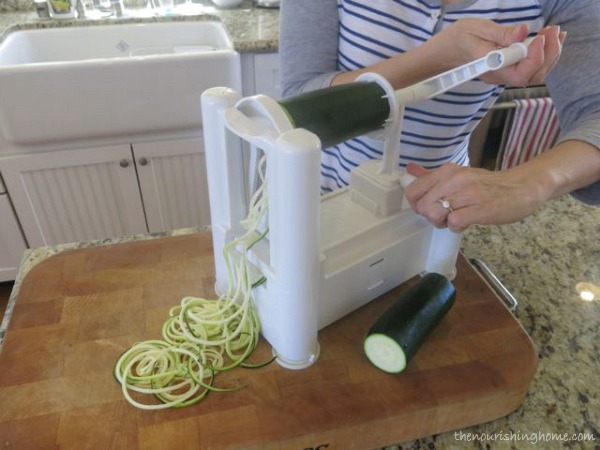
Spiralizing

Once the veggie and base are secure, use one hand to hold the handle at the bottom and gently push that handle forward into the blade, while using the other handle to turn the spiralizer in a clockwise direction. As you can see in the photo above, the zucchini is instantly transformed into nutritious zucchini noodles that can be used in virtually any pasta recipe as a healthy, grain-free option.

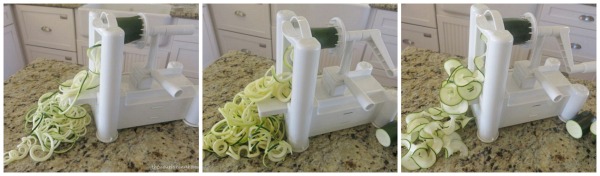
Zoodle Shapes Collage

One of my favorite things about the spiralizer is that you can change the shape of your “zoodles” by simply selecting from among the three blades that come with it. As shown in the photo collage above (from left to right): The blade with the small holes creates zoodles that are about the thickness of spaghetti. The larger hole blade creates thicker noodles similar to bucatini. And the flat blade creates beautiful ribbons of zoodles similar to pappardelle. This provides a wonderful versatility in creating a multitude of healthy and delicious recipes.

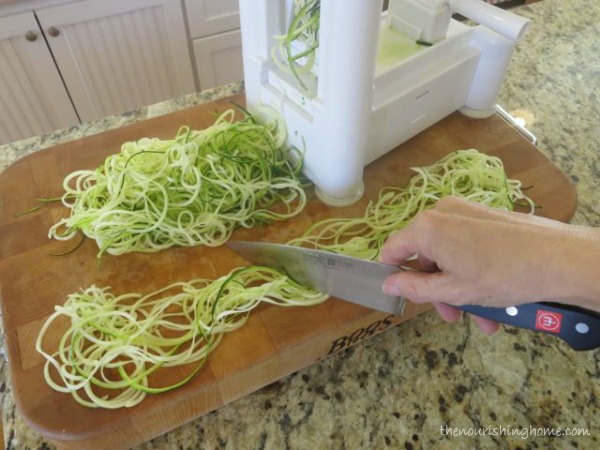
Cutting Zucchini Noodles

One thing you’ll quickly notice about zoodles is that they are really L O N G … so it’s best to cut them into manageable lengths, unless of course you don’t mind twirling your fork forever, or enjoying a never-ending zoodle slurp (hee hee!).

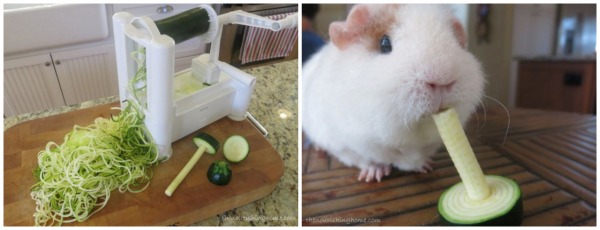
Leftover veggies collage

Wondering what to do with those funny little spiralizer veggie plugs and ends? As you can see above, our sweet little guinea pig Phoebe is more than willing to take care of them for us. But if you don’t have a furry little friend, be sure to use these leftover veggie bits & pieces in soups, stocks, casseroles, sautés or in your compost.

Storing Your Spiralized Veggies

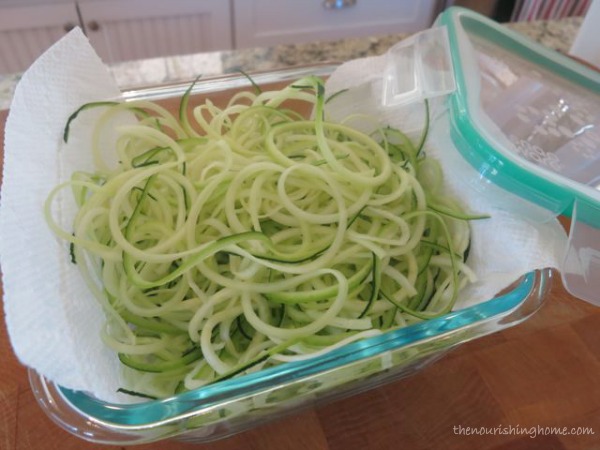
Storing Zucchini Noodles

Another great thing about spiralizing, is that most of the veggies can be easily stored in the fridge for up to 3-4 days, making it easy to prep ahead. I prefer to use glass snap ware containers for storing my spiraled veggies. Just place a paper towel at the bottom of the dish to help absorb any excess moisture. Then secure the lid and store in the fridge until ready to cook.

Cooking Your Spiralized Veggies

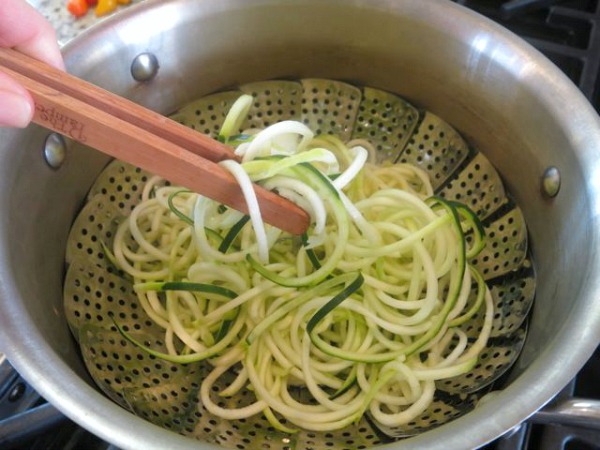
Steaming Zoodles

For most dishes, you can simply add the raw zoodles to your finished sauce to warm them. If using them in cold dishes or salads, you may wish to steam them a bit first. Just remember to not overcook your zoodles, as they’re best served al dente, not mushy.

Oodles of Zoodles Spiralizer Recipes

Ready to get started spiralizing, here a few of my favorite veggie-packed spiralizer recipes perfect for putting your new “zoodles” skills to work:
• Chicken Zoodle Pho Bowl (Whole30, GF, DF)
• Slow Cooker Italian Beef & Swiss Chard with Zoodles (Whole30, GF, DF)
• Pan-Seared Balsamic Chicken with Pesto Zoodles (Whole30, GF, DF)
• Veggie Sauté with Zoodle Ribbons (Whole30, GF, DF)
• Veggie Stir Fry with Zoodles (Whole30, GF, DF)

By the way, if you’d like to Join Us for the Whole30, you can join in anytime. Also, just a friendly reminder, that I provide free monthly meal plans over at The Better Mom blog. Each week’s meal plan contains delicious family-friendly GF recipes utilizing a time-saving method to make getting a healthy dinner on the table a snap! I highly recommend you pop over to The Better Mom and download these free meal plans.

P.S. If the price tag of the spiralizer isn’t within budget, I wanted to let you know about an affordable alternative. Oxo makes a terrific little julienne peeler that can be used to create zoodles. It takes more effort and it doesn’t produce completely uniform in size zoodles, but it still works quite well and is a good option while you save for the real deal.

Disclosure: The above links to the spiralizer kitchen tool are amazon affiliate links. By purchasing via these links The Nourishing Home receives a small percentage of the sale at no additional cost to you. Of course, you are not obligated to use these links to make a purchase, but if you do, please know that it helps to support this site and ministry. Thank you!

You Might Also Like:

Fresh Pineapple Salsa (GF, DF, Whole30)
How to make The Ultimate Pico de Gallo!
Herb Seasoned Grain-Free Stuffing

Filed Under: Meatless, Sides, The FUNdamentals, Whole30 ·

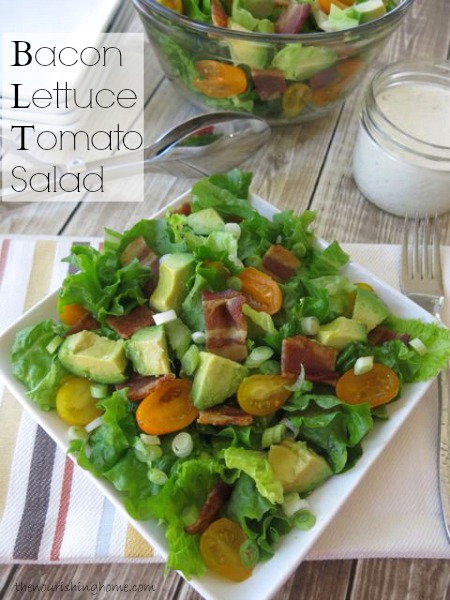
Bacon, Lettuce & Tomato Salad {with Avocado & Ranch}

By Kelly · 6 Comments

A special welcome to my sweet friend Katie at Simple Foody. Her site is all about feeding a large family real food on a budget. She’s visiting with us today sharing one of her favorite Salad-for-Dinner recipes. And after giving it a go ourselves, my youngest son put it best when he exclaimed … “BLT Salad, where have you been all my life?” Yep, this one’s a keeper! Thanks, Katie!

Bacon, Lettuce & Tomato Salad (with Avocado) The Nourishing Home

by Katie at Simple Foody

I love a good BLT, which is what inspired this salad. I know it might seem a bit odd sharing about salads in the midst of winter. But a hearty salad paired with a warm bowl of satisfying soup makes a delicious, filling meal (as well as a frugal one), which is why it often graces our table in the dark cold days of winter.

Of course, it will soon be getting warmer – thankfully!  So as spring arrives, we’ll trade in those large pots of soup for big bowls of salad topped with bits of oven-fried bacon and roasted chicken (or turkey) to make a complete, nourishing meal.

The beauty of this delicious Bacon, Lettuce & Tomato Salad is it works anytime of year. And it’s so simple. It really doesn’t take any time at all to pop that bacon into the oven while you rinse and chop the salad veggies, and make some homemade ranch dressing. Within 15 minutes of putting the bacon in the oven, you’ll have a gourmet-tasting meal that’s sure to impress and delight even the pickiest eaters!

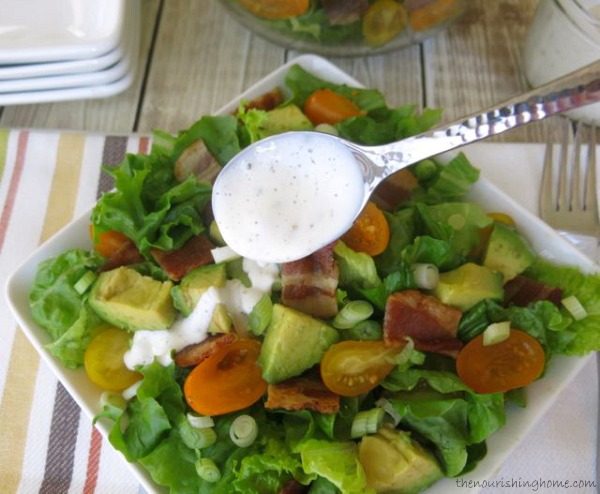
BLT Salad wRanch Dressing

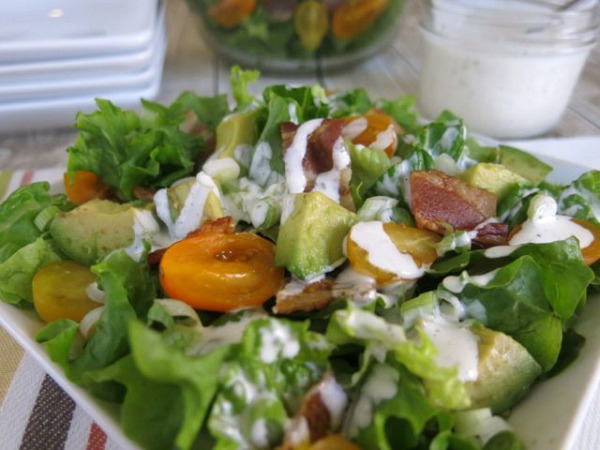
BLT Salad CloseUp

Print
Bacon, Lettuce & Tomato Salad {with Avocado & Ranch}

Yield: 4-5 servings, if served alone (or 5-6 servings if served with a side dish)

Recipe courtesy of Katie at Simple Foody.

Ingredients

  • 1/2 lb. nitrate-free bacon
  • 1 large head of lettuce (such as romaine or green leaf)
  • 1 ripe avocado
  • 1/2 pint cherry tomatoes
  • Optional Add-Ins:
  • Thinly sliced green onions or chives
  • Crumbled blue cheese or feta
  • Roasted or grilled chicken (or turkey)

Instructions

  1. Cook the bacon. (I prefer to oven-fry bacon because it saves time and creates less mess.).
  2. While bacon is cooking, rinse and chop the lettuce. Place in a large serving bowl.
  3. Cut the cherry tomatoes in half and dice the avocado, as shown in photo below. Thinly slice some green onions (or chives), if using.
  4. Place veggies on top of the salad, along with crumbled cheese, if desired.
  5. Once bacon is cooled, cut into bite-sized pieces and sprinkle on top of the salad. For a hearty salad, top with leftover roasted or grilled chicken (or turkey).
  6. Serve with a drizzle of your favorite dressing. We enjoy Kelly’s homemade ranch dressing or a creamy vinaigrette. (Blue cheese dressing is another delicious option.)
  7. Serve with a bowl of hearty soup or a crockpot baked potato for an even more satisfying meal. Enjoy!
3.1
https://thenourishinghome.com/2014/03/bacon-lettuce-tomato-salad/

AvocadoKitchen Tip: Cut the avocado in half lengthwise, place the seeded side on the counter, seed side up.  Hit the seed with the sharp edge of a knife then gently wiggle to release the pit from the fruit.  (To avoid injury, make sure your hand is not near the avocado when you strike it.)

To dice avocado, hold one half in your hand and gently score the flesh down to the peel cutting in strips lengthwise and cross-wise as shown in the photo.  Then using  a spoon, scoop it all out.  Ta-Da! Diced avocado without the mess.

Got leftover bacon? Be sure to whip up some homemade chocolate covered bacon for an amazing sweet treat! Yum!

You Might Also Like:

Savory Cottage Pie {Whole30 option}
How to Make Squash Pasta {Whole30}
Slow Cooker Roasted Chicken (GF)

Filed Under: Salads, Whole30 ·

  • « Previous Page
  • 1
  • …
  • 19
  • 20
  • 21
  • 22
  • 23
  • …
  • 25
  • Next Page »

My New Cookbook is Here!

Welcome to The Nourishing Home!

I’m so glad you’re here and want you to feel right at home! My heart in creating this blog is to help you by sharing helpful meal planning strategies and nourishing GF recipes that are healthy, easy and delicious with thanksgiving to God! [Read More …]


All content (recipes, photos, posts, etc.) on this site is the creative property of Kelly Smith. You are welcome to share a photo via social media, as long as it contains a link back to the corresponding recipe or post from this site. However, you may not republish a recipe in its entirety in any form. For questions, or for permission to use a photo or recipe, please contact me via email at [email protected]. Thank you!

Please Note: All content (recipes, photos, text, etc.) on this site is the creative property of Kelly Smith of The Nourishing Home. You are welcome to share a photo via social media, as long as it contains a link back to the corresponding recipe from this site. However, re-publishing a recipe in any form is strictly prohibited. Additionally, please refrain from adapting recipes without properly linking back to the original recipe, and keep in mind that simple substitutions do not constitute an adapted or original recipe. For details regarding recipe copyright law, please visit the Food Blog Alliance.
The Nourishing Home is a participant in the Amazon Services LLC Associates Program, an affiliate advertising program designed to provide a means for sites to earn advertising fees by advertising and linking to amazon.com.

Privacy Policy
DMCA.com

Copyright © 2026 · All Rights Reserved · The Nourishing Home · Artwork by Nancy Panaccione · Site Design by Deluxe Designs · Log in