The Nourishing Home

living healthier lives in service to the King!

  • Home
  • About
    • About TNH
    • Contact
  • Meal Planning
  • Health & Wellness
    • Real Food Basics
  • Whole30
  • GF Recipes
    • Whole30
    • Breakfast
    • Lunch
    • Entrées
    • Slow Cooker
    • Soups & Stews
    • Sides & Salads
    • Snacks
    • Desserts
    • Kids in the Kitchen
  • My Cookbook
  • Subscribe

How to Make the Perfect Grain-Free Pie Crust

By Kelly · 19 Comments

This easy-to-make, grain-free pie crust tastes great with whatever delectable filling is your favorite. It's my new favorite!

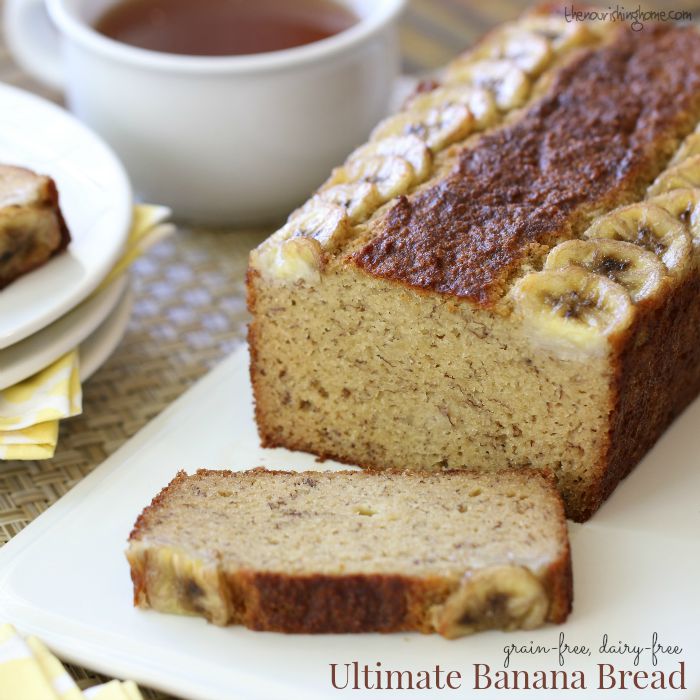
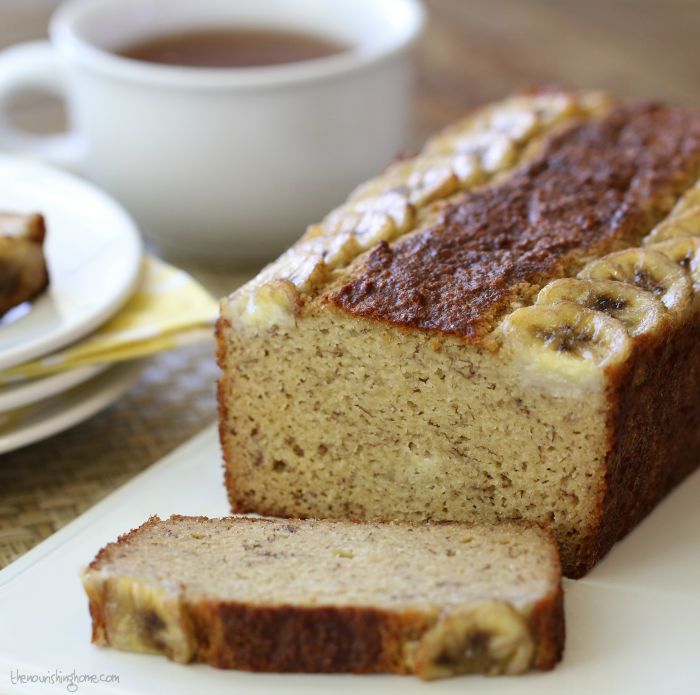
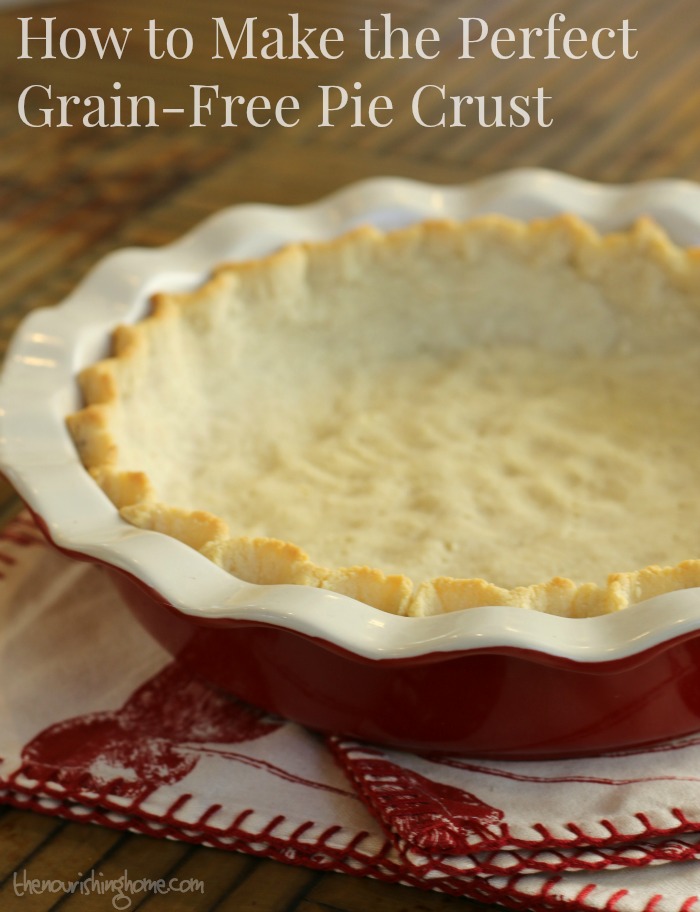
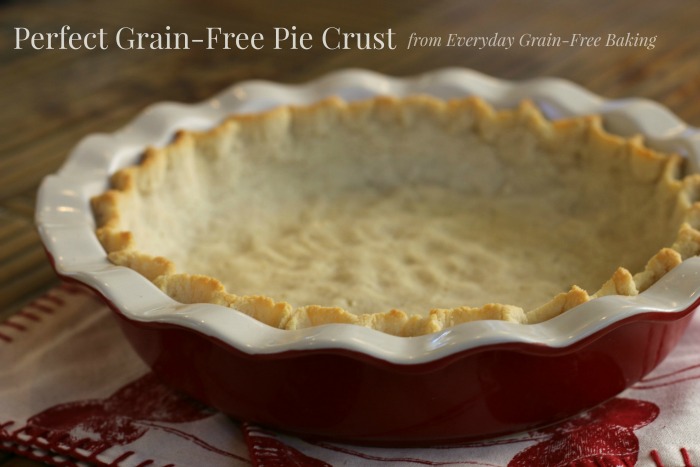
Pies are such a beloved holiday tradition! And since I’m a firm believer that everyone deserves a great-tasting slice of homemade pie, I’m sharing my tried-n-true, always scrumptious, perfect grain-free pie crust recipe with you, including a helpful photo tutorial below.

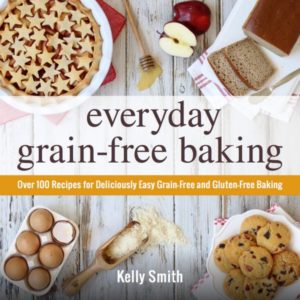
Whether you’re a seasoned pie-baking master, or you’ve yet to roll out a flaky crust and fill it full of yumminess, this tasty grain-free, dairy-free pie crust is super simple! And best of all, it tastes great with whatever delectable filling is your favorite. It’s an exclusive recipe from my new cookbook, Everyday Grain-Free Baking.

In fact, I’ve included more than a half-dozen classic pie recipes in Everyday Grain-Free Baking, including my secret method for creating grain-free fruit-filled pies that are absolutely outstanding!

This easy-to-make, grain-free pie crust tastes great with whatever delectable filling is your favorite. It's my new favorite!

My heart in creating Everyday Grain-Free Baking is to transform the everyday comfort foods we each hold dear into delightfully flavorful and satisfying GF creations that are so remarkably similar to traditional gluten-based foods that everyone will enjoy these recipes, whether or not they’re living a GF lifestyle.

Finding recipes that will work for everyone that actually taste AMAZING is what Everyday Grain-Free Baking is all about! So if you haven’t already, I encourage you to grab a copy today and rediscover the joy of baking everyday favorites your whole family will love!

(P.S. It also makes a great gift for your gluten-free, grain-free friends!)

Print
Perfect Grain-Free Pie Crust (GF, DF)

Yield: 1 nine-inch pie crust

Recipe courtesy of Everyday Grain-Free Baking Cookbook

Ingredients

  • 2 1/4 cups blanched almond flour
  • 1 Tbsp coconut flour
  • 1/4 tsp unflavored gelatin, preferably grassfed
  • 1/4 tsp sea salt
  • 3 Tbsp palm shortening
  • 1 Tbsp honey
  • 1 large egg white

Instructions

  1. In a food processor, combine the almond flour, coconut flour, gelatin and salt. Pulse in the palm shortening, until it’s well incorporated. If you don’t have a food processor, use a pastry cutter (or two knifes) to cut the shortening into the flour.
  2. Add the honey and egg white and pulse until a dough ball forms.
  3. Carefully remove the dough and shape it into a disk. Wrap in plastic and place it in the fridge to chill for 20-30 minutes.
  4. Preheat oven to 325°F. Lightly oil a 9-inch pie dish with palm shortening.
  5. Once dough is chilled, remove it from the fridge and place it into the prepared pie dish.
  6. As shown in the photos below, starting with the sides of the dish, break off small strips of dough and press them along the edge of the dish to form a sturdy crust. (This will help keep your filling in place when you slice the baked pie.) Press the remaining dough evenly along the bottom of the dish to connect the bottom and sides together. Poke the bottom of the crust with a fork.
  7. Bake 12-14 minutes until crust is golden brown. Allow the crust to cool and then fill it as desired.
3.1
https://thenourishinghome.com/2015/11/grain-free-pie-crust-recipe/

How to Make the Perfect Grain-Free Pie Crust

This easy-to-make, grain-free pie crust tastes great with whatever delectable filling is your favorite. It's my new favorite!

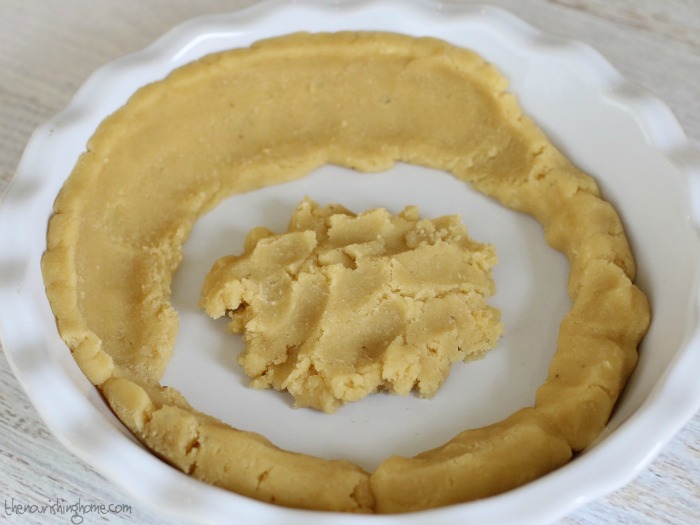
Step One: Shape the Crust
My simple method for an evenly baked, sturdy pie crust is to break off even pieces of the dough and press them along the sides of the dish. Place the remaining dough in the center. Start by building a nice thick and even crust along the sides of the dish. (This will help keep your filling in place when you slice the baked pie.) Then, press the remaining dough evenly along the bottom of the dish to connect the bottom and sides together.

This easy-to-make, grain-free pie crust tastes great with whatever delectable filling is your favorite. It's my new favorite!

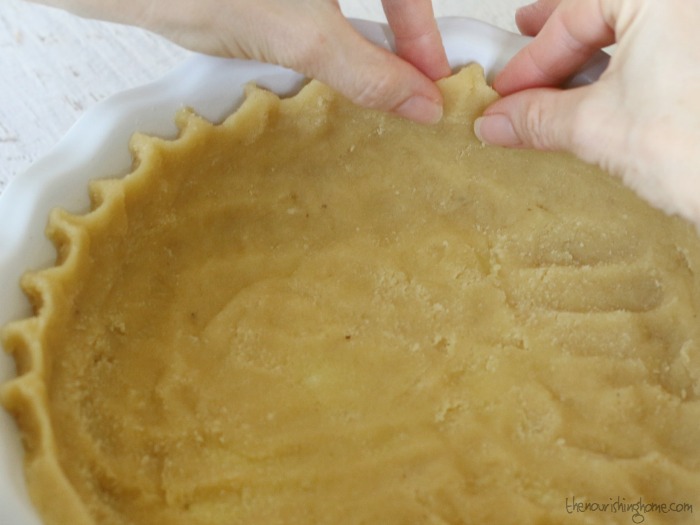
Step Two: Add a Decorative Touch
A perfect pie crust should be pretty – pretty easy that is! I learned this simple technique for creating a decorative pie crust from my Grandma. Use your index fingers and thumbs as shown in the photo above to gently pinch the edges to create a scalloped pattern. Another simple method is to use a fork to press the crust gently against the side of the dish to create a decorative striped pattern.

This easy-to-make, grain-free pie crust tastes great with whatever delectable filling is your favorite. It's my new favorite!

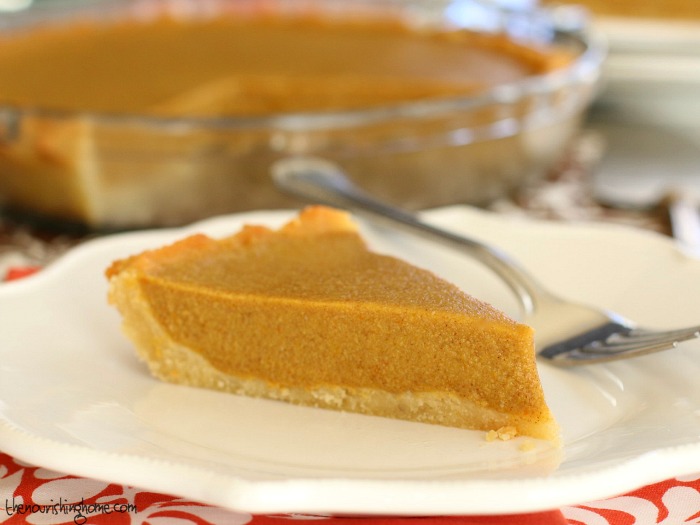
Step Three: Bake, Fill & Enjoy!
Of course, the best part is enjoying your perfect grain-free pie crust with any number of your favorite fillings. And guess what, I have a secret for you … You don’t have to put up with over-baked grain-free pie crusts to enjoy classic desserts like pumpkin pie! I’ve got a simple method for making perfectly scrumptious pumpkin pie with a light flaky grain-free crust. What’s the secret? Pop over to my Perfect Pumpkin Pie recipe to get the delicious details!

You Might Also Like:

Berry Breakfast Cobbler (GF)
Perfect Grain-Free No-Bake Pumpkin Pie
Double Chocolate Cream Pie {DF, GF}

Filed Under: Pies/Tarts ·

Double Chocolate Banana Bars

By Kelly · 11 Comments

A Special Treat to Celebrate National Fair Trade Month!

These irresistible Double Chocolate Banana Bars are made with pure fair-trade ingredients and are certain to become a family favorite!

The ingredients we choose not only impact our lives, they also impact the lives of countless others across the globe. That’s because many of the ingredients we purchase, like chocolate for example, come from countries where people are not paid fairly for the hard work they do to bring us these cherished foods.

I know your heart is kind and full of love and compassion, and so is mine. So what can we do to help these beautiful people escape poverty and mistreatment?

It’s actually pretty simple … We can choose to Be Fair and Support Fair Trade!

These irresistible Double Chocolate Banana Bars are made with pure fair-trade ingredients and are certain to become a family favorite!

October is National Fair Trade Month, and so to celebrate, I’ve created an absolutely scrumptious gluten-free, grain-free treat that’s made with some of my favorite fair trade ingredients.

By choosing to purchase fair-trade ingredients, we can make a difference in the lives of others for just a few pennies more per serving. Buying Fair Trade ensures that you’re not only getting quality products, but the people who grow and harvest them get fair pay for their hard work.

In fact, your everyday purchases can help farmers and workers in 70 countries across the globe to work in safe conditions, earn extra money to invest in their communities and improve the lives of their families.

These irresistible Double Chocolate Banana Bars are made with pure fair-trade ingredients and are certain to become a family favorite!Wondering where you can find fair-trade products? Most whole food type stores, markets and even Amazon sell a wide selection of fair trade products. Just look for the fair trade symbol.

You can also check out Fair Trade USA’s Be Fair website for a complete listing of fair-trade products – everything from chocolate, coffee, and other foods to apparel, home goods and body care products. I also encourage you to watch the brief Be Fair Video at the bottom their site. It’s absolutely wonderful!

Of course, a celebration wouldn’t be a celebration without a special treat. So I’ve gathered together some of my favorite fair trade ingredients to create a special treat just for you!

These irresistible Double Chocolate Banana Bars are certain to become a family favorite! My kids love these moist, ooey-gooey bars full of chocolatey goodness (and so do the adults around here).

But what we love most is knowing that our choice to select fair trade ingredients is helping to secure a better life for other families across the globe. I hope you’ll join me in this mission!

These irresistible Double Chocolate Banana Bars are made with pure fair-trade ingredients and are certain to become a family favorite!

Print
Double Chocolate Banana Bars

Yield: Makes 12 bars

Ingredients

  • 2 cups blanched almond flour
  • 1/4 cup unsweetened fair trade cocoa powder
  • 1 Tbsp fair trade coconut flour
  • 1/2 tsp baking soda
  • 1/4 tsp sea salt
  • 1 cup mashed ripe banana (about 2 large ripe bananas)
  • 3 Tbsp honey
  • 2 Tbsp fair trade coconut oil, melted
  • 3 large eggs
  • 2 Tbsp pure coconut milk (or almond milk)
  • 2 tsp pure vanilla extract
  • 1 tsp apple cider vinegar
  • 1 cup rough-chopped fair trade baking chocolate, divided

Instructions

  1. Preheat oven to 350°F. Grease 9x9-inch baking dish. In a small bowl, combine the almond flour, cocoa powder, coconut flour, baking soda and salt; set aside.
  2. In a large mixing bowl, add the mashed banana, honey and coconut oil. Using a stand mixer or electric hand mixer, blend together until smooth and creamy.
  3. Add the eggs, milk, vanilla and apple cider vinegar to the banana mixture and blend until well combined.
  4. Add the dry ingredients to the wet and mix until batter is thick and smooth, making sure to scrape down the bowl as needed.
  5. Fold in half of the chocolate pieces into the batter. Then pour batter into the prepared baking dish using a rubber spatula to scrape all the batter from the bowl.
  6. Use an offset spatula to even out batter. Sprinkle remaining chocolate pieces evenly over the top of the batter.
  7. Bake approximately 30 minutes, until toothpick inserted into center comes out clean. Allow bars to rest on stovetop until completely cool. Then, cut into bars and enjoy!
3.1
https://thenourishinghome.com/2015/10/double-chocolate-banana-bars/

*Disclosure: I believe in making a difference by choosing to purchase fair trade products. That’s why my family always purchases fair trade. As a friend of Fair Trade USA, I received complimentary products to create this particular recipe as a thank you for helping spread the word about how fair trade makes a difference in the lives of people across the globe. Also note, if you opt to purchase using the amazon affiliate links in this post, a small portion of the sale goes to support The Nourishing Home at no additional cost to you. There is no obligation to purchase, but if you do, you are helping to support the free resources, meal plans and recipes here at The Nourishing Home. Thank you!

You Might Also Like:

Top 10 Healthy Snacks for Kids (& Adults)
Pumpkin Swirl Bars (GF, DF option)
Fruit & Yogurt Parfaits (GF)

Filed Under: Cookies/Bars/Brownies, Sweet ·

Ultimate Banana Bread (GF, DF)

By Kelly · 17 Comments

I bet you’ll go bananas over this tasty sweet treat too!

Ultimate Banana Bread

This easy, scrumptious banana bread is one of the most beloved recipes from my published cookbook, Everyday Grain-Free Baking. And I’m certain that you’ll soon discover it to be a new family favorite in your home too!

Topped with a layer of sliced bananas, it’s truly the ultimate in moist, delicious flavor. In fact, it’s so scrumptious, I promise – no one will know it’s grain-free and dairy-free! And since over-ripe bananas are naturally sweet, just a touch of honey is all that’s needed to create a perfect balance of sweetness and rich flavor. So it’s definitely a nutritious treat you can feel good about serving.

Ultimate Banana Bread CU

With its light, moist texture and rich banana flavor, this delightful bread makes a beautiful and tasty addition to any breakfast or brunch. Classic sweet quick breads like this one are certain to bring back fond memories that everyone deserves to enjoy!

EverydayGrainFreeBakingThis delightful recipe is just one of more than 100 irresistible grain-free, dairy-free recipes in my new cookbook – Everyday Grain-Free Baking!

From breads, biscuits and muffins to savory snacks and decadent treats, you’ll find step-by-step instructions, beautiful color photographs and helpful tips & tidbits to make all of your GF baking adventures a delicious success!

Click here to get a SNEAK PEEK of the book!

Print
Ultimate Banana Bread

Yield: 12 slices

Ingredients

  • 2 cups blanched almond flour
  • 2 Tbsp coconut flour
  • 1 tsp baking soda
  • 1/2 tsp sea salt
  • 1 cup mashed ripe banana (about 2 large ripe bananas)
  • 3 Tbsp honey
  • 2 Tbsp coconut oil, melted
  • 3 large eggs
  • 2 Tbsp pure coconut milk
  • 2 tsp pure vanilla extract
  • 1 tsp apple cider vinegar
  • Optional: 1 large ripe banana, sliced

Instructions

  1. Preheat oven to 350°F. Grease an 8.25x4.25-inch loaf pan and line bottom only with parchment paper, slightly greasing the parchment as well. Note: A standard 9x5-inch loaf pan will result in a longer, shorter loaf. But it will still taste great!)
  2. In a small bowl, combine the almond flour, coconut flour, baking soda and salt; set aside.
  3. In a large mixing bowl, add the mashed banana, honey and coconut oil. Using a stand mixer or electric hand mixer, blend together until smooth and creamy.
  4. Add the eggs, milk and vanilla to the banana mixture and blend until well combined.
  5. Add the dry ingredients to the wet and mix until batter is thick and smooth, making sure to scrape down the bowl as needed.
  6. Mix in the apple cider vinegar, then pour batter into the prepared loaf pan using a rubber spatula to scrape all the batter from the bowl.
  7. Optional: In a medium bowl, add one tablespoon of melted coconut oil. Cut one banana into thin slices and gently toss in the coconut oil until well coated. Arrange the banana slices along the top of the batter, leaving the center open for even baking.
  8. Bake bread for approximately 45 minutes, until golden brown and toothpick inserted into center comes out clean. Allow bread to rest on stovetop about 10 minutes. Then, run a knife along the edges and invert onto a cutting board to finish cooling.

Notes

Recipe Variation: If you’re a chocolate lover, fold 1/3 cup of dairy-free mini chocolate chips into the batter. This bread is also delicious with the addition of walnuts, either sprinkled across the top of the bread, or folded into the batter—or both!

3.1
https://thenourishinghome.com/2015/09/ultimate-banana-bread/

You Might Also Like:

Pumpkin Praline Coffee Cake
Fruit & Nut Bars in a Jar (GF)
New Raw Cookie Recipe with Honey Pacifica!

Filed Under: Muffins/Breads/Biscuits, Other Desserts, Sweet ·

  • « Previous Page
  • 1
  • …
  • 3
  • 4
  • 5
  • 6
  • 7
  • …
  • 27
  • Next Page »

My New Cookbook is Here!

Welcome to The Nourishing Home!

I’m so glad you’re here and want you to feel right at home! My heart in creating this blog is to help you by sharing helpful meal planning strategies and nourishing GF recipes that are healthy, easy and delicious with thanksgiving to God! [Read More …]


All content (recipes, photos, posts, etc.) on this site is the creative property of Kelly Smith. You are welcome to share a photo via social media, as long as it contains a link back to the corresponding recipe or post from this site. However, you may not republish a recipe in its entirety in any form. For questions, or for permission to use a photo or recipe, please contact me via email at [email protected]. Thank you!

Please Note: All content (recipes, photos, text, etc.) on this site is the creative property of Kelly Smith of The Nourishing Home. You are welcome to share a photo via social media, as long as it contains a link back to the corresponding recipe from this site. However, re-publishing a recipe in any form is strictly prohibited. Additionally, please refrain from adapting recipes without properly linking back to the original recipe, and keep in mind that simple substitutions do not constitute an adapted or original recipe. For details regarding recipe copyright law, please visit the Food Blog Alliance.
The Nourishing Home is a participant in the Amazon Services LLC Associates Program, an affiliate advertising program designed to provide a means for sites to earn advertising fees by advertising and linking to amazon.com.

Privacy Policy
DMCA.com

Copyright © 2023 · All Rights Reserved · The Nourishing Home · Artwork by Nancy Panaccione · Site Design by Deluxe Designs · Log in