The Nourishing Home

living healthier lives in service to the King!

  • Home
  • About
    • About TNH
    • Contact
  • Meal Planning
  • Health & Wellness
    • Real Food Basics
  • Whole30
  • GF Recipes
    • Whole30
    • Breakfast
    • Lunch
    • Entrées
    • Slow Cooker
    • Soups & Stews
    • Sides & Salads
    • Snacks
    • Desserts
    • Kids in the Kitchen
  • My Cookbook
  • Subscribe

Fruit-on-the-Bottom (and top) Yogurt Cups

By Kelly · Leave a Comment

Healthy Homemade Fruit-on-the-Bottom Yogurt Cups
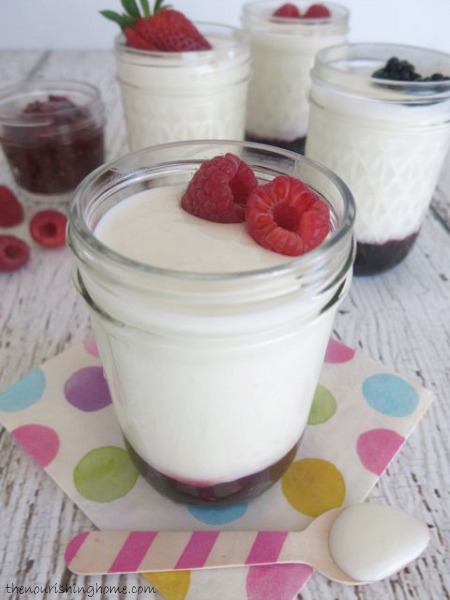
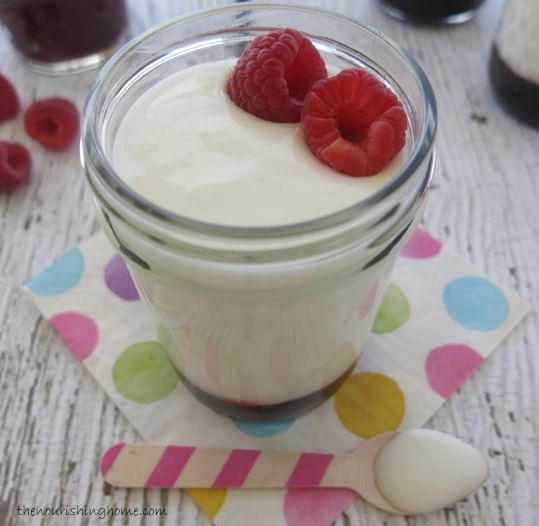
This healthier version of the popular commercial brand fruit-on-the-bottom yogurt is packed with greater nutrition because it’s made with homemade yogurt, honey-sweetened jam and fresh organic berries.

And it’s so simple to make! Just add a tablespoon or two of your favorite jam to a small mason jar and top with fresh homemade yogurt and a handful of berries.

Fruit on Bottom Yogurt Close Up

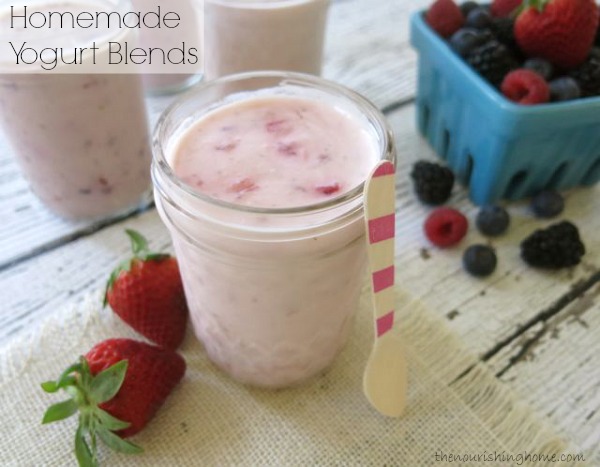
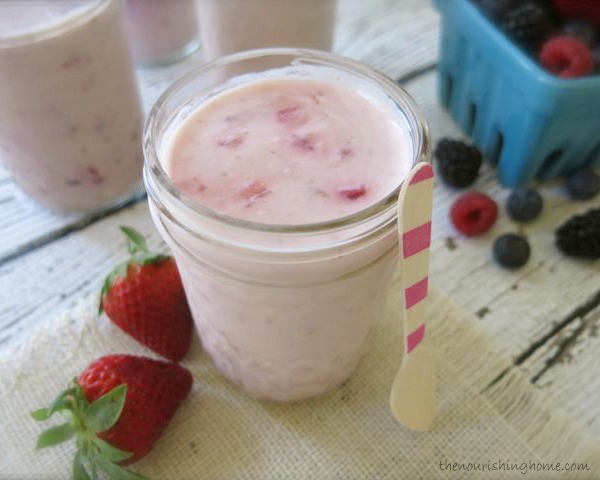
Making your own yogurt is not only easy and more nutritious, it’s a great way to save money too! And there are so many delicious ways to use it – from fruit & yogurt parfaits to creamy homemade salad dressings – the ideas are endless!

Print
Fruit-on-the-Bottom (and top) Yogurt Cups

Yield: 1 serving

Fruit-on-the-Bottom (and top) Yogurt Cups

Ingredients

  • 3/4 cup homemade dairy or non-dairy yogurt
  • 1-2 tbsp of homemade honey-sweetened fruit preserves (or your favorite all-fruit organic jam)
  • 1/4 cup fresh organic berries

Instructions

  1. Add fruit preserves to a half-pint mason jar or small bowl. Then top with plain yogurt and a sprinkling of fresh berries.
  2. If you like a little crunch, add some chopped crispy nuts (like walnuts) or a sprinkling of homemade grain-free granola to the top. So easy and so yummy!
3.1
https://thenourishinghome.com/2012/03/fruit-on-the-bottom-and-top-yogurt/

You Might Also Like:

Mixed Berry Muffins (GF)
Cinnamon Streusel Muffins (GF)
Nut Butter & Jam Pancakes {Leftovers made FUN!}

Filed Under: Breakfast, Other Breakfast Foods ·

Healthier Flavored Yogurt (GF)

By Kelly · Leave a Comment

Homemade Blended Yogurts
Making your own flavored yogurt is so easy and is much healthier, because you can avoid all of the refined sugar, “natural” flavorings and fillers. And the best part is … it’s even more delicious!

It’s also more economical – it costs much less per serving to buy a large container of plain organic yogurt (or even better, make your own homemade yogurt), and then add a variety of healthy real foods to create your favorite flavors.

Homemade Blended Yogurt
Below you’ll find our simple recipe for making blended fruit yogurts, followed by a simple recipe for making classic vanilla flavored yogurt. Enjoy!

(recipe contains some aff.links)

Print
How to Make Homemade Fruit Yogurt Blends

Yield: 2 servings

Ingredients

  • 
1 1/4 cup homemade dairy or non-dairy yogurt, divided
  • 1/2 cup diced or halved fresh (or frozen) berries of your choice (see below)
  • 2-
3 tbsp of homemade jam, honey or maple syrup

Instructions

  1. If using strawberries, remove the stems and quarter before measuring out 1/2 cup. If using blueberries, raspberries or blackberries, simply cut them in half and then measure.
  2. In a blender (or VitaMix), add 1/4 cup of yogurt, the berries and sweetener of choice. If you like fruit pieces in your yogurt, blend 10-20 seconds, just until combined. For a smoother yogurt, continue to blend until mixture is completely blended.
  3. Pour the fruit blend into a small bowl and add the remaining 1 cup of yogurt. Gently whisk to combine.
  4. Divide among two small mason jars or containers of choice, cover, and refrigerate. Fresh fruit blended yogurt should be eaten right away, or at least within two days, for best flavor.

Notes

More Flavor Variations: Enjoy “mixed berry” yogurt by using a combination of organic strawberries, blueberries and raspberries. Yum! Another variation my kids love is strawberry-banana. As you can see, the possibilities are endless! And because you are making it yourself, you can adjust the amount of fruit and natural sweetener to suit your taste preferences.

Note about separation: Many fresh fruits can cause yogurt to become runny and separate, especially as time passes. So homemade yogurt blends using fresh fruit are best consumed within 2-3 days, or simply whisk the yogurt to re-blend, if separate occurs.

Money-Saving Tip: When fresh berries are in season they’re usually at the lowest price, so why not buy lots and freeze them for use in smoothies, yogurt and desserts! It’s also fun (and more economical) to find a local organic U-Pick farm and enjoy a family field trip to berry-pick together.

3.1
https://thenourishinghome.com/2012/03/healthier-flavored-yogurt-gf/

Print
Simply Delicious Vanilla Yogurt

1 one-cup serving

Ingredients

  • 1 cup homemade dairy or non-dairy yogurt
  • 2 tbsp pure maple syrup (or honey)
  • 1/4 tsp pure vanilla extract

Instructions

  1. In a mixing bowl, add yogurt, vanilla and maple syrup; gently stir to combine. Makes two half-cup servings. Enjoy!
3.1
https://thenourishinghome.com/2012/03/healthier-flavored-yogurt-gf/

You Might Also Like:

Easy Summer Berry Yogurt Parfait
Lemonberry Muffins (GF)
Fruit & Yogurt Parfaits (GF)

Filed Under: Breakfast, Other Breakfast Foods ·

Fruity Coconut Flour Pancakes (GF, DF Option)

By Kelly · 20 Comments

Pancakes are one of those comfort foods that everyone loves. So now that we’re eating less gluten and grains, I thought it would be fun to try coconut flour pancakes, especially since there seems to be such strong opinions about what makes a great coconut flour pancake.

Well, in my humble opinion, the fluffier (and fruiter) the pancake, the better. And after making way too many batches, I’ve found that the key to fluffy coconut flour pancakes is two things: Separate your eggs, so you can fold well-whipped, fluffy egg whites into the batter, and keep the pancakes small – silver dollar size to be exact.

So if you enjoy the flavor and texture of coconut flour, we think you’ll find these pancakes quite tasty, especially with fresh organic blueberries added. They’re also delicious with fresh diced organic strawberries, or diced banana with a sprinkling of crispy walnuts. Mmm! Just see note below about how to properly add fruit to pancakes. Enjoy!


Whipping the egg whites is key to fluffy coconut flour pancakes!

The trick to perfectly flipping pancakes … wet your nylon spatula with a little water before flipping. It helps to keep the spatula from sticking to the pancakes. 🙂

Adding fruit directly to the top of each cooking pancake (rather than adding it to the batter) ensures that the pancakes cook through evenly.

Print
Fruity Coconut Flour Pancakes (GF, DF Option)

Yield: 16 three-inch diameter pancakes

Fruity Coconut Flour Pancakes (GF, DF Option)

Ingredients

  • 1/2 cup coconut flour
  • 1 tsp baking soda
  • 1/4 tsp sea salt
  • Pinch of ground cinnamon
  • 4 large eggs, room temperature
  • 2 tbsp unsalted butter (or coconut oil), melted
  • 1 tbsp pure maple syrup or honey
  • 1 tsp vanilla extract
  • 1 cup pure coconut milk (or whole milk yogurt or whole milk kefir)
  • 1/4 tsp apple cider vinegar
  • Fresh blueberries (or your favorite fresh fruit)

Instructions

  1. Preheat griddle over medium to medium-low heat.
  2. In a small bowl combine the coconut flour, baking soda, salt and pinch of ground cinnamon.
  3. Next, separate the egg whites from the yolks. Place the egg whites in a medium bowl; set aside.
  4. Place the egg yolks in a large bowl and whisk in the melted butter. (Be sure the melted butter has cooled to touch before adding, otherwise you may end up with some cooked egg-yolk bits.) Next, whisk in the maple syrup (or honey), vanilla, coconut milk and apple cider vinegar.
  5. Then, add the dry mixture to the egg yolk mixture, whisking well to thoroughly combine, making sure there are no lumps in the batter.
  6. Using a clean large wire whisk, whisk the egg whites rapidly until very foamy (about two minutes).
  7. Then, use the whisk to fold the whipped egg whites into the batter; by gently turning the batter over and over again, until well combined. Allow batter to sit about 3-5 minutes for coconut flour to absorb the liquid. Note: Batter should be somewhat thick. But if batter is too thick for your liking, add additional milk 1 tablespoon at a time until desired consistency is reached.
  8. Grease preheated griddle with butter (or coconut oil).
  9. Ladle a spoonful of batter onto the griddle to form a silver dollar size pancake (about 3” in diameter).
  10. Top each pancake with a few fresh blueberries, if desired (see note below). Cook for a few minutes, until the tops begin to dry out and the bottoms are a golden brown. It’s important to keep a careful eye on them as coconut flour pancakes burn easily. (I like to take a little peek under one of the pancakes to check, before flipping.)
  11. Carefully flip and cook another few minutes until done, but not over-browned.
  12. Serve hot off the griddle with butter, pure maple syrup and a medley of fresh berries.

Notes

Fabulous Fruity Pancakes: To make fabulous fruity pancakes, do not add fruit directly into the pancake batter. Instead, once you ladle out the batter onto the hot griddle, add a small amount of fresh whole blueberries (or other diced fruit of your choice) to the top of each pancake prior to flipping (see photo above). This ensures that the pancakes cook through evenly. It's also best to use fresh fruit, since frozen fruit tends to be excessively moist and may result in a soggy pancake.

*Note about Substitutions: For best results, use pure canned coconut milk (not light coconut milk or coconut milk beverages). Or if you're not dairy-free, use whole milk kefir or whole milk yogurt. Either way, it's the higher fat content that contributes to the fluffiness and flavor of the pancakes. (Note: Native Forest brand canned organic unsweetened coconut milk is BPA-free.)

Time Saving Tip: Make a double batch and allow extra pancakes to cool on wire rack. Then place cooled pancakes on baking sheets and place baking sheets in freezer. Once pancakes are frozen, remove from baking sheet and place frozen pancakes in freezer-safe container. Store in freezer for up to one month. No need to thaw, simply reheat frozen pancakes in toaster oven (at 275 degrees) for a quick, healthy breakfast.

3.1
https://thenourishinghome.com/2012/03/fruity-coconut-flour-pancakes-gf/

*Disclosure: If you opt to purchase using the affiliate links in this post, a small portion of the sale goes to support The Nourishing Home at no additional cost to you. There is no obligation to purchase, but if you do, you are helping to support the free resources, meal plans and recipes here at The Nourishing Home. Thank you!

You Might Also Like:

Easy Summer Berry Yogurt Parfait
Pineapple-Coconut Muffins (GF)
Cinnamon Streusel Muffins (GF)

Filed Under: Breakfast, Pancakes/Waffles ·

  • « Previous Page
  • 1
  • …
  • 14
  • 15
  • 16
  • 17
  • 18
  • …
  • 20
  • Next Page »

My New Cookbook is Here!

Welcome to The Nourishing Home!

I’m so glad you’re here and want you to feel right at home! My heart in creating this blog is to help you by sharing helpful meal planning strategies and nourishing GF recipes that are healthy, easy and delicious with thanksgiving to God! [Read More …]


All content (recipes, photos, posts, etc.) on this site is the creative property of Kelly Smith. You are welcome to share a photo via social media, as long as it contains a link back to the corresponding recipe or post from this site. However, you may not republish a recipe in its entirety in any form. For questions, or for permission to use a photo or recipe, please contact me via email at [email protected]. Thank you!

Please Note: All content (recipes, photos, text, etc.) on this site is the creative property of Kelly Smith of The Nourishing Home. You are welcome to share a photo via social media, as long as it contains a link back to the corresponding recipe from this site. However, re-publishing a recipe in any form is strictly prohibited. Additionally, please refrain from adapting recipes without properly linking back to the original recipe, and keep in mind that simple substitutions do not constitute an adapted or original recipe. For details regarding recipe copyright law, please visit the Food Blog Alliance.
The Nourishing Home is a participant in the Amazon Services LLC Associates Program, an affiliate advertising program designed to provide a means for sites to earn advertising fees by advertising and linking to amazon.com.

Privacy Policy
DMCA.com

Copyright © 2026 · All Rights Reserved · The Nourishing Home · Artwork by Nancy Panaccione · Site Design by Deluxe Designs · Log in