The Nourishing Home

living healthier lives in service to the King!

  • Home
  • About
    • About TNH
    • Contact
  • Meal Planning
  • Health & Wellness
    • Real Food Basics
  • Whole30
  • GF Recipes
    • Whole30
    • Breakfast
    • Lunch
    • Entrées
    • Slow Cooker
    • Soups & Stews
    • Sides & Salads
    • Snacks
    • Desserts
    • Kids in the Kitchen
  • My Cookbook
  • Subscribe

Cinnamon Apple Grain-Free Breakfast Porridge (Dairy-Free too!)

By Kelly · 103 Comments

I’m in love, I’m in love and I don’t care who knows it!

I'm in love with this delicious dairy free and grain-free breakfast porridge with its rich cinnamon-apple flavor delightfully paired with a creamy, oat-like chewy texture.

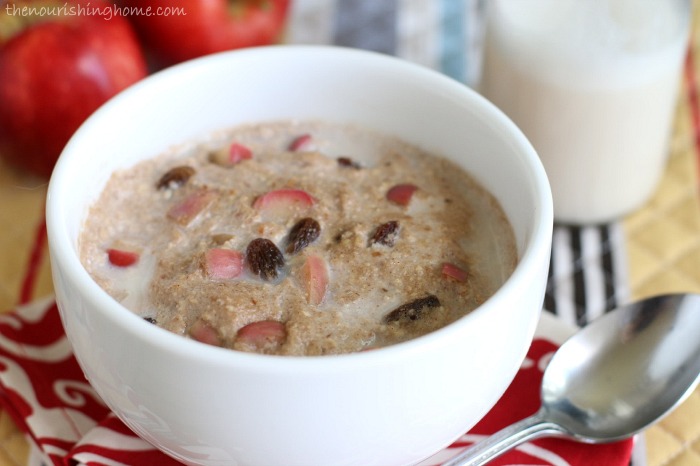
I know I can be a bit overdramatic at times (okay, maybe a lot) … but it’s true …. I’m in love with this scrumptious Cinnamon Apple Breakfast Porridge! I can’t begin to tell you how much I’ve longed for a warm, creamy bowl of delicious porridge! Maybe you have too?

Since oats are a big no-no for those of us living grain-free, the question was how to capture the flavor and texture of oats without the use of that classic porridge staple?

So, similar to my scrumptious grain-free Almost Oatmeal Cookies recipe, I decided to use unsweetened coconut to provide a chewy texture similar to oats. I also based this recipe on a method for creating grain-free porridge that I learned from Danielle Walker in her wonderful cookbook Against All Grain – by grinding soaked nuts with sweet ripe banana you can create a consistency remarkably similar to porridges like Scottish Oatmeal and classic Cream of Wheat. (Danielle is so brilliant!)

Another secret to this unbelievably yummy grain-free breakfast porridge is sweet and fragrant bite-sized apples sautéed with a pinch of fresh ground nutmeg and the addition of chewy sweet raisins. The culmination of flavors creates the ultimate porridge experience – rich cinnamony-apple flavor delightfully paired with a creamy, oat-like chewy texture.

I'm in love with this delicious dairy free and grain-free breakfast porridge with its rich cinnamon-apple flavor delightfully paired with a creamy, oat-like chewy texture.

Still, even with all these tempting descriptions … Maybe you’re feeling a little skeptical – wondering if this interesting concoction of healthy grain-free ingredients might actually be capable of filling that void in your heart that longs for a warm bowl of creamy oatmeal?

Well, let me assure you that all of my doubts were tossed aside after one delicious bite … followed by two … then, three … then, oops! the whole bowl is gone! (Of course, it’s important to point out that technically speaking this isn’t a Whole30-compliant breakfast since it mimics cereal. But you’ll definitely want to add this to your reintroduction phase!)

It’s such a joy to be able to create delicious grain-free foods that capture the tastes and textures of favorite comfort foods, and even better is when they are SO good that even our family and friends eagerly enjoy them too!

That’s why I’m SO excited to share this delightful Cinnamon Apple Breakfast Porridge with you. I’m beyond thrilled to be reunited with one of my ultimate wintertime favorites and I’m certain you and your family will be too!

Print
Cinnamon Apple Breakfast Porridge (Grain-Free, Dairy-Free)

Yield: 4 servings

Ingredients

  • 1/2 cup whole raw almonds
  • 1/2 cup whole raw cashews
  • 1/4 cup raw walnuts
  • 1/3 cup unsweetened coconut flakes
  • 1 large ripe banana
  • 1 egg yolk (optional)
  • 1 tbsp ghee (or coconut oil)
  • 1 medium apple, chopped into bite-sized pieces
  • 1/8 tsp ground nutmeg
  • 1 14 oz. can (1 3/4 cups) pure coconut milk
  • 2 tsp pure vanilla extract
  • 2 tsp ground cinnamon
  • 1/2 cup raisins

Instructions

  1. In a medium bowl, add the nuts and coconut flakes. Add enough filtered water to the bowl to completely cover the nuts and coconut. Add a pinch of salt and cover the bowl with a kitchen towel or plate. Allow the nuts to soak at least 7-8 hours or overnight.
  2. Once soaking time is completed, drain the nuts and coconut flakes in a colander; making sure to rinse them well until water runs clear.
  3. Add the nuts and coconut flakes to the bowl of a food processor. Then, add the egg yolk (if using) and banana (break the banana in pieces and add to the top of the nuts).
  4. Pulse the nuts and banana mixture until it forms a fine nut meal, making sure to stop and scrape down the bowl as needed for an even texture. Then, remove bowl from food processor and set aside. (Please note: You can alternate between pulsing and blending, if desired. The goal is to create a fine nut meal, but not a paste. I find pulsing makes it easier to keep an eye on the consistency.)
  5. Add ghee (or coconut oil) to a saucepan over medium heat. Add the chopped apple and nutmeg to the pan and sauté the apples until they begin to soften.
  6. Next, add the coconut milk, vanilla, cinnamon and raisins. Then add the banana-nut meal mixture. Stir well to thoroughly combine.
  7. Bring the porridge to a gentle simmer and cook for about 5-6 minutes until it's thick and creamy.
  8. Ladle the cinnamon apple porridge into bowls and add a splash of your favorite milk. Truly the perfect breakfast to warm your family's hearts and tummies on cold fall and wintertime mornings.

Notes

Love pumpkin pie? Be sure to try my scrumptious Grain-free Pumpkin Pie Breakfast Porridge too! Yum!

Doing the Whole30? It's important to point out that technically speaking this isn't a Whole30-compliant breakfast since it mimics cereal. But you'll definitely want to add this to your reintroduction phase!

3.1
https://thenourishinghome.com/2014/10/grain-free-cinnamon-apple-breakfast-porridge/

P.S. The lovely table linens featured in these photos are courtesy of my friends at Hen House Linens. I just adore their beautiful linens, and even more so, their mission to make mealtimes special by adding a touch of warmth and beauty to the table.

Disclosure: Some of the links in this post include affiliate links, providing The Nourishing Home a small percentage of the sale at no additional cost to you. Of course, you are not obligated to use these links to make a purchase, but if you do, it helps to support this site and ministry. Thank you!

You Might Also Like:

Pumpkin Pie Porridge (Grain-Free, Dairy-Free)
How to Make Grain Free Granola {Step-by-Step}
Pumpkin Spice Granola (Grain-Free, Dairy-Free)

Filed Under: Porridges & Cereals ·

How to Make Simple Seasoned Cauliflower Rice

By Kelly · 16 Comments

Wondering how to magically transform cauliflower into a highly nutritious grain-free rice dish? Let me show you how to make cauliflower rice!

Exciting News: This is just one of a bunch of Whole30 Recipes here at The Nourishing Home. PLUS I’ll be sharing even more Whole30-friendly recipes and FREE Whole30 Meal Plans as part of The Ultimate Whole30 Success Guide!

As I’ve made my way along the grain-free path, I’ve often found myself craving rice. Honestly, it’s been the only grain that I miss. So when I discovered lots of grain-free foodies turning cauliflower into “rice,” I must admit, I was a bit skeptical. But thank goodness my curiosity was greater than my doubt, because I truly enjoy this newfound alternative!

In fact, I’ve been having lots of tasty-fun creating my own versions of cauli-rice like this highly versatile, yet simple, seasoned cauliflower rice dish. So if you’ve been on the fence about trying cauli-rice too, let me assure you – it’s absolutely delicious, nutritious, and really easy to make!

Wondering how to magically transform cauliflower into a highly nutritious grain-free rice dish? Let me show you just how simple it is …

How to Make Cauliflower Rice …

Step 1: Rinse and Dry a Head of Cauliflower

Wondering how to magically transform cauliflower into a highly nutritious grain-free rice dish? Let me show you how to make cauliflower rice!

Purchase a large head of cauliflower; rinse well and dry thoroughly before cutting. I usually get my cauliflower from Trader Joe’s because they sell it by the head, not by the pound. (So you guessed it, I dig around in search of the largest cauliflower in the bin. And you should too! After all, the bigger the cauliflower, the more rice you’ll have to enjoy!)

Step 2: Cut Out the Core of the Cauliflower and Cut into Florets

Wondering how to magically transform cauliflower into a highly nutritious grain-free rice dish? Let me show you how to make cauliflower rice!

Place the core face up and then carefully use a sharp knife to cut in a circular pattern around the core. Removing the core makes it much easier to cut the cauliflower into even-sized florets.

Step 3: Using a Food Processor, Pulse Cauliflower Florets into Rice

Wondering how to magically transform cauliflower into a highly nutritious grain-free rice dish? Let me show you how to make cauliflower rice!

Place half of the cauliflower florets into a food processor. Cover and pulse until the cauliflower resembles rice grains.

Wondering how to magically transform cauliflower into a highly nutritious grain-free rice dish? Let me show you how to make cauliflower rice!

By slowly pulsing the cauliflower, you will be able to carefully monitor your progress in reaching grain-sized pieces.

Step 4: Sauté and Steam the Cauliflower in a Large Skillet

Wondering how to magically transform cauliflower into a highly nutritious grain-free rice dish? Let me show you how to make cauliflower rice!

Add the cauliflower rice to a large skillet and cook as directed in the recipe below. It only takes about 10-15 minutes to cook cauli-rice, so it really is a pretty quick dish to put together even on a busy night. (Especially if you process the cauliflower on your prep day and place it in an airtight container in the fridge until you’re ready to cook it. See recipe instructions below for details.)

Step 5: Enjoy!

Wondering how to magically transform cauliflower into a highly nutritious grain-free rice dish? Let me show you how to make cauliflower rice!

For those of us who’ve been missing rice, cauli-rice is a dream come true! You simply won’t believe how delicious cauli-rice is until you try it for yourself. It’s mild flavor and rice-like texture makes it the perfect addition to any meal that calls for rice.

Ready to give cauli-rice a try?

Below you’ll find my simple seasoned cauli-rice recipe. It really is a delicious grain-free alternative to rice! Use it as a base for your favorite stir fry. Or serve it alongside your favorite grilled meats, poultry, fish and veggies.

And by changing the herbs used, you can create a customized flavorful “rice” dish to complement just about any main dish you desire. (See recipe notes for details.)

Wondering how to magically transform cauliflower into a highly nutritious grain-free rice dish? Let me show you how to make cauliflower rice!

P.S. The lovely napkins featured in these photos are courtesy of my friends at Hen House Linens. I just adore their beautiful table linens, and even more so, their mission to make mealtimes special by adding a touch of warmth and beauty to the table.

Print
Simple Seasoned Cauliflower Rice

Yield: 8-10 one-cup servings

Ingredients

  • 1 large head of cauliflower
  • 2 tbsp ghee (or butter)
  • 1 tbsp olive oil
  • 1/2 cup fine diced yellow onion
  • 3/4 tsp sea salt
  • 1/2 tsp dried parsley
  • 1/2 tsp garlic powder
  • 1/4 tsp fresh ground black pepper
  • 1/3 cup homemade chicken stock
  • 1-2 tbsp minced fresh parsley (see note below for more options)

Instructions

  1. Cut the cauliflower into florets, and then use a food processor to pulse the florets into rice-like grains as described in the above photo tutorial. Set riced cauliflower aside.
  2. Meanwhile, in a large skillet over medium heat, add the ghee, olive oil and onion. Sauté onion until it begins to soften. Then, add the salt, dried parsley, garlic powder and pepper. Stir well to combine the seasonings with the onion. Continue to cook onion another 1-2 minutes until soft and translucent.
  3. Add the riced cauliflower to the seasoned onion and stir well to combine. Continue stirring and sautéing the cauli-rice until it begins to soften (about 5 minutes).
  4. Add the chicken stock and cover the skillet. Allow the cauli-rice to steam for about 5 minutes until the stock is absorbed and the cauli-rice reaches desired texture.
  5. Remove cover, add the minced fresh parsley and fluff cauli-rice to combine.
  6. Makes a tasty and nutritious grain-free “rice” dish to serve alongside your favorite healthy meals.

Notes

Recipe Variation: By changing the herbs in this recipe, you can create customized cauli-rice to complement you main dish. For example, substitute minced fresh cilantro for the fresh parsley and add about 1/4 tsp cumin and 1/4 tsp chili powder to create a delicious Mexi-Style Cauli-Rice.

Time Saving Tip: You can process a head of cauliflower into rice up to 3-4 days in advance. Store the uncooked cauli-rice in an airtight container in the fridge until ready to cook. Cooked rice should also be stored in an airtight container in the fridge and generally tastes great for up to 2-3 days. However, I do not recommend freezing uncooked or cooked cauli-rice, as it becomes mushy.

3.1
https://thenourishinghome.com/2014/10/how-to-make-cauliflower-rice/

For even more delicious cauliflower rice recipes, I highly recommend picking up a copy of Meals Made Simple by Danielle Walker. It’s truly one of my favorite grain-free cookbooks, and it’s what finally convinced me to give cauli-rice a try. Yum!

Disclosure: Some of the links in this post include affiliate links, providing The Nourishing Home a small percentage of the sale at no additional cost to you. Of course, you are not obligated to use these links to make a purchase, but if you do, it helps to support this site and ministry. Thank you!

You Might Also Like:

Roasted Herb Sweet Potato Bites
Healthier French Fries (GF)
Fresh Pineapple Salsa (GF, DF, Whole30)

Filed Under: Sides, Whole30 ·

Creamy Pumpkin Soup with Crispy Bacon Bits (dairy-free)

By Kelly · 28 Comments

Warm . Savory . Delicious!

Pumpkin Soup with Crispy Bacon Bits

A big bowl of creamy, hearty soup on a cool autumn evening is such a comforting and satisfying meal. That’s why this time of year, I love to create delicious new soup and stew recipes and include them in my weekly meal plans.

I’ve always loved the idea of pumpkin soup, but to be honest I haven’t really enjoyed the recipes I’ve tried that call for pumpkin pie type spices in the soup. Maybe it’s just me, but when I sit down to a warm bowl of soup, I really want something S A V O R Y! … Mmm!

So I set out to create a creamy pumpkin soup that combines the subtle sweetness of this classic fall favorite with the savory bold flavors of bacon, onion, sage and thyme with just a hint of spicy ginger.

Pumpkin Soup with Crispy Bacon & CoconutSwirl

I cannot even begin to describe to you how incredibly wonderful this soup is … suffice it to say, “This soup is SOOOOOOO… GOOD!

Plus, it’s so easy to make! And, it’s dairy-free, which you simply will not believe because it’s so creamy and rich! It truly is savory, satisfying and delicious! Enjoy!

P.S. The lovely fall-inspired napkins featured in these photos are courtesy of my friends at Hen House Linens. I just adore their beautiful table linens, and even more so, their mission to make mealtimes special by adding a touch of warmth and beauty to the table.

Dairy-Free Pumpkin Soup with Crispy Bacon

Print
Creamy Pumpkin Soup with Crispy Bacon Bits

Yield: 6 servings

Ingredients

  • 2 tbsp ghee (or butter)
  • 4 slices bacon, diced (see tip below)
  • 1/2 cup fine diced sweet onion
  • 1 1/2 cups homemade chicken stock
  • 3 1/2 cups homemade pumpkin puree (or two 15oz. cans)
  • 2 14 oz cans pure coconut milk
  • 1 tbsp minced fresh sage, plus extra for topping soup
  • 1/2 tsp ground ginger
  • 1/2 tsp dried thyme
  • 1 1/2 tsp sea salt

Instructions

  1. In a large stockpot (or dutch oven) over medium-high heat, add the ghee and bacon pieces. Sauté until bacon is crispy. Use a slotted spoon to remove the bacon bits; place on a paper towel and set aside.
  2. Reduce heat to medium, add the fine diced onion to the stockpot and sauté until translucent and golden in color. Then add the chicken stock, pumpkin, coconut milk (make sure to reserve 1/4 cup to create decorative pattern, if desired), sage, ginger, thyme and salt.
  3. Bring soup to a gentle simmer, cook uncovered for 15 minutes. Use immersion blender to blend the onion into the soup. Or use a blender and transfer the soup in batches until well blended.
  4. Ladle soup into bowls and drizzle top with the reserved coconut milk, if desired. Then top with crispy bacon bits, and minced fresh sage. YUM!

Notes

Tip: Using kitchen shears is an easy way to cut bacon slices into bite-size pieces.

Recipe Variation: Substitute the pumpkin puree with butternut squash puree for an equally delicious Creamy Butternut Squash Soup! YUM!

3.1
https://thenourishinghome.com/2014/10/creamy-pumpkin-soup-crispy-bacon-bits/

Looking for more delicious pumpkin recipes? Be sure to check out my “35 GF Pumpkin Recipes“ post over at Keeper of the Home.

Disclosure: Some of the links in this post include affiliate links, providing The Nourishing Home a small percentage of the sale at no additional cost to you. Of course, you are not obligated to use these links to make a purchase, but if you do, it helps to support this site and ministry. Thank you!

You Might Also Like:

Slow Cooker Apple Cider Pulled Pork {Whole30 Guest Post}
Roasted Lemon Spatchcock Chicken {How to Butterfly a Chicken}
Savory Cottage Pie {Whole30 option}

Filed Under: Soups, Whole30 ·

  • « Previous Page
  • 1
  • …
  • 37
  • 38
  • 39
  • 40
  • 41
  • …
  • 182
  • Next Page »

My New Cookbook is Here!

Welcome to The Nourishing Home!

I’m so glad you’re here and want you to feel right at home! My heart in creating this blog is to help you by sharing helpful meal planning strategies and nourishing GF recipes that are healthy, easy and delicious with thanksgiving to God! [Read More …]


All content (recipes, photos, posts, etc.) on this site is the creative property of Kelly Smith. You are welcome to share a photo via social media, as long as it contains a link back to the corresponding recipe or post from this site. However, you may not republish a recipe in its entirety in any form. For questions, or for permission to use a photo or recipe, please contact me via email at [email protected]. Thank you!

Please Note: All content (recipes, photos, text, etc.) on this site is the creative property of Kelly Smith of The Nourishing Home. You are welcome to share a photo via social media, as long as it contains a link back to the corresponding recipe from this site. However, re-publishing a recipe in any form is strictly prohibited. Additionally, please refrain from adapting recipes without properly linking back to the original recipe, and keep in mind that simple substitutions do not constitute an adapted or original recipe. For details regarding recipe copyright law, please visit the Food Blog Alliance.
The Nourishing Home is a participant in the Amazon Services LLC Associates Program, an affiliate advertising program designed to provide a means for sites to earn advertising fees by advertising and linking to amazon.com.

Privacy Policy
DMCA.com

Copyright © 2026 · All Rights Reserved · The Nourishing Home · Artwork by Nancy Panaccione · Site Design by Deluxe Designs · Log in