The Nourishing Home

living healthier lives in service to the King!

  • Home
  • About
    • About TNH
    • Contact
  • Meal Planning
  • Health & Wellness
    • Real Food Basics
  • Whole30
  • GF Recipes
    • Whole30
    • Breakfast
    • Lunch
    • Entrées
    • Slow Cooker
    • Soups & Stews
    • Sides & Salads
    • Snacks
    • Desserts
    • Kids in the Kitchen
  • My Cookbook
  • Subscribe

15 Fabulous Ways to Enjoy Dried Strawberries

By Kelly · 20 Comments

It’s a Strawberry Festival here! And guess what? You’re invited.

It’s a Strawberry Festival here! And guess what? You’re invited. Join me to discover 15 Fabulous Ways to Enjoy Dried Strawberries in your favorite recipes!

Recently, I got on a dried strawberry kick and couldn’t stop myself from eating them. Seriously! I was putting these awesome “Strawberry Chips” (as my youngest calls them) in and on everything.

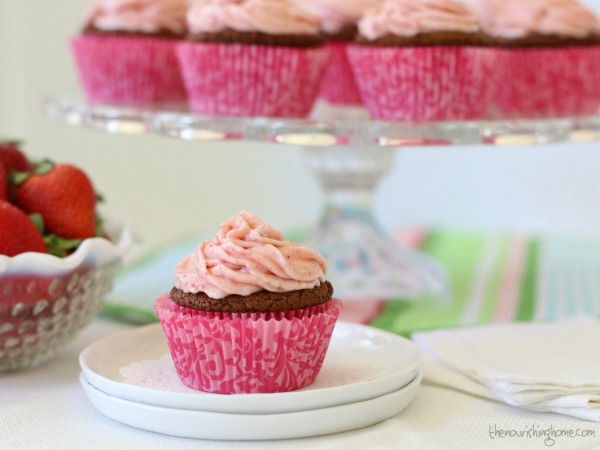
First, it started with creating an absolutely scrumptious Dairy-Free Strawberry Frosting that basically you’ll want to spread on everything!

It’s a Strawberry Festival here! And guess what? You’re invited. Join me to discover 15 Fabulous Ways to Enjoy Dried Strawberries in your favorite recipes!

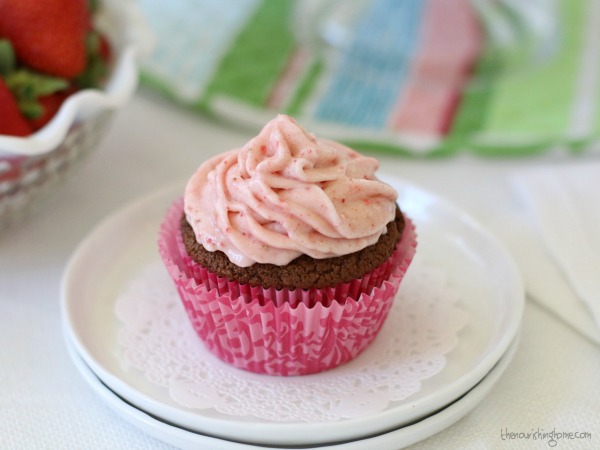
Of course, my Chocolate Lovers Cupcakes are a great place to start, unless you’re on the Whole30 – sorry, you’ll have to wait! But don’t be sad, because I’ve got lots of other delicious ideas that don’t involve cupcakes …

So why my fascination with these freeze-dried strawberries? Well, my friends at Honeyville were kind enough to send me a sample of their freeze-dried strawberries so I could create that yummy strawberry frosting. And since then, I’ve gone a little overboard coming up with even more tasty ways to enjoy them … as you’ll soon discover …

Although you can purchase freeze-dried strawberries from quality retailers like Honeyville, for most recipes, you can substitute with dehydrated strawberries instead. I’ve found that the best flavor comes from strawberries that are fully ripened. So if your fresh berries are beginning to get overripe, why not make a batch of delicious dried berries that can be used to add a sweet burst of flavor to your favorite recipes.

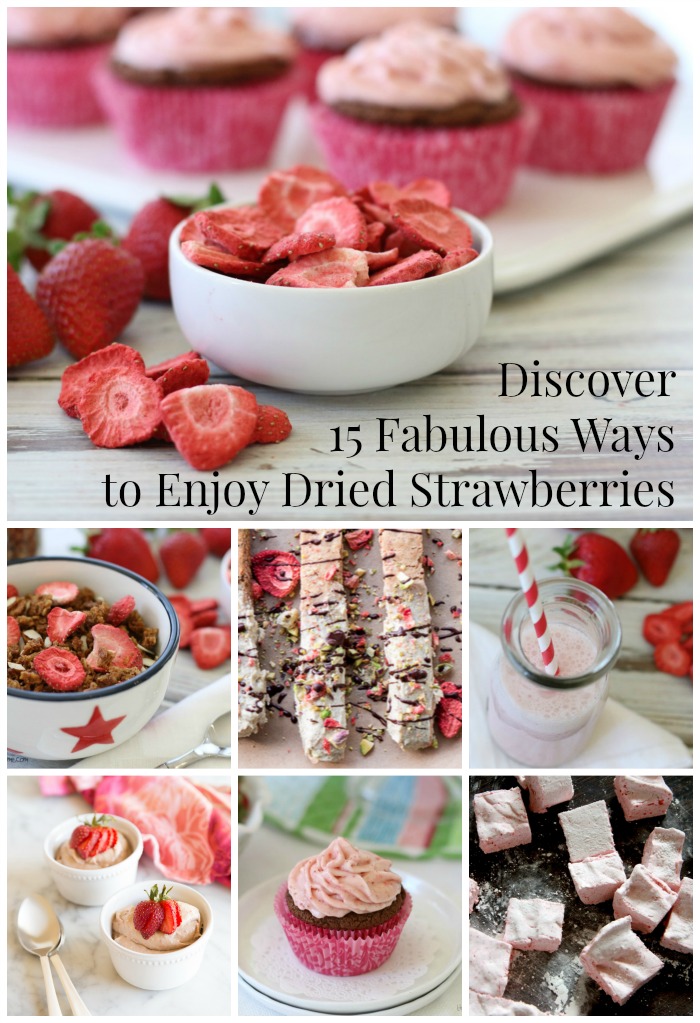
To help, I’m sharing 15 fabulous ways to use freeze-dried (or home dehydrated) strawberries. Of course, I’d love to hear your favorite tips for using dried strawberries too!

15 Fabulous Ways to Enjoy Dried Strawberries

It’s a Strawberry Festival here! And guess what? You’re invited. Join me to discover 15 Fabulous Ways to Enjoy Dried Strawberries in your favorite recipes!It’s a Strawberry Festival here! And guess what? You’re invited. Join me to discover 15 Fabulous Ways to Enjoy Dried Strawberries in your favorite recipes!

1. Whip up a delightful Dairy-Free Strawberry Frosting!

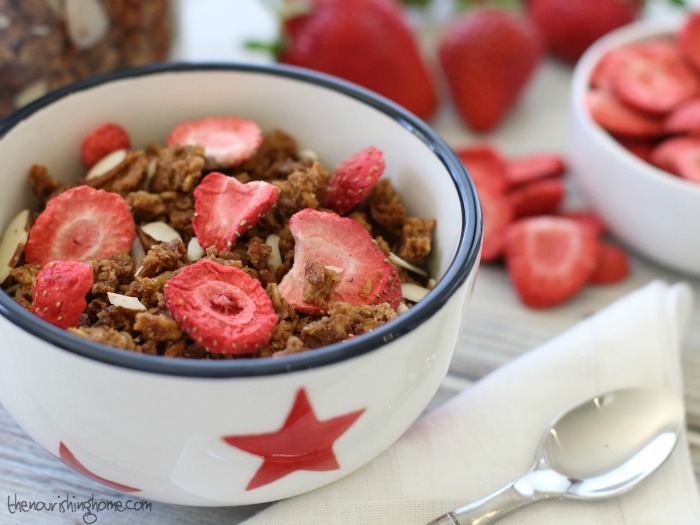
2. Pile them on your favorite Grain-Free Granola!

3. Create amazing mock-KIND bars with a burst of strawberry flavor!

4. Blend them in with your favorite Fruit–n-Veggie Smoothies
for an extra punch of flavor!

5. Mix them into your favorite Grain-Free Breakfast Porridge!

It’s a Strawberry Festival here! And guess what? You’re invited. Join me to discover 15 Fabulous Ways to Enjoy Dried Strawberries in your favorite recipes!It’s a Strawberry Festival here! And guess what? You’re invited. Join me to discover 15 Fabulous Ways to Enjoy Dried Strawberries in your favorite recipes!

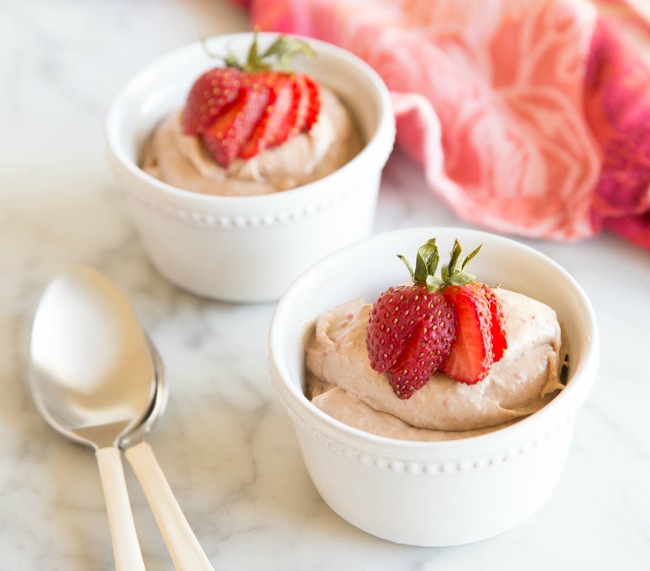
6. Whip up a luscious Dairy-Free Strawberry Mouse!

7. Dunk this scrumptious White Chocolate Strawberry Pistachio Biscotti
in your coffee!

8. Crush them up and use them to coat these
awesome Raw Almond Butter Truffles!

9. Or crush them up and use them as sprinkles
on Homemade Grain-Free Donuts!

10. Chop them up to make amazing Vanilla-Strawberry Macaroons!

It’s a Strawberry Festival here! And guess what? You’re invited. Join me to discover 15 Fabulous Ways to Enjoy Dried Strawberries in your favorite recipes!It’s a Strawberry Festival here! And guess what? You’re invited. Join me to discover 15 Fabulous Ways to Enjoy Dried Strawberries in your favorite recipes!

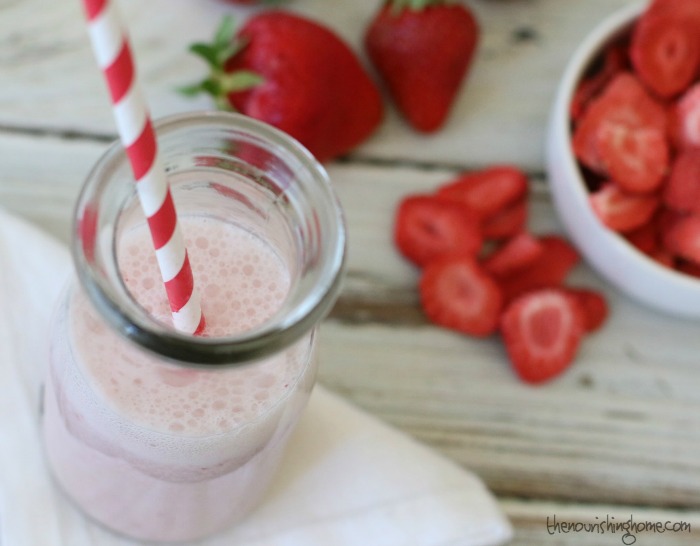
11. Use them to make Strawberry Milk that’s actually good for you!
(Simply grind 1/4 cup dried strawberries in a blender, add
1 cup of milk and 1-2 tsp of raw honey. Blend until frothy!)

12. Take s’mores to an all-new level with these
Homemade Strawberry Marshmallows!

13. Use them to make easy
3-Ingredient Strawberry White Chocolate Candies for your sweetie!

14, Add them to Trail Mix for an extra burst of sweetness!

15. Add fine-ground dried strawberry powder to Dairy-Free Icing
and use it to top your favorite cookies and desserts!

Bonus recipe … My creative friend Michele from Thriving on Paleo created the most luscious Fruit Tinted Lip Balm using dried strawberries and raspberries. If you’re a DIY’r then be sure to pop over to Paleo Parents check it out!

Have you tried dried strawberries? If so, what are your favorite ways to enjoy them?

You Might Also Like:

How to Season and Grill Veggies Like Pro!
Nut-Free "KIND" Bars (GF)
Simple Healthy Hash Browns {3 Tips for Perfect Hash Browns Every Time!}

Filed Under: Other Desserts, Sides, Sweet ·

Simple Healthy Hash Browns {3 Tips for Perfect Hash Browns Every Time!}

By Kelly · 26 Comments

Simple Healthy Hash Browns

Exciting News: This is just one of a bunch of Whole30 Recipes here at The Nourishing Home. PLUS I’ll be sharing even more Whole30-compliant recipes as we start our next Whole30 Challenge 2016. (P.S. You can join us anytime you’re ready to Jumpstart Your Health with Whole30!)

When it comes to classic breakfast side dishes, I know you may be thinking that a girl with roots in the South should be pretty partial to grits, right? Yet, the fact is, I’ve never been a fan, even when I wasn’t grain-free. (Thankfully my family hasn’t disowned me.)

Instead, as you’ve probably guessed from this post – I’m all about breakfast potatoes – homemade hash browns to be exact. Incase you’ve attempting making hash browns in the past, and have been sorely disappointed in their often soggy, gummy texture, I’ve got good news for you! I’m sharing the secrets to hash brown making perfection that will ensure a crisp and delicious result every time!

3 Tips for Ensuring Crisp & Tender Healthy Hash Browns:

1. Proper Potato Prep – Shred potatoes (using a food processor with shred-disc is best, but a box grater will do). Soak shredded potatoes in water to release starches. Thoroughly dry shredded potatoes by pressing between kitchen towels. This is key for crispier results!

2. Seasoning is Your Friend – Be generous in using fine chopped onion and bell pepper, along with sea salt and pepper to turn up the taste!

3. Do Not Disturb! – The process goes like this … Cook undisturbed. Flip potatoes in sections. Cook undisturbed. Flip in sections. Repeat until perfect.

Now, let’s put these top tips into action! My savory recipe below has just three simple ingredients. Yet, combined with a little dash of sea salt and pepper, and a whole lot of love, your family will want to kiss you!

Simple Healthy Hash Browns Close Up

So … make LOTS, because they’re the perfect side dish whether it’s breakfast or dinnertime. Plus, they keep well in the fridge or freezer, and can easily be reheated in a skillet.

P.S. If you’re not fond of white potatoes – no worries – sweet potatoes make unbelievably delicious hash browns too!

Print
Simple Healthy Hash Browns (GF, DF)

4-5 servings

Ingredients

  • 2 tbsp ghee (or coconut oil)
  • 1/4 cup fine diced yellow onion
  • 1/3 cup fine diced red bell pepper (or use yellow & red combo)
  • 3 medium russet potatoes (or white sweet potatoes - they're less sweet than orange)
  • Sea salt and pepper to taste

Instructions

  1. Dice the onion and pepper first, so that they’re ready to go once you shred the potatoes.
  2. Then, peel the potatoes (or leave them unpeeled if you'd prefer). Use a box grater or the shredder attachment on your food processor to shred the potatoes.
  3. Be sure to follow the tips in the post above on how to properly prepare your shredded potatoes.
  4. Heat a large skillet (preferably cast iron) over medium-high heat. Once hot, add ghee, onion and peppers. Sauté for a minute, then add the shredded potatoes, making sure to evenly distribute across the skillet.
  5. Allow potatoes to cook undisturbed for a few minutes, then carefully flip section by section. Continue to cook as noted in tips above, until golden brown.
  6. Transfer to a serving dish and enjoy!

Notes

Leftovers Tip: My kids love it when I make breakfast burritos using leftover hash browns. I just beat a couple of eggs and add them to a hot skillet and scramble the potatoes and eggs together. Then, add the potato-egg mixture to warm tortillas, roll them up and serve with a side of pico de gallo and sliced avocado. If you’re grain-free like me, I highly recommend keeping some of Danielle’s amazing GF tortillas on hand. That way, you can enjoy the burrito fiesta as well!

3.1
https://thenourishinghome.com/2014/10/simple-healthy-hash-browns/

Disclosure: Some of the links in this post include affiliate links, providing The Nourishing Home a small percentage of the sale at no additional cost to you. Of course, you are not obligated to use these links to make a purchase, but if you do, it helps to support this site and ministry. Thank you!

You Might Also Like:

Savory Herb Dressing (GF)
Herb Seasoned Grain-Free Stuffing
Easy Crockpot Beef Stew (GF, DF)

Filed Under: Sides, Whole30 ·

How to Make Simple Seasoned Cauliflower Rice

By Kelly · 16 Comments

Wondering how to magically transform cauliflower into a highly nutritious grain-free rice dish? Let me show you how to make cauliflower rice!

Exciting News: This is just one of a bunch of Whole30 Recipes here at The Nourishing Home. PLUS I’ll be sharing even more Whole30-friendly recipes and FREE Whole30 Meal Plans as part of The Ultimate Whole30 Success Guide!

As I’ve made my way along the grain-free path, I’ve often found myself craving rice. Honestly, it’s been the only grain that I miss. So when I discovered lots of grain-free foodies turning cauliflower into “rice,” I must admit, I was a bit skeptical. But thank goodness my curiosity was greater than my doubt, because I truly enjoy this newfound alternative!

In fact, I’ve been having lots of tasty-fun creating my own versions of cauli-rice like this highly versatile, yet simple, seasoned cauliflower rice dish. So if you’ve been on the fence about trying cauli-rice too, let me assure you – it’s absolutely delicious, nutritious, and really easy to make!

Wondering how to magically transform cauliflower into a highly nutritious grain-free rice dish? Let me show you just how simple it is …

How to Make Cauliflower Rice …

Step 1: Rinse and Dry a Head of Cauliflower

Wondering how to magically transform cauliflower into a highly nutritious grain-free rice dish? Let me show you how to make cauliflower rice!

Purchase a large head of cauliflower; rinse well and dry thoroughly before cutting. I usually get my cauliflower from Trader Joe’s because they sell it by the head, not by the pound. (So you guessed it, I dig around in search of the largest cauliflower in the bin. And you should too! After all, the bigger the cauliflower, the more rice you’ll have to enjoy!)

Step 2: Cut Out the Core of the Cauliflower and Cut into Florets

Wondering how to magically transform cauliflower into a highly nutritious grain-free rice dish? Let me show you how to make cauliflower rice!

Place the core face up and then carefully use a sharp knife to cut in a circular pattern around the core. Removing the core makes it much easier to cut the cauliflower into even-sized florets.

Step 3: Using a Food Processor, Pulse Cauliflower Florets into Rice

Wondering how to magically transform cauliflower into a highly nutritious grain-free rice dish? Let me show you how to make cauliflower rice!

Place half of the cauliflower florets into a food processor. Cover and pulse until the cauliflower resembles rice grains.

Wondering how to magically transform cauliflower into a highly nutritious grain-free rice dish? Let me show you how to make cauliflower rice!

By slowly pulsing the cauliflower, you will be able to carefully monitor your progress in reaching grain-sized pieces.

Step 4: Sauté and Steam the Cauliflower in a Large Skillet

Wondering how to magically transform cauliflower into a highly nutritious grain-free rice dish? Let me show you how to make cauliflower rice!

Add the cauliflower rice to a large skillet and cook as directed in the recipe below. It only takes about 10-15 minutes to cook cauli-rice, so it really is a pretty quick dish to put together even on a busy night. (Especially if you process the cauliflower on your prep day and place it in an airtight container in the fridge until you’re ready to cook it. See recipe instructions below for details.)

Step 5: Enjoy!

Wondering how to magically transform cauliflower into a highly nutritious grain-free rice dish? Let me show you how to make cauliflower rice!

For those of us who’ve been missing rice, cauli-rice is a dream come true! You simply won’t believe how delicious cauli-rice is until you try it for yourself. It’s mild flavor and rice-like texture makes it the perfect addition to any meal that calls for rice.

Ready to give cauli-rice a try?

Below you’ll find my simple seasoned cauli-rice recipe. It really is a delicious grain-free alternative to rice! Use it as a base for your favorite stir fry. Or serve it alongside your favorite grilled meats, poultry, fish and veggies.

And by changing the herbs used, you can create a customized flavorful “rice” dish to complement just about any main dish you desire. (See recipe notes for details.)

Wondering how to magically transform cauliflower into a highly nutritious grain-free rice dish? Let me show you how to make cauliflower rice!

P.S. The lovely napkins featured in these photos are courtesy of my friends at Hen House Linens. I just adore their beautiful table linens, and even more so, their mission to make mealtimes special by adding a touch of warmth and beauty to the table.

Print
Simple Seasoned Cauliflower Rice

Yield: 8-10 one-cup servings

Ingredients

  • 1 large head of cauliflower
  • 2 tbsp ghee (or butter)
  • 1 tbsp olive oil
  • 1/2 cup fine diced yellow onion
  • 3/4 tsp sea salt
  • 1/2 tsp dried parsley
  • 1/2 tsp garlic powder
  • 1/4 tsp fresh ground black pepper
  • 1/3 cup homemade chicken stock
  • 1-2 tbsp minced fresh parsley (see note below for more options)

Instructions

  1. Cut the cauliflower into florets, and then use a food processor to pulse the florets into rice-like grains as described in the above photo tutorial. Set riced cauliflower aside.
  2. Meanwhile, in a large skillet over medium heat, add the ghee, olive oil and onion. Sauté onion until it begins to soften. Then, add the salt, dried parsley, garlic powder and pepper. Stir well to combine the seasonings with the onion. Continue to cook onion another 1-2 minutes until soft and translucent.
  3. Add the riced cauliflower to the seasoned onion and stir well to combine. Continue stirring and sautéing the cauli-rice until it begins to soften (about 5 minutes).
  4. Add the chicken stock and cover the skillet. Allow the cauli-rice to steam for about 5 minutes until the stock is absorbed and the cauli-rice reaches desired texture.
  5. Remove cover, add the minced fresh parsley and fluff cauli-rice to combine.
  6. Makes a tasty and nutritious grain-free “rice” dish to serve alongside your favorite healthy meals.

Notes

Recipe Variation: By changing the herbs in this recipe, you can create customized cauli-rice to complement you main dish. For example, substitute minced fresh cilantro for the fresh parsley and add about 1/4 tsp cumin and 1/4 tsp chili powder to create a delicious Mexi-Style Cauli-Rice.

Time Saving Tip: You can process a head of cauliflower into rice up to 3-4 days in advance. Store the uncooked cauli-rice in an airtight container in the fridge until ready to cook. Cooked rice should also be stored in an airtight container in the fridge and generally tastes great for up to 2-3 days. However, I do not recommend freezing uncooked or cooked cauli-rice, as it becomes mushy.

3.1
https://thenourishinghome.com/2014/10/how-to-make-cauliflower-rice/

For even more delicious cauliflower rice recipes, I highly recommend picking up a copy of Meals Made Simple by Danielle Walker. It’s truly one of my favorite grain-free cookbooks, and it’s what finally convinced me to give cauli-rice a try. Yum!

Disclosure: Some of the links in this post include affiliate links, providing The Nourishing Home a small percentage of the sale at no additional cost to you. Of course, you are not obligated to use these links to make a purchase, but if you do, it helps to support this site and ministry. Thank you!

You Might Also Like:

Savory Cottage Pie {Whole30 option}
Baja-Style Cilantro Rice
Slow Cooker Rotisserie Style Chicken {Whole30 Guest Post}

Filed Under: Sides, Whole30 ·

  • « Previous Page
  • 1
  • 2
  • 3
  • 4
  • 5
  • 6
  • …
  • 13
  • Next Page »

My New Cookbook is Here!

Welcome to The Nourishing Home!

I’m so glad you’re here and want you to feel right at home! My heart in creating this blog is to help you by sharing helpful meal planning strategies and nourishing GF recipes that are healthy, easy and delicious with thanksgiving to God! [Read More …]


All content (recipes, photos, posts, etc.) on this site is the creative property of Kelly Smith. You are welcome to share a photo via social media, as long as it contains a link back to the corresponding recipe or post from this site. However, you may not republish a recipe in its entirety in any form. For questions, or for permission to use a photo or recipe, please contact me via email at [email protected]. Thank you!

Please Note: All content (recipes, photos, text, etc.) on this site is the creative property of Kelly Smith of The Nourishing Home. You are welcome to share a photo via social media, as long as it contains a link back to the corresponding recipe from this site. However, re-publishing a recipe in any form is strictly prohibited. Additionally, please refrain from adapting recipes without properly linking back to the original recipe, and keep in mind that simple substitutions do not constitute an adapted or original recipe. For details regarding recipe copyright law, please visit the Food Blog Alliance.
The Nourishing Home is a participant in the Amazon Services LLC Associates Program, an affiliate advertising program designed to provide a means for sites to earn advertising fees by advertising and linking to amazon.com.

Privacy Policy
DMCA.com

Copyright © 2026 · All Rights Reserved · The Nourishing Home · Artwork by Nancy Panaccione · Site Design by Deluxe Designs · Log in