The Nourishing Home

living healthier lives in service to the King!

  • Home
  • About
    • About TNH
    • Contact
  • Meal Planning
  • Health & Wellness
    • Real Food Basics
  • Whole30
  • GF Recipes
    • Whole30
    • Breakfast
    • Lunch
    • Entrées
    • Slow Cooker
    • Soups & Stews
    • Sides & Salads
    • Snacks
    • Desserts
    • Kids in the Kitchen
  • My Cookbook
  • Subscribe

Cherry Chocolate Chip Scones

By Kelly · 5 Comments

These delicious cherry chocolate chip scones are the perfect treat to enjoy with a steamy cup of tea or coffee.

Love is in the air! And so is the irresistible aroma of chocolate – the quintessential Valentine’s Day treat!

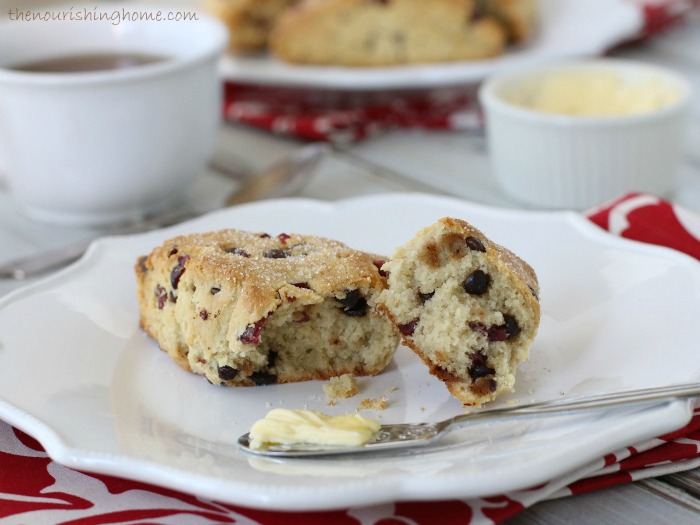
The great news is you can indulge a bit in this favorite Valentine’s Day pastime by baking-up your own chocolately-delicious treats like these scrumptious Cherry Chocolate Chip Scones!

These delicious cherry chocolate chip scones are the perfect treat to enjoy with a steamy cup of tea or coffee.

These delightful scones are the perfect treat to enjoy with a steamy cup of tea or coffee. The combination of rich chocolate morsels and tangy dried cherries with just a hint of sweet almond flavor makes them a special favorite at Valentine’s, or anytime you’re in the mood for a not-too-sweet, flavorful treat!

These delicious cherry chocolate chip scones are the perfect treat to enjoy with a steamy cup of tea or coffee.Enjoy even more delicious GF baking treats …
This delightful recipe is just one of more than 100 irresistible grain-free, dairy-free recipes in my new cookbook – Everyday Grain-Free Baking!

From breads, biscuits and muffins to savory snacks and decadent treats, you’ll find step-by-step instructions, beautiful color photographs and helpful tips & tidbits to make all of your GF baking adventures a delicious success!

Click here to get a SNEAK PEEK of the book!

Print
Cherry Chocolate Chip Scones

Yield: 8 scones

Ingredients

  • 2 3/4 cup blanched almond flour
  • 1/2 tsp baking soda
  • 1/4 tsp sea salt
  • 2 Tbsp cold unsalted butter (or palm shortening)
  • 2 large eggs
  • 2 Tbsp coconut milk (or milk of your choice)
  • 2 tsp honey
  • 1/2 tsp pure almond extract
  • 1/3 cup dried cherries
  • 2 Tbsp dairy-free mini chocolate chips
  • Optional: Coconut sugar or maple sugar for sprinkling on top

Instructions

  1. In a food processor, combine the almond flour, baking soda and salt. Pulse in the butter (or palm shortening), until it's well incorporated. If you don't have a food processor, use a pastry cutter| (or two knifes) to cut the butter (or shortening) into the flour.
  2. In a large bowl, whisk together the eggs, milk, honey and almond extract, until well combined.
  3. Using a spoon, stir the dry mixture into the wet mixture, until thoroughly combined. Then, fold in the dried cherries and chocolate chips. Place dough in fridge to cool about 10-15 minutes.
  4. Preheat oven to 350°F while dough is chilling. Line a baking sheet with parchment paper; set aside. Sprinkle your work surface with a handful blanched almond flour. Melt a teaspoon of butter or coconut oil for brushing the tops of the scones.
  5. Once dough is chilled, gather it together in a ball and place it on the floured surface. Shape the dough into a square about six-inches in diameter and one inch thick, then cut it in half twice to form four small squares. Next, cut each of the four small squares in half diagonally to form eight small triangles.
  6. Brush the tops of the scones with a little melted butter or coconut oil. Sprinkle tops with a little coconut sugar or maple sugar, if desired.
  7. Using a spatula, gently place each scone onto the prepared baking sheet. Bake about 15-18 minutes, until scones are lightly golden brown along the edges. Serve warm with your favorite herbal or green tea.
3.1
https://thenourishinghome.com/2016/02/cherry-chocolate-chip-scones/

These delicious cherry chocolate chip scones are the perfect treat to enjoy with a steamy cup of tea or coffee.

You Might Also Like:

Fruit & Yogurt Parfaits (GF)
Almond Flour Blueberry Scones {Grain-Free, Dairy-Free Option}
Pancake & Sausage Pops {GF, DF}

Filed Under: Muffins/Breads/Biscuits, Sweet ·

How to Make The Perfect Omelette

By Kelly · 4 Comments

Make the perfect omelette with these three simple steps. You'll be ensured that your omelette is a success each and every time! And once you’ve mastered the technique, as long as you have a few eggs on hand you’ll always be able to whip up a quick, healthy meal perfect for breakfast, lunch or dinner!

It’s day one of our Whole30 challenge, so I decided to kick it off with one of my favorite breakfasts. In my humble opinion, there are few breakfasts as beautiful and delicious as a French-style omelette with a savory center bursting from the seams. And although they may look a bit complicated, they’re surprisingly easy and quick to make (less than two minutes to be exact)!

To help you achieve omelette-making perfection, I’m sharing three simple steps to ensure your omelette is a success each and every time! And once you’ve mastered the technique, as long as you have a few eggs on hand you’ll always be able to whip up a quick, healthy meal perfect for breakfast, lunch or dinner!

First Things First! As with any cooking session, it’s important to remember your Mise en Place. Having all of your ingredients ready to go before you get started helps to ensure everything comes together beautifully.

To make this delicious Bacon, Avocado and Tomato Omelette, I precooked the bacon and cut it into small strips. Then, I seeded and sliced half of a tomato and a fourth of an avocado. However, you can use whatever ingredients you prefer. Other great fillings include: sautéed mushrooms and crumbled breakfast sausage, leftover grilled veggies, or simply a sprinkling of fresh herbs.

How to Make The Perfect Omelette in 3 Simple Steps

Once you’ve gathered your ingredients, follow the three easy steps below. And in just a couple of minutes, you’ll enjoy a light, fluffy omelette that’s chock full of your favorite healthy fillings. Yum!

Make the perfect omelette with these three simple steps. You'll be ensured that your omelette is a success each and every time! And once you’ve mastered the technique, as long as you have a few eggs on hand you’ll always be able to whip up a quick, healthy meal perfect for breakfast, lunch or dinner!

Step 1: It all starts with a well-oiled plan
Whisk two eggs together with a teaspoon of water and a little salt and pepper until well combined. Heat an 8-inch skillet over medium-high heat until hot. Melt the ghee in the pan (or butter or coconut oil). It should sizzle, otherwise the pan is not hot enough. Tilt the skillet and gently swirl the pan around in a circle so the ghee evenly coats the bottom and sides of the pan.

Step 2: Make waves with your eggs
Add the whisked eggs to the skillet, tilting the pan so the eggs cover the entire bottom of the pan. Use a spatula to gently push the eggs from the edges toward the center of the skillet. As you do, tilt the pan a bit, so the uncooked eggs flow into the open spaces. You’ll notice waves beginning to form in your omelette.

Step 3: Fill, flip and enjoy!
The omelette is done cooking when the bottom is set, and the top still looks a bit undercooked (as shown in photo). Although the omelette may seem a bit underdone, remember that it will continue cooking off the heat. So now’s the time to add your fillings. Then, fold the omelette in half and gently slide it out of the pan onto a plate. Enjoy!

Make the perfect omelette with these three simple steps. You'll be ensured that your omelette is a success each and every time! And once you’ve mastered the technique, as long as you have a few eggs on hand you’ll always be able to whip up a quick, healthy meal perfect for breakfast, lunch or dinner!

You Might Also Like:

Fresh Summer Grilling with Chimichurri ...
Slow Cooker Meatballs with Zesty Marinara Sauce {Whole30 Guest Post}
Grilled Fajita Salad {Whole30, DF, GF}

Filed Under: Egg Dishes, Whole30 ·

Pumpkin Spice Granola (Grain-Free, Dairy-Free)

By Kelly · 7 Comments

This delightful fall-inspired pumpkin spice granola is not only gluten-free and grain-free – it’s also dairy-free and egg-free as well.

Fall has officially arrived! And around here that means it’s “pumpkin time” – one of my favorite times of year for baking! I get so excited when I see the market brimming with sweet pumpkins fresh from the field, and of course, the shelves filled with canned pumpkin puree too. I can’t help but turn on the oven and start baking up lots of delicious pumpkin treats!

This week alone, I’ve already made my popular grain-free Pumpkin Muffins twice to bring to various breakfast meetings, since they’re always a huge hit! And this morning, I just had to make my personal favorite – Pumpkin Pie Porridge – the ultimate warm and creamy breakfast for cool Autumn mornings!

Another breakfast favorite around here is granola. We adore it solo with a splash of almond milk, as a sweet and crunchy addition to Fruit & Yogurt Parfaits, and it also makes a wonderful afterschool snack. In fact, you might say we’re just a little nuts about granola!

This delightful fall-inspired pumpkin spice granola is not only gluten-free and grain-free – it’s also dairy-free and egg-free as well.

That’s why when I started thinking about sharing a new fall-inspired recipe with y’all, the first one that came to mind is my scrumptious Pumpkin Spice Granola! This delightful granola is not only gluten-free and grain-free – it’s also dairy-free and egg-free as well.

This delightful fall-inspired pumpkin spice granola is not only gluten-free and grain-free – it’s also dairy-free and egg-free as well.

This crunchy pumpkin pie flavored treat is a delightful spin on my popular Vanilla Cinnamon Crunch Granola. If it’s your first time making granola, be sure to check out my “How to Make Grain-Free Granola” photo tutorial to learn just how easy (and delicious!) it is to make your own homemade granola.

In fact, I should probably warn you … with just one bite, you may find yourself becoming a little nutty over homemade granola, too!

This delightful fall-inspired pumpkin spice granola is not only gluten-free and grain-free – it’s also dairy-free and egg-free as well.

Print
Pumpkin Spice Granola (Grain-Free, Dairy-Free)

Ingredients

    Nut Mixture
  • 1 1/2 cups raw whole almonds
  • 1 cup raw whole cashews
  • 1/2 cup raw pecans
  • 1/2 cup raw pumpkin seeds (pepitas)
  • 1 teaspoon sea salt
  • All-Natural Sweetener
  • 1/4 cup coconut butter, softened
  • 1/2 cup pure dark maple syrup
  • 2 Tbsp honey
  • 2 Tbsp pumpkin puree
  • 2 Tbsp pure vanilla extract
  • 1 tsp pumpkin pie spice
  • 1 tsp ground cinnamon
  • 1 tsp coconut flour (or 2 tsp ground flax seed)
  • Add-Ins
  • 3/4 cup raisins, currants or cranberries

Instructions

  1. For the Nut Mixture: Place the nuts and salt in a large bowl and cover with warm water. Cover the bowl with a clean kitchen towel, and allow the nuts to soak 18–24 hours. When soaking time is completed, drain and rinse nuts. Place on a clean kitchen towel to absorb excess moisture.
  2. For the All-Natural Sweetener: In a large bowl, whisk together the softened coconut butter, maple syrup, honey and pumpkin until smooth and creamy. Then add the remaining ingredients (vanilla, pumpkin pie spice, cinnamon and coconut flour). Whisk until well combined; set aside
  3. For the Granola: Preheat oven to 210°F. Line a 12´ 17-inch rimmed baking sheet with parchment paper. Set aside.
  4. Using a food processor, place a couple of handfuls of the soaked nuts into the processor bowl and pulse to chop the nuts until they are about the size of oats. (Do not overprocess or you will create nut butter.)
  5. Add the finely chopped nuts to the bowl with the maple-honey mixture. Continue to pulse the whole nuts a few handfuls at a time until finished and continue adding them to the bowl with the maple-honey mixture. Once all the nuts are ground, use a rubber spatula to fold them into the creamy pumpkin mixture until well combined.
  6. Spoon the granola mixture onto the parchment-lined baking sheet. Use an offset spatula to evenly spread the granola across the pan into a thin layer. Bake the granola for 2 hours, then remove from the oven and gently flip section by section using a spatula, making sure to separate any large pieces into small cereal clusters. (Be sure to check out “How to Make Grain-Free Granola” for an easy step-by-step photo tutorial.)
  7. Return granola to the oven and bake another 2 hours. Then repeat the process of gently flipping the granola. Return granola to the oven one more time and bake another 45-60 minutes.
  8. Turn off the oven. Place the baking sheet of granola on the stovetop to cool. After about 5 minutes, check the granola for the crunch-factor. If it’s crunchy enough for you, allow it to continue cooling. (It will get crunchier as it cools.) If it isn’t crunchy enough, return it to the warm oven and allow it to sit in the warm oven for 20–30 minutes more until it reaches desired level of crispness.
  9. Allow the granola to completely cool, then immediately transfer it to mason jars, or other airtight containers. Store in the pantry for up to 2 weeks or in the freezer for up to 3 months. Enjoy with a splash of your favorite milk, or use it to create a healthy snack mix.
3.1
https://thenourishinghome.com/2015/09/pumpkin-spice-granola-grain-free-dairy-free/

You Might Also Like:

Cinnamon-Walnut Buttons (GF)
Raw Almond Butter Truffles (GF)
Raw Cookie Dough Bites (GF)

Filed Under: Porridges & Cereals, Sweet ·

  • « Previous Page
  • 1
  • 2
  • 3
  • 4
  • 5
  • 6
  • …
  • 20
  • Next Page »

My New Cookbook is Here!

Welcome to The Nourishing Home!

I’m so glad you’re here and want you to feel right at home! My heart in creating this blog is to help you by sharing helpful meal planning strategies and nourishing GF recipes that are healthy, easy and delicious with thanksgiving to God! [Read More …]


All content (recipes, photos, posts, etc.) on this site is the creative property of Kelly Smith. You are welcome to share a photo via social media, as long as it contains a link back to the corresponding recipe or post from this site. However, you may not republish a recipe in its entirety in any form. For questions, or for permission to use a photo or recipe, please contact me via email at [email protected]. Thank you!

Please Note: All content (recipes, photos, text, etc.) on this site is the creative property of Kelly Smith of The Nourishing Home. You are welcome to share a photo via social media, as long as it contains a link back to the corresponding recipe from this site. However, re-publishing a recipe in any form is strictly prohibited. Additionally, please refrain from adapting recipes without properly linking back to the original recipe, and keep in mind that simple substitutions do not constitute an adapted or original recipe. For details regarding recipe copyright law, please visit the Food Blog Alliance.
The Nourishing Home is a participant in the Amazon Services LLC Associates Program, an affiliate advertising program designed to provide a means for sites to earn advertising fees by advertising and linking to amazon.com.

Privacy Policy
DMCA.com

Copyright © 2026 · All Rights Reserved · The Nourishing Home · Artwork by Nancy Panaccione · Site Design by Deluxe Designs · Log in