The Nourishing Home

living healthier lives in service to the King!

  • Home
  • About
    • About TNH
    • Contact
  • Meal Planning
  • Health & Wellness
    • Real Food Basics
  • Whole30
  • GF Recipes
    • Whole30
    • Breakfast
    • Lunch
    • Entrées
    • Slow Cooker
    • Soups & Stews
    • Sides & Salads
    • Snacks
    • Desserts
    • Kids in the Kitchen
  • My Cookbook
  • Subscribe

Foolproof BBQ Chicken {Plus BBQ Sauce Recipe}

By Kelly · 12 Comments

BBQ Sauce

A great barbecue sauce is a really a matter of opinion – and opinions run high – which is why it comes in so many varieties. In fact, different regions of the country typically have their own favorite version of barbecue sauce that highlights that region’s particular taste preferences – whether sweet or vinegary, runny or thick, or some variation in between.

Personally, we enjoy a Southern-style sweet-n-tangy sauce with rich molasses undertones and just a slight nuance of kick. I’ve shared our favorite BBQ sauce recipe below, incase you’d like to give it a try this summer. However, if you prefer a more tomato-based Kansas-style sauce, my friend Diana developed a real food version that’s especially delicious.

Tips for Foolproof Grilled BBQ Chicken

Whichever sauce you choose, let me share a few secrets with you for foolproof BBQ chicken that will turn your next backyard barbecue into a deliciously memorable event that will have your family and friends begging for more!

• Consider a rub – Most BBQ gurus recommend seasoning chicken pieces with a tasty spice rub prior to grilling. Think of it as layering flavors. The result is an amazingly delicious depth of flavor. You can use any number of spice rubs, but our personal favorite is to sprinkle on a little bam. Trust me, a little goes a long way! Then, allow the chicken to sit at room temp, while you preheat the grill as described below.

• Preheat – When it comes to any kind of cooking, preheating is key and grilling is no different. Preheating your grill at least 10-15 minutes before cooking is vital to getting a good sear. This not only helps to prevent sticking, but even more important, results in a more flavorful and moist outcome.

• Indirect heat – Cooking bone-in chicken over indirect heat rather than an open flame results in moister, more tender chicken. Indirect heat is also crucial when it comes to ensuring that your sauce caramelizes rather than burns. If using a gas grill, turn on just one side of the grill to high. Allow the grill to preheat 10-15 minutes and then place your favorite bone-in chicken pieces (drumsticks, thighs or breasts) on the opposite side of the grill (not over the flames). Cover and allow the chicken pieces to cook until they start to turn golden brown (about 20-25 minutes), making sure to follow the tip below. 

• Even heat – Movement is key to ensure all of the chicken cooks evenly. So make sure to switch the pieces halfway through the cook time so that the ones closer to the flames trade places with the pieces that are furthest from the flames. This will ensure all pieces are equally cooked.

• Bring on the sauce – Once the chicken is golden and near done, move the pieces closer to the flames and start brushing the sauce on, making sure to turn the chicken often. It’s important at this point to remain stationed at the grill – brushing, turning, and moving the pieces around. Giving the final stage your full focus will ensure everything cooks evenly and is thoroughly covered in a perfectly caramelized sauce. 

• Ready to Eat! Once the chicken’s internal temp reads 165°F, remove the pieces from the grill and place them on a serving platter. Tent with foil and allow the chicken to rest about 5 minutes. Then serve and enjoy some finger-licking good barbecue!

With the tips above (and the great sauce below), now it’s your turn to fire up that grill and get your summer BBQ on! For more great summer grilling tips, be sure to check out “The Top 10 Best Grilling Tips.”

BBQ w:Citrus Salad

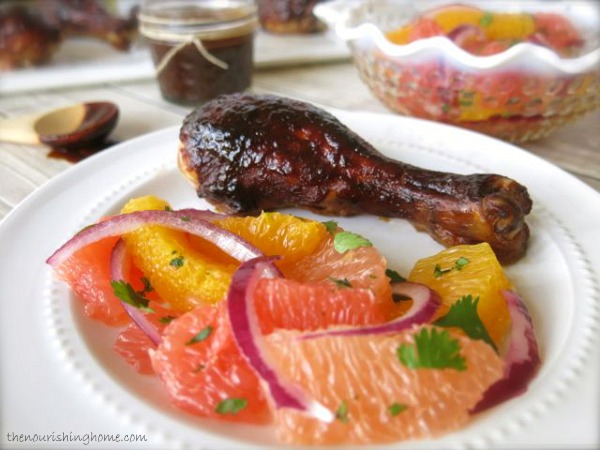
That gorgeous Citrus Salad sure looks good, hey? You can find the recipe here. It makes a delicious sweet-n-tangy addition to any summer barbecue!

Print
Southern-Style BBQ Sauce (GF)

Yield: 1 cup of icing

Ingredients

  • 1/2 cup ketchup
  • 2 tbsp organic unsulphured molasses
  • 1 tbsp apple cider vinegar
  • 1 tbsp Worcestershire sauce
  • 1 tbsp Dijon mustard
  • 1/2 tsp sea salt
  • 1/4 tsp freshly ground black pepper
  • 1 tbsp olive oil
  • 3 tbsp finely diced onion
  • 2 cloves garlic, minced
  • 1/4 tsp dried thyme
  • 1/4 tsp chili powder
  • 1/8 tsp cayenne pepper (add more for extra kick)

Instructions

  1. In a small bowl, whisk together the ketchup, molasses, vinegar, Worcestershire, mustard, salt and pepper until well combined. Set aside.
  2. In a skillet over medium heat, add olive oil, onion and garlic. Cook until onion begins to soften, about 2-3 minutes. Then add thyme, chili powder and cayenne pepper cooking. Stir until well blended.
  3. Whisk in the ketchup mixture. Bring sauce to a gentle simmer (once it begins to simmer, you may need to reduce heat to medium-low to maintain a gentle simmer). Allow sauce to simmer for 5-8 minutes. It will thick a bit as it cooks.
  4. Then, remove from heat and allow to cool completely. Transfer to a small bowl or a mason jar. Cover and store in refrigerator until ready to use.
  5. Sauce may be kept in fridge for up to a week, or store in an airtight freezer-safe container in the freezer for up to a month. Thaw in fridge overnight when ready to use.
3.1
https://thenourishinghome.com/2014/06/foolproof-bbq-chicken/


Disclosure: The above recipe ingredient links are amazon affiliate links. By purchasing via these links The Nourishing Home receives a small percentage of the sale at no additional cost to you. Of course, you are not obligated to use these links to make a purchase, but if you do, please know that it helps to support this site and ministry. Thank you!

You Might Also Like:

Potato Casserole Lasagna {Whole30, GF, DF}
Soy-Free Teriyaki Chicken {Slow Cooker Recipe}
Turkey Cutlets w/Pan Gravy (GF Option)

Filed Under: Condiments, Poultry ·

How to Make Honey Sweetened Fruit Preserves {using natural pectin}

By Kelly · 52 Comments

It's so easy to make your own honey sweetened fruit preserves perfect for spreading on breads, biscuits and for creating homemade fruit flavored yogurts.

Spring officially arrives this week, and with it comes the start of berry season here in Southern California. First to appear are red and delicious organic strawberries, followed by sweet-n-tangy raspberries, plump blueberries and one of my personal favorites – blackberries.

It’s no secret that we get a little excited about fresh berries around here. And rightly so! They’re not only absolutely delicious, but they’re chock full of beneficial nutrients and antioxidants too! That’s why they’re a favorite for enjoying in fruit salads and adding to grain-free granola, yogurt and desserts.

Of course, they also make amazing jams and preserves, which is why I’m sharing a simple method for making your own delightful honey sweetened fruit preserves using your favorite seasonal berries. A key part of this method is a little secret I learned from one of my favorite grain-free cookbooks.

The secret? Cranberries! By using a small amount of whole cranberries, you can avoid using powdered pectins to set your preserves. That’s because cranberries are high in natural pectin. So by including them in the recipe, your preserves will set-up nicely with just a little touch of fresh-squeezed lemon.

It's so easy to make your own honey sweetened fruit preserves perfect for spreading on breads, biscuits and for creating homemade fruit flavored yogurts.

This easy recipe will enable you to make delicious berry preserves with less fuss and more all-natural flavor. Shown above (left to right): Blackberry Preserves, Strawberry Jam and Raspberry Preserves. Yum!

What to do with all that delicious homemade jam? Why not make these amazing jam-layered crumble cookie bars! Mmm, they are soooo gooood!

It's so easy to make your own honey sweetened fruit preserves perfect for spreading on breads, biscuits and for creating homemade fruit flavored yogurts.
This special recipe at Deliciously Organic highlights the sweet fruity flavor of preserves sandwiched between two layers of scrumptious cookie crumble. Yes, please!

P.S. Just a friendly reminder, that I provide free monthly meal plans over at The Better Mom blog. Each week’s meal plan contains delicious family-friendly GF recipes utilizing a time-saving method to make getting a healthy dinner on the table a snap! I highly recommend you pop over to The Better Mom and download these free meal plans.

Print
Honey Sweetened Fruit Preserves {using natural pectin}

Yield: 4 one-cup servings

Ingredients

  • 4 cups of your favorite fresh berries, such as raspberries, strawberries or blackberries (or use thawed frozen berries)
  • 1 cup whole cranberries (fresh or frozen)
  • 1 to 1 1/4 cups pure honey (depending on how sweet you prefer your jam)
  • 1 tbsp of fresh-squeezed lemon juice (about 1/2 of a lemon)

Instructions

  1. Please Note: If making strawberry preserves, remove the stems and quarter the strawberries before measuring out 4 cups. For raspberry or blackberry jam, simply cut the berries in half before measuring. If making blueberry jam, no need to cut them.
  2. In a medium saucepan over medium/medium-high heat, bring the berries and honey to a boil while stirring. Then, reduce the temperature until the mixture remains at a constant simmer. Allow berries to simmer for 20 minutes, stirring occasionally.
  3. Once you reach the 20-minute mark, use the back of a wooden spoon to mash the cranberries against the side of the saucepan. This helps to release all of their natural pectin.
  4. Maintain a gentle simmer, making sure to stir the mixture frequently, so it does not scorch. While stirring, use the "back-of-spoon" method to break up any large pieces of fruit into smaller pieces. Or if you prefer a less chunky jam, thoroughly mash all of the berries.
  5. After 10 minutes, if the mixture is somewhat thick and no longer runny, turn off the heat. It will thicken more as it cools. If it is not thick enough, continue cooking at a gentle simmer, while stirring constantly until it thickens a bit more, then turn off the heat. (Keep in mind, preserves are looser than jellies, so once the mixture is chilled, it will be thick, but not gelatin-like.)
  6. Pour the fresh-squeezed lemon juice over the warm preserves, stir well and allow the mixture to cool to room temperature.
  7. Evenly distribute the cooled preserves among four 8 oz. glass jars making sure to leave about an inch of space between the top of the jam and the jar lid to accommodate for expansion. Then, cover and refrigerate or freeze. (Or you can preserve the jam by following the classic hot water bath canning method.)
  8. Because homemade jam/preserves do not contain any preservatives, I recommend placing one jar in the fridge to enjoy now, and freeze the three remaining jars for future use.

Notes

Recipe Variation: You can also combine berries to create delicious flavor combinations, such as my popular Jumble Berry Jam recipe.

Will Cranberries Affect the Flavor of my Jam? Yes, slightly. Cranberries will add a slightly tangy undertone, that is actually very pleasant in balancing the sweetness of the honey. This slight tartness may be more noticeable with milder fruits like strawberries, depending on your taste preferences.

If you're not a fan of cranberries, there are several things you can do if you wish to avoid their slight tart undertone ... First, I've found frozen cranberries to be less tart in flavor. Second, you can decrease the amount of cranberries to 3/4 cups and increase the berries by 1/4 cup. The jam won’t be as thick, but with milder fruits, such as strawberries, the mild tartness will be less noticeable.

In addition, if you are able to tolerate pectin (some diets restrict it), then you could opt to bypass the cranberries altogether and use a little Pomona’s Pectin instead to help thicken your jam, as I did in my homemade Peach Preserves recipe, since peaches are an especially mild fruit.

Did You Know: The words "jam" and "preserves" are often used interchangeably. However, there is a slight difference between the two. The fruit in preserves is often cut into chunks and allowed to remain somewhat whole, whereas jam is made using crushed or mashed fruit, which gives it a less chunky texture. So for this recipe, you can mash the fruit thoroughly during the cooking process to create a classic-style jam, or you can leave much of the fruit intact to create traditional preserves. Either option is delicious!

3.1
https://thenourishinghome.com/2014/03/honey-sweetened-fruit-preserves/

It's so easy to make your own honey sweetened fruit preserves perfect for spreading on breads, biscuits and for creating homemade fruit flavored yogurts.

You Might Also Like:

Perfectly Easy Peach Preserves (GF)
Jumble Berry Jam (GF)
Season's Greetings Gift: All-Purpose Seasoning Mix in a Jar

Filed Under: Condiments ·

Crockpot Apple Butter (GF, DF)

By Kelly · 15 Comments

How to Make Apple ButterIt doesn’t take a national holiday to get me excited about Fall apples! However, since October is National Apple Month, we’ve got all the more reason to celebrate these delicious little gems from God!

Homemade apple butter is just one more way you can preserve the bounty of apple season to enjoy all year long. That’s why, I’m sharing this simple slow-cooker method for making apple butter that will not only fill your home with the amazing aroma of fall spices, but also fill your family’s tummies as well!

So easy to make, just pop all of the ingredients into your crockpot before bed and wake up to a special treat your whole family will love!

Homemade apple butter makes a delightful spread for toast, biscuits and muffins, as well as a delicious topping for pancakes and French toast.

Apple butter also makes a great appetizer – either as a dip served alongside graham crackers and fresh fruit slices – or you can place a thick layer of apple butter on top of a block of cream cheese and serve it alongside your favorite crackers. Yum!

And, with the holidays fast approaching, homemade apple butter also makes a delicious and thoughtful gift!

Print
Easy Slow Cooker Apple Butter (GF, DF)

Ingredients

  • 10 large apples (I prefer a mix of sweet and tart apples)
  • 2 cups unfiltered apple juice
  • 1 1/2 cups pure dark maple syrup
  • 1/4 cup fresh-squeezed lemon juice (about 2 small lemons)
  • 1 tsp ground cinnamon
  • 1/4 tsp ground nutmeg
  • 1/4 tsp ground ginger
  • 1/4 teaspoon sea salt
  • 1/8 tsp allspice

Instructions

  1. Peel and core apples. Then cut them into bite-sized pieces. (One large apple yields approximately one cup of cored diced apples. So if you’re using small or medium apples, simply use about 10-12 cups of diced apples.)
  2. Add the diced apples to a 6-quart slow cooker. Then add all remaining ingredients. Stir well to combine. Cover and cook on high for one hour, stirring once or twice. Mixture should be bubbly after an hour. If not, allow it to continue to cook until it comes to a bubbly simmer. Then reduce heat to low and cook the apples an additional hour.
  3. Remove the cover, stir the mixture and then set the cover back on slightly ajar, so some steam can escape during the remainder of the cooking time. Then continue to cook the apple butter on low (with cover ajar) until it’s dark brown and thick (about 8-9 hours).
  4. Turn off the crockpot, stir the apple butter and then allow it to cool to room temperature. If you prefer a smooth (less chunky) apple butter, use an immersion blender, or place the apple butter in a food processor for a quick whirl, to create a smoother texture.
  5. Then, transfer the apple butter to half-pint or pint-sized mason jars. Makes 12 half-pint or six pint-sized jars. Store in refrigerator for up to two weeks. (Or you can preserve the apple butter longer using the classic hot water bath canning method.)
3.1
https://thenourishinghome.com/2013/10/crockpot-apple-butter-gf-df/

Disclosure: Some of the links in this post include affiliate links, providing The Nourishing Home a small percentage of the sale at no additional cost to you. Of course, you are not obligated to use these links to make a purchase, but if you do, it helps to support this site and ministry. Thank you!

And incase you’re as crazy about apples as we are, I’ve provided a list of all the apple posts I’ve shared this month, so you don’t miss out on more great ideas and delicious recipes featuring fresh fall apples.

Simple, Healthy & Delicious Fall Apple Recipes
• Easy Apple Pie Filling(GF, DF)
• Cinnamony Apple Pie Muffins(GF, DF)
• Fall Apple-Picking Recipes Round-Up
• How to Make Apple Butter

Happy fall blessings to you and yours, Kelly

You Might Also Like:

Simple & Savory Watermelon Salsa
Soy-Free Teriyaki Chicken {Slow Cooker Recipe}
Fresh Summer Grilling with Chimichurri ...

Filed Under: Condiments, Slow Cooker ·

  • « Previous Page
  • 1
  • 2
  • 3
  • 4
  • …
  • 6
  • Next Page »

My New Cookbook is Here!

Welcome to The Nourishing Home!

I’m so glad you’re here and want you to feel right at home! My heart in creating this blog is to help you by sharing helpful meal planning strategies and nourishing GF recipes that are healthy, easy and delicious with thanksgiving to God! [Read More …]


All content (recipes, photos, posts, etc.) on this site is the creative property of Kelly Smith. You are welcome to share a photo via social media, as long as it contains a link back to the corresponding recipe or post from this site. However, you may not republish a recipe in its entirety in any form. For questions, or for permission to use a photo or recipe, please contact me via email at [email protected]. Thank you!

Please Note: All content (recipes, photos, text, etc.) on this site is the creative property of Kelly Smith of The Nourishing Home. You are welcome to share a photo via social media, as long as it contains a link back to the corresponding recipe from this site. However, re-publishing a recipe in any form is strictly prohibited. Additionally, please refrain from adapting recipes without properly linking back to the original recipe, and keep in mind that simple substitutions do not constitute an adapted or original recipe. For details regarding recipe copyright law, please visit the Food Blog Alliance.
The Nourishing Home is a participant in the Amazon Services LLC Associates Program, an affiliate advertising program designed to provide a means for sites to earn advertising fees by advertising and linking to amazon.com.

Privacy Policy
DMCA.com

Copyright © 2025 · All Rights Reserved · The Nourishing Home · Artwork by Nancy Panaccione · Site Design by Deluxe Designs · Log in