The Nourishing Home

living healthier lives in service to the King!

  • Home
  • About
    • About TNH
    • Contact
  • Meal Planning
  • Health & Wellness
    • Real Food Basics
  • Whole30
  • GF Recipes
    • Whole30
    • Breakfast
    • Lunch
    • Entrées
    • Slow Cooker
    • Soups & Stews
    • Sides & Salads
    • Snacks
    • Desserts
    • Kids in the Kitchen
  • My Cookbook
  • Subscribe

Easy Chocolate Ganache Icing (DF Option)

By Kelly · 7 Comments

Coconut Flour Brownie

Traditional ganache is made using heavy cream and semi-sweet chocolate. However, this renegade recipe utilizes a little coconut milk in place of the cream, along with a touch of cocoa powder to create a delicious thick chocolatey icing perfect for topping cakes and brownies. 

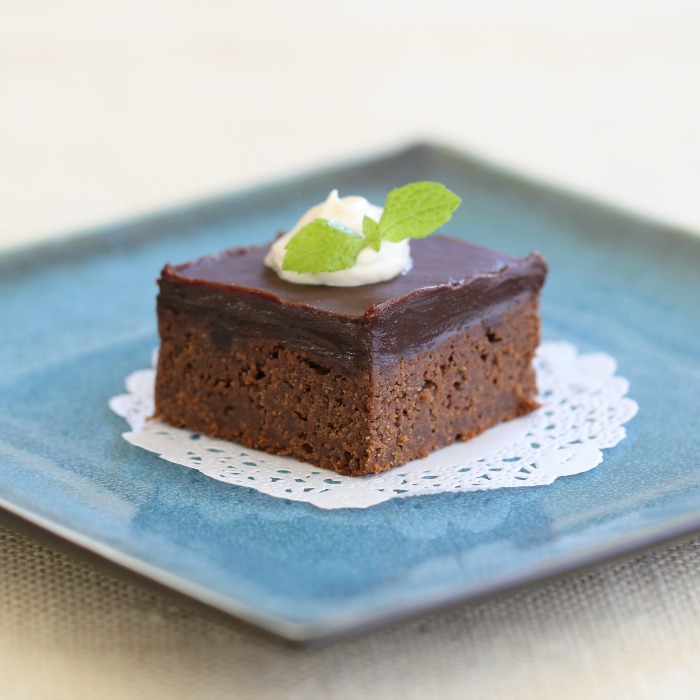
How to use Ganache: Ganache is traditionally used as a glaze or icing, and it can be whipped to a mousse-like consistency using a mixer for use as a filling in pastries. When ganache is still warm it’s pourable, so you can easily pour and spread it over a pan of brownies or a sheet cake (shown above). You can also use warm ganache to make chocolate dipped strawberries. Once it’s cooled to room temperature, chocolate ganache makes a great icing for frosting cakes or cupcakes.

How to store Ganache: In general, ganache can be left at room temperature for 1-2 days. If you find yourself with leftover ganache, you can refrigerate it for up to two weeks. To use it, bring it back to room temperature for use as an icing, or rewarm it to use it as a glaze or sauce (warm ganache is delicious over ice cream).

P.S. For those of you who are dairy-free, you can easily use ghee or palm shortening in place of the butter with equally delicious results! (I’ve found it to be similar to butter to use a combination of 2 Tbsp of ghee with 2 Tbsp of palm shortening in this recipe.)

Print
Easy Chocolate Ganache Icing (DF Option)

Yield: Makes 1 1/4 cups

Easy Chocolate Ganache Icing (DF Option)

Ingredients

  • 1/4 cup butter (if DF, use ghee or palm shortening)
  • 1/2 cup dairy-free mini-chocolate chips
  • 1 tbsp unsweetened fair trade cacao powder
  • 1 tbsp pure coconut milk
  • 1/4 cup honey (mild clover honey is best)

Instructions

  1. In a small saucepan over low heat, melt the butter.
  2. Once melted, turn off the heat and add the chocolate chips, slowly whisking until melted.
  3. Move pan to a cool area on the stovetop and whisk in the cocoa powder, coconut milk and honey.
  4. Allow mixture to cool to room temperature in order for ganache to firm up (see note below). Then use it to frost your favorite cakes, cupcakes or brownies. Use an offset spatula to evenly distribute the ganache icing.

Notes

In order for the ganache to fully set, you can either leave it out at room temperature until cooled. Or you can refrigerate the ganache briefly, until icing reaches desired firmness – about 20-30 minutes. (Please note: If you refrigerate the ganache overnight, it will harden completely, and will need to come back to room temperature again before you'll be able to use it as frosting/icing.)

Read How to Store Ganache in post above for storage instructions. See How to Use Ganache in post above for more delicious uses for ganache.

3.1
https://thenourishinghome.com/2013/01/easy-chocolate-ganache-icing-df-option/

You Might Also Like:

Favorite Holiday Recipe: Patriotic Cupcakes (GF)
Special Recipe from Nourishing Cookies for a Healthy Holiday Cookbook
Little Lemon Custard Cups (GF)

Filed Under: Cakes/Cupcakes, Other Desserts ·

Summertime Favorite: Grilled Peaches & Cream (GF)

By Kelly · 12 Comments


Fresh, ripe peaches snuggle-up with pure vanilla and ground cinnamon in a cozy
foil-packet to create a fragrant and delicious summertime treat. Simply top with a
scoop of homemade vanilla ice cream. “Oh yeah, now we’re talking!”


Simply drizzle the sweet-syrup mixture over peach halves, placing the majority into the
peach halve-cavities. Then …


Fold foil together to form a packet, crimping edges to seal. Grill, covered, for 10-12 minutes. Enjoy!

P.S. If you love grilled fruit as much as we do, be sure to check out my special Spicy Tropical Fruit Skewers – an easy, yet beautiful dessert with a little bit of BAM! and a whole lot of WOW!

Print
Grilled Peaches & Cream (GF)

Yield: 6 servings

Grilled Peaches & Cream (GF)

Ingredients

  • 6 fresh ripe organic peaches
  • 1 tbsp of fresh-squeezed lemon juice
  • 1 tbsp butter, melted (or coconut oil)
  • 2 tbsp coconut sugar (or sucanat)
  • 1 tsp pure vanilla extract
  • 1/8 tsp ground cinnamon
  • Homemade vanilla ice cream (see *notes below)

Instructions

  1. Preheat grill to medium-high (400 degrees). Peel, halve, and pit peaches. (See note below for an easy peach peeling tip.)
  2. In a large bowl, combine lemon juice and melted butter. Add peach halves; toss well to coat.
  3. Next, place the peach halves on a large piece of parchment-lined foil.
  4. In the bowl containing the leftover lemon-butter mixture that the peaches were tossed in, whisk in the rapadura, vanilla extract and cinnamon.
  5. Drizzle mixture over peach halves, placing majority of liquid into the peach halve-cavities.
  6. Take another large sheet of foil and cover the peaches. Fold foil together to form a packet, crimping edges to seal. Grill, covered, for 10-12 minutes.
  7. Remove from grill and allow foil packet to rest undisturbed for about 5-10 minutes. Then, carefully open packet.
  8. Slice each peach halve into quarters and divide among six bowls.
  9. Top with scoops of homemade vanilla ice cream and drizzle with the grilled peach juices. So yummy!

Notes

A quick and easy way to peel peaches ... bring a stockpot of water to a rolling boil. Add whole peaches and cook for one minute. Remove peaches from boiling water, using tongs, and place in a cold water bath. Once cooled to touch, peel off skins.

*Laura at Heavenly Homemakers has a wonderful Homemade Vanilla Ice Cream recipe that's one of our absolute favorites! Or check out my friend Wardeh's Vanilla Coconut Milk Ice Cream recipe for a delicious dairy-free option.

3.1
https://thenourishinghome.com/2012/08/grilled-peaches-cream-gf/

This recipe was featured at: Gluten-Free Wednesdays.

You Might Also Like:

Ultimate Banana Bread (GF, DF)
Almost Oatmeal Cookies (Grain-Free, Egg-Free, Dairy-Free Option)
Our Favorite Almond Flour Chocolate Chip Cookies (GF)

Filed Under: Desserts, Frozen Treats, Other Desserts ·

Little Lemon Custard Cups (GF)

By Kelly · 23 Comments

These creamy little lemon custards are like a drop of delicious sunshine in a cup – the perfect way to end a meal on a sweet note without feeling like you’ve overindulged.

Layering the ingredients in 4oz wide-mouth mason jars tied with pieces of dainty gingham ribbon add to the charm of this delightful dessert. It also makes it the perfect showpiece for summertime brunches, bridal and baby showers, or other fun occasions!

Print
Little Lemon Custard Cups (GF)

Yield: approx. 8 half-cup servings

Little Lemon Custard Cups (GF)

Ingredients

  • 6 large egg yolks, room temperature (pastured eggs are best)
  • 1/2 cup pure honey (I prefer sage honey due to its mild flavor)
  • 1/3 cup fresh-squeezed lemon juice (about 2 Meyer lemons)
  • 2 tbsp filtered water
  • 1 tsp lemon zest
  • 1/4 tsp pure vanilla extract
  • 1/2 cup butter, cold, cut into pieces
  • 2 cups fresh whipped cream
  • Your favorite fresh organic berries (raspberries are especially delicious with lemon!)

Instructions

  1. In a double boiler, or in a heat-safe glass bowl resting above a pot of gently simmering (not boiling) water, whisk together the egg yolks, honey, lemon juice, water, lemon zest and vanilla until well blended.
  2. Slowly add the butter, 2-3 pieces at a time, while constantly whisking. Add more pieces as the previous ones melt.
  3. After all of the butter pieces are melted and incorporated, cook for an additional 15-18 minutes, stirring just occasionally, until it thickens like a thin pudding. Then, place the lemon curd in the refrigerator to cool completely (about 2-3 hours). (Please note: You can make the lemon curd one day in advance for easier final prep.)
  4. Once lemon curd is chilled, use a large rubber spatula to gentle fold in 1 3/4 cups of fresh whipped cream to create a creamy lemon custard. Reserve the remaining 1/4 cup of whipped cream for garnish.
  5. There are two fun options for serving: Either layer the bottom of 4oz serving cups (or ramekins) with fresh berries and top with the lemon custard, followed by a dollop of fresh whipped cream ...
  6. Or create beautiful little lemon berry trifles by layering the ingredients in 4oz wide-mouth mason jars tied with pieces of dainty gingham ribbon. Absolutely delightful!
3.1
https://thenourishinghome.com/2012/06/lemon-berry-custard-cups/


P.S. If you’re on Pinterest, I’d love to be pin-pals with you! It’s so much fun sharing healthy delicious recipes! Blessings, Kelly

This recipe was shared at: Homestead Barn Hop, Make Your Own Monday, Better Mom Mondays, Monday Mania, Made from Scratch Mondays, I Gotta Try That, Modest Mondays, Welcome Home Mondays, Fat Tuesdays, Titus 2sdays, Titus Tuesdays Link-Up, Domestically Divine, Living Well Wednesdays, Allergy-Free Wednesdays, Gluten-Free Wednesdays,  Homemaking Link-Up, Creative at Home Wednesdays,

You Might Also Like:

Creamy Custard with Summer Berries (GF, DF Option)
Dairy-Free Whipped Coconut Cream {Simple & Delicious}
Special Recipe from Nourishing Cookies for a Healthy Holiday Cookbook

Filed Under: Other Desserts ·

  • « Previous Page
  • 1
  • …
  • 4
  • 5
  • 6
  • 7
  • Next Page »

My New Cookbook is Here!

Welcome to The Nourishing Home!

I’m so glad you’re here and want you to feel right at home! My heart in creating this blog is to help you by sharing helpful meal planning strategies and nourishing GF recipes that are healthy, easy and delicious with thanksgiving to God! [Read More …]


All content (recipes, photos, posts, etc.) on this site is the creative property of Kelly Smith. You are welcome to share a photo via social media, as long as it contains a link back to the corresponding recipe or post from this site. However, you may not republish a recipe in its entirety in any form. For questions, or for permission to use a photo or recipe, please contact me via email at [email protected]. Thank you!

Please Note: All content (recipes, photos, text, etc.) on this site is the creative property of Kelly Smith of The Nourishing Home. You are welcome to share a photo via social media, as long as it contains a link back to the corresponding recipe from this site. However, re-publishing a recipe in any form is strictly prohibited. Additionally, please refrain from adapting recipes without properly linking back to the original recipe, and keep in mind that simple substitutions do not constitute an adapted or original recipe. For details regarding recipe copyright law, please visit the Food Blog Alliance.
The Nourishing Home is a participant in the Amazon Services LLC Associates Program, an affiliate advertising program designed to provide a means for sites to earn advertising fees by advertising and linking to amazon.com.

Privacy Policy
DMCA.com

Copyright © 2026 · All Rights Reserved · The Nourishing Home · Artwork by Nancy Panaccione · Site Design by Deluxe Designs · Log in