The Nourishing Home

living healthier lives in service to the King!

  • Home
  • About
    • About TNH
    • Contact
  • Meal Planning
  • Health & Wellness
    • Real Food Basics
  • Whole30
  • GF Recipes
    • Whole30
    • Breakfast
    • Lunch
    • Entrées
    • Slow Cooker
    • Soups & Stews
    • Sides & Salads
    • Snacks
    • Desserts
    • Kids in the Kitchen
  • My Cookbook
  • Subscribe

Featured Recipe: Easy Nut Butter Cookies (GF, DF)

By Kelly · 8 Comments

Easy Nut Butter Cookies {GF, DF}

Last week, Wardeh at GNOWFGLINS was here talking about her new eBook Real Food Kids in the Kitchen – a terrific resource chock-full of helpful tips, strategies and age-appropriate activities for getting your kids excited about cooking wholesome food.

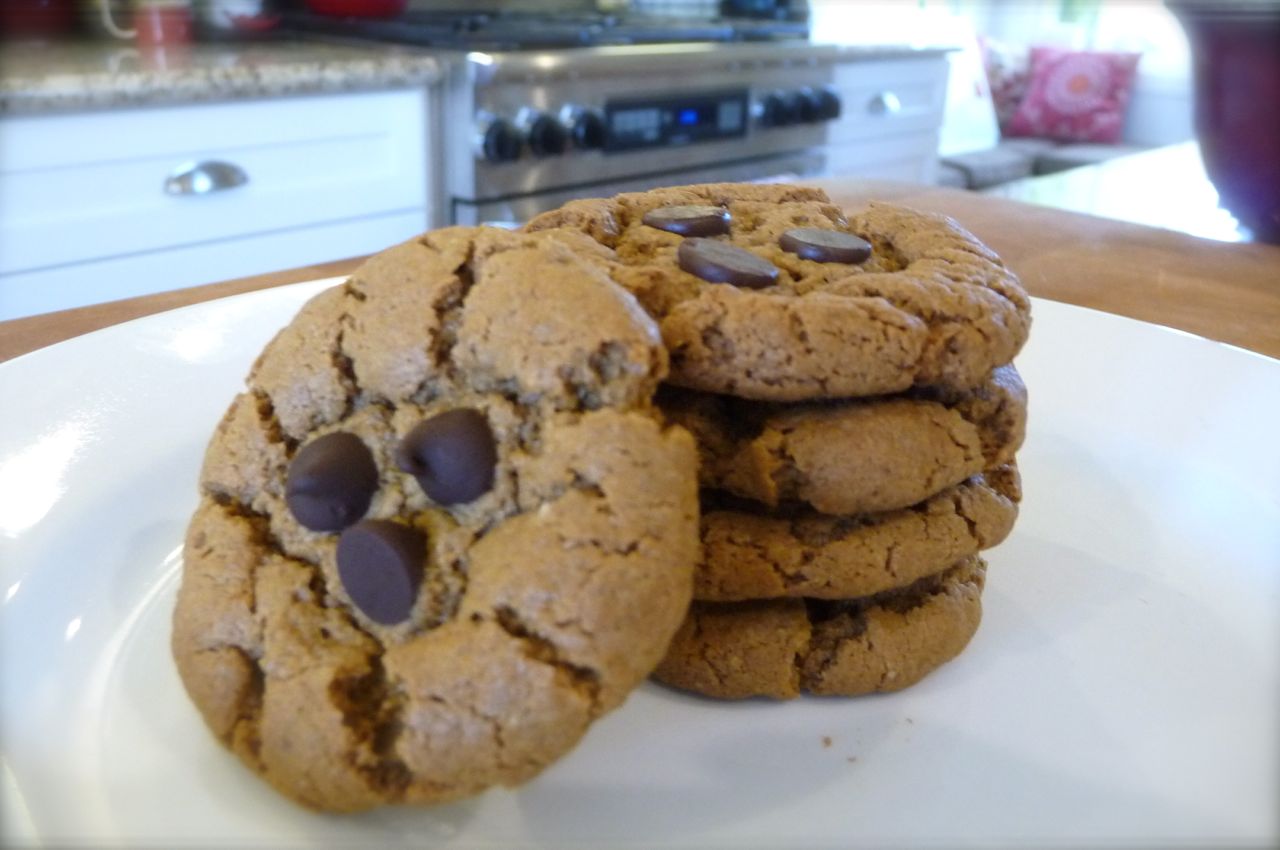
I thought it would be fun to share one of Wardeh’s recipes from the book and she agreed (thanks, Wardeh!). So after looking at the many choices, the boys and I decided to give her quick and easy nut butter cookies a try! After all, a key strategy for getting kids excited about cooking, especially if you have older kiddos, is to select a simple recipe that they’re certain to enjoy. And what do all kids love? COOKIES, of course!

So whether you’re just getting started, or have been cooking with your kiddos for years, this is a wonderfully easy and fun (not to mention, scrumptious) recipe to make together!

Real Food Kids in the Kitchen:
Easy Nut Butter Cookies in Three Easy Steps!

Cookie Boys Stirring

Step One: The boys work as a team to add and mix all of the ingredients.

Cookie Boys Making Cookie Balls

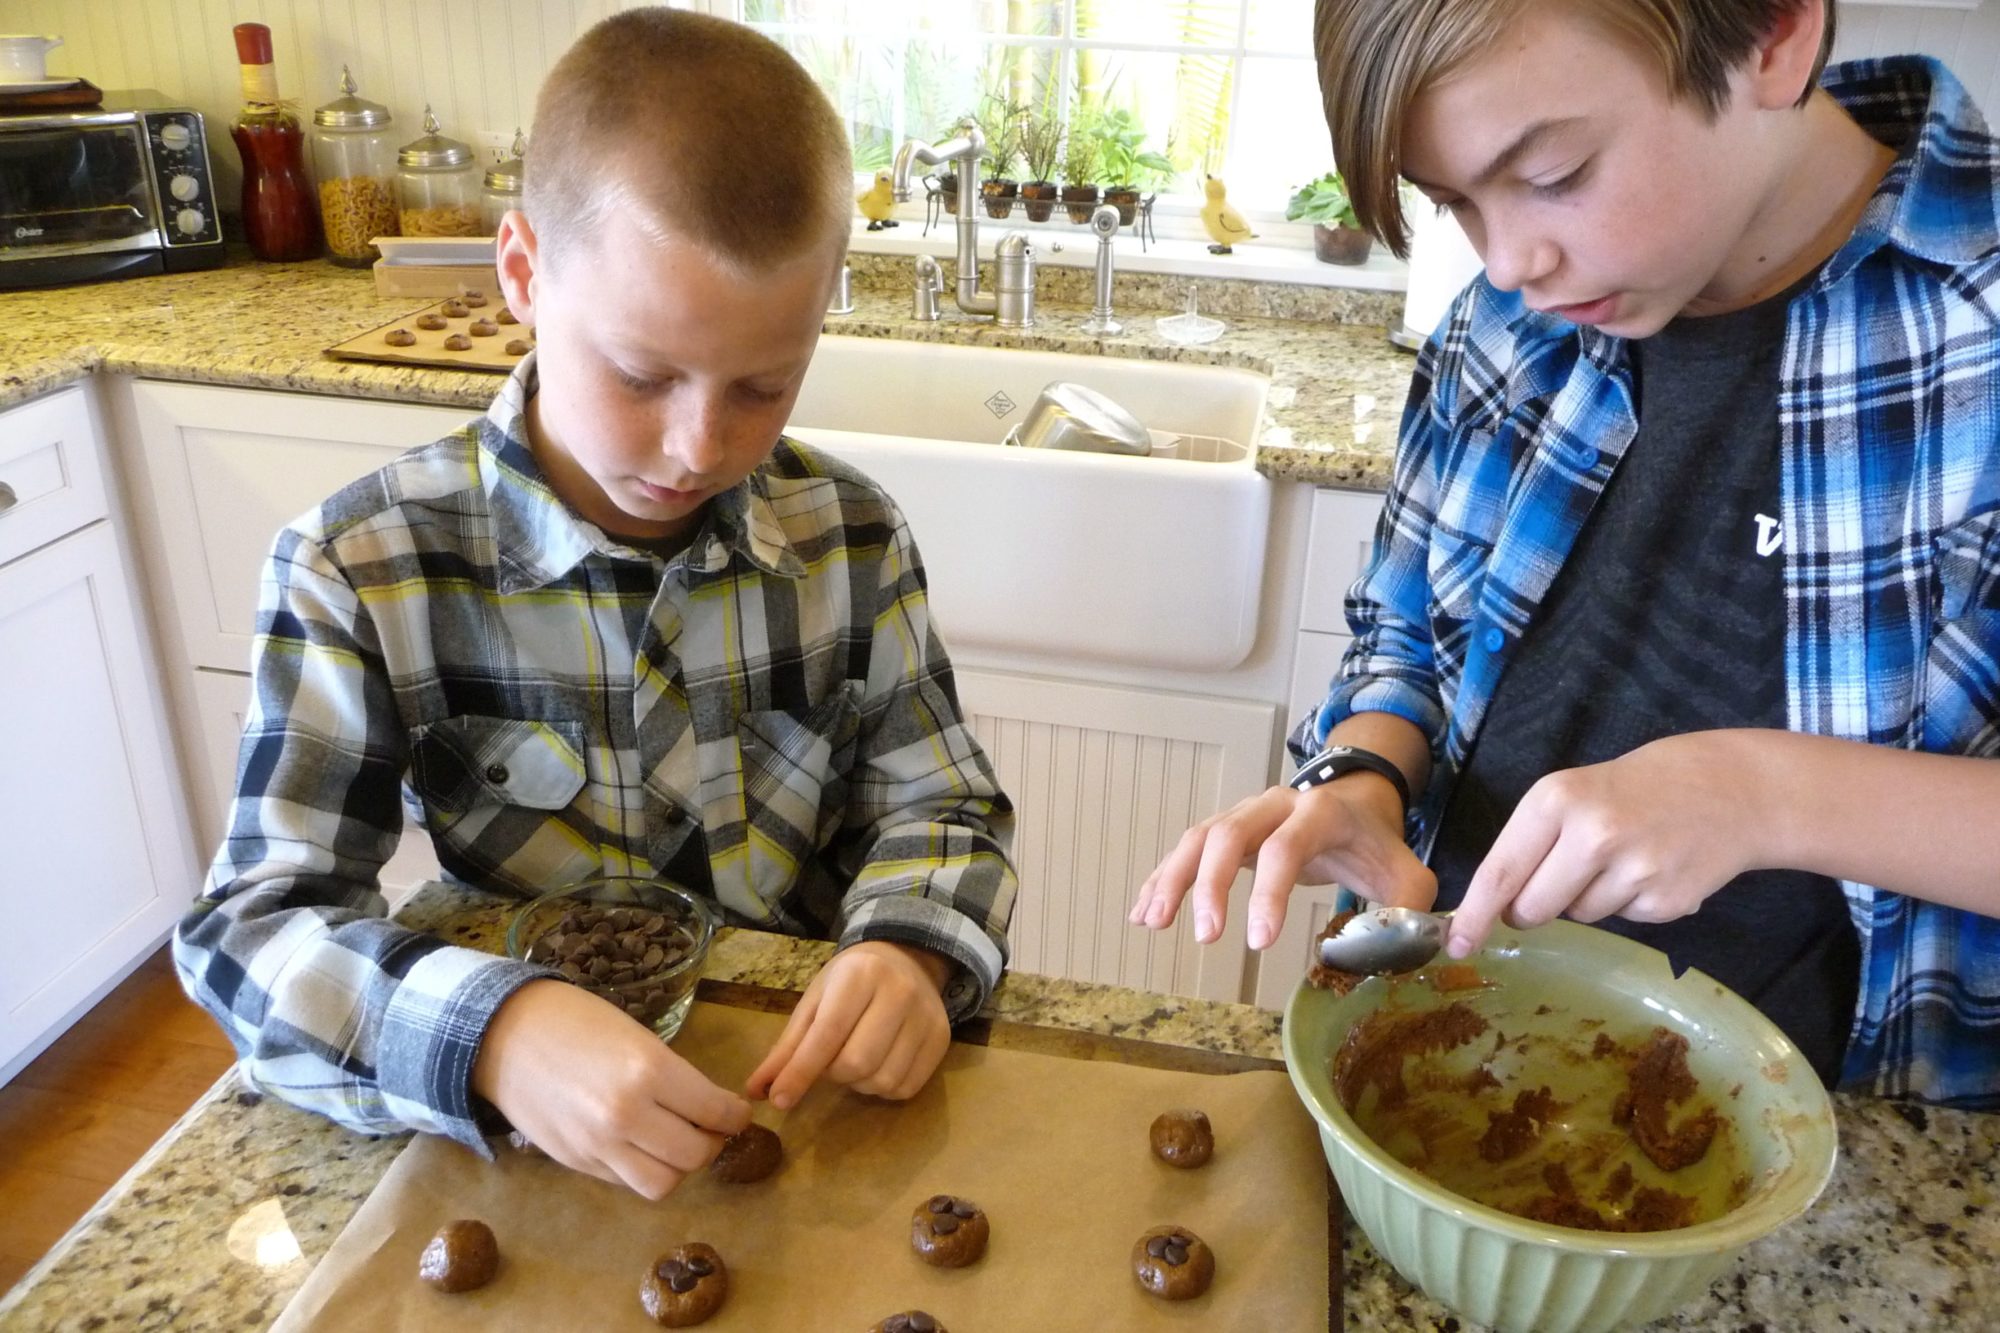
Step Two: My older son rolls the dough into small tablespoon-size cookie balls, while his little bro adds a few chocolate chips in the center. (The chocolate chips were their idea, because quote – “everything tastes better with chocolate!” It’s hard to argue with that logic!)

Easy Nut Butter Cookies {GF, DF}

Step Three: Bake and ENJOY! Now, it’s your turn to enjoy some fun in the kitchen with your kiddos!

Print
Easy Nut Butter Cookies (GF, DF)

Yield: 3 dozen

Easy Nut Butter Cookies (GF, DF)

Featured recipe from GNOWFGLINS Real Food Kids in the Kitchen eBook

Ingredients

  • 1 cup of your favorite *all-natural nut butter (such as peanut, almond or sunflower butter for those w/nut allergies)
  • 1 cup coconut sugar (or sucanat)
  • 1 large egg
  • 1 tsp baking soda
  • Optional: Fair trade dark chocolate chips (65% cacao or higher)

Instructions

  1. Preheat oven to 350 degrees. In a large mixing bowl, combine all ingredients. (Our special trick to ensure the ingredients are well combined, is to first whisk the egg, coconut sugar and baking soda together and then use a large rubber spatula to add the nut butter.)
  2. Cover the bowl and place the dough in the frig for about 10 minutes so the dough will cool and thicken a bit. (This makes it easier to roll into cookie balls.)
  3. Then, pinch off small teaspoon-size pieces and roll into a ball. Add a few chocolate chips to the center of each cookie ball, if desired.
  4. Place cookie balls onto a parchment lined baking sheet and bake approximately 8-9 minutes. Allow to cool on the pan for a couple of minutes. Then, carefully transfer cookies to a wire rack to finish cooling.
  5. For cookies now and later – Create cookie balls out of all the dough, but only bake one dozen now. Freeze the remaining two dozen uncooked cookie balls in a single layer on a parchment-lined baking sheet. Then, transfer the cookie dough balls to a freezer-safe container. That way, when you want more cookies at a later date, you can simply remove the desired amount from the freezer, allow the cookies to thaw a bit and then bake as instructed above.

Notes

*For best results, use an all-natural nut butter that contains nuts only without added ingredients (salt is fine). For those with nut allergies, Wardeh recommends using sunflower seed butter.

3.1
https://thenourishinghome.com/2013/01/featured-recipe-easy-nut-butter-cookies-gf-df/

P.S. If you missed my interview with Wardee, co-author of the best-selling Real Food Kids in the Kitchen eBook, I highly encourage you to pop over and check it out. In this exclusive interview, she shares her wisdom and passion for teaching children (and families) the joy of cooking real food, as well as provides a few helpful tips for getting your kids in the kitchen – which is, as you know, one of my passions as well!

Disclosure: I make a small commission if you opt to purchase Wardeh’s eBook using the links above. All commissions help to support the many free resources available here at The Nourishing Home! 

follow-me-on-pinterest-button

You Might Also Like:

Double Chocolate Banana Bars
Cranberry Orange Cookies
Test Kitchen Showdown: Which Lunch Box Food Storage System is Right for Your Family?

Filed Under: Cookies/Bars/Brownies, Kid Friendly Recipes ·

Easy Chocolate Ganache Icing (DF Option)

By Kelly · 7 Comments

Coconut Flour Brownie

Traditional ganache is made using heavy cream and semi-sweet chocolate. However, this renegade recipe utilizes a little coconut milk in place of the cream, along with a touch of cocoa powder to create a delicious thick chocolatey icing perfect for topping cakes and brownies. 

How to use Ganache: Ganache is traditionally used as a glaze or icing, and it can be whipped to a mousse-like consistency using a mixer for use as a filling in pastries. When ganache is still warm it’s pourable, so you can easily pour and spread it over a pan of brownies or a sheet cake (shown above). You can also use warm ganache to make chocolate dipped strawberries. Once it’s cooled to room temperature, chocolate ganache makes a great icing for frosting cakes or cupcakes.

How to store Ganache: In general, ganache can be left at room temperature for 1-2 days. If you find yourself with leftover ganache, you can refrigerate it for up to two weeks. To use it, bring it back to room temperature for use as an icing, or rewarm it to use it as a glaze or sauce (warm ganache is delicious over ice cream).

P.S. For those of you who are dairy-free, you can easily use ghee or palm shortening in place of the butter with equally delicious results! (I’ve found it to be similar to butter to use a combination of 2 Tbsp of ghee with 2 Tbsp of palm shortening in this recipe.)

Print
Easy Chocolate Ganache Icing (DF Option)

Yield: Makes 1 1/4 cups

Easy Chocolate Ganache Icing (DF Option)

Ingredients

  • 1/4 cup butter (if DF, use ghee or palm shortening)
  • 1/2 cup dairy-free mini-chocolate chips
  • 1 tbsp unsweetened fair trade cacao powder
  • 1 tbsp pure coconut milk
  • 1/4 cup honey (mild clover honey is best)

Instructions

  1. In a small saucepan over low heat, melt the butter.
  2. Once melted, turn off the heat and add the chocolate chips, slowly whisking until melted.
  3. Move pan to a cool area on the stovetop and whisk in the cocoa powder, coconut milk and honey.
  4. Allow mixture to cool to room temperature in order for ganache to firm up (see note below). Then use it to frost your favorite cakes, cupcakes or brownies. Use an offset spatula to evenly distribute the ganache icing.

Notes

In order for the ganache to fully set, you can either leave it out at room temperature until cooled. Or you can refrigerate the ganache briefly, until icing reaches desired firmness – about 20-30 minutes. (Please note: If you refrigerate the ganache overnight, it will harden completely, and will need to come back to room temperature again before you'll be able to use it as frosting/icing.)

Read How to Store Ganache in post above for storage instructions. See How to Use Ganache in post above for more delicious uses for ganache.

3.1
https://thenourishinghome.com/2013/01/easy-chocolate-ganache-icing-df-option/

You Might Also Like:

Apple Streusel Upside Down Cake (GF)
Creamy Custard with Summer Berries (GF, DF Option)
Grain-Free Chocolate Cake with Fudge Icing

Filed Under: Cakes/Cupcakes, Other Desserts ·

Thumbprint Cookies(GF): Special Holiday Guest Post!

By Kelly · Leave a Comment

I’m honored to be a special guest once again at Honeyville Grains, sharing one of my family’s favorite Christmas cookie recipes – Almond Flour Thumbprint Cookies. These traditional treats are so easy to make, and are beautifully festive too, which is why they’re often seen at holiday cookie exchanges.

So what makes these thumbprint cookies different from traditional recipes? These beauties are made with whole food ingredients of course, such as highly nutritious blanched almond flour, coconut oil and just a touch of pure maple syrup ­– making them the perfect tasty, yet wholesome addition to any holiday party or cookie exchange.

So, I invited you to pop over to Honeyville’s recipe blog – The Cookin’ Cousins – to check out these delightful Almond Flour Thumbprint Cookies. They’re definitely a scrumptious and festive treat to share at holiday gatherings with family and friends!

Thank You for Your COMMENTS!
Hi, friends! I always am blessed by your sweet comments! If you would like to comment about this recipe, may I ask a favor – please pop on over to the recipe at Honeyville Grains and leave your comment there. Thanks so much! I promise you’re going to LOVE this recipe!

Wishing you a joy-filled CHRISTmas, Kelly

You Might Also Like:

Raw Almond Butter Truffles (GF)
Kid's Favorite Fruit Pizza (GF Option)
Chocolate Dipped Raspberry Brownie Bites (GF, DF option)

Filed Under: Cookies/Bars/Brownies ·

  • « Previous Page
  • 1
  • …
  • 14
  • 15
  • 16
  • 17
  • 18
  • …
  • 27
  • Next Page »

My New Cookbook is Here!

Welcome to The Nourishing Home!

I’m so glad you’re here and want you to feel right at home! My heart in creating this blog is to help you by sharing helpful meal planning strategies and nourishing GF recipes that are healthy, easy and delicious with thanksgiving to God! [Read More …]


All content (recipes, photos, posts, etc.) on this site is the creative property of Kelly Smith. You are welcome to share a photo via social media, as long as it contains a link back to the corresponding recipe or post from this site. However, you may not republish a recipe in its entirety in any form. For questions, or for permission to use a photo or recipe, please contact me via email at [email protected]. Thank you!

Please Note: All content (recipes, photos, text, etc.) on this site is the creative property of Kelly Smith of The Nourishing Home. You are welcome to share a photo via social media, as long as it contains a link back to the corresponding recipe from this site. However, re-publishing a recipe in any form is strictly prohibited. Additionally, please refrain from adapting recipes without properly linking back to the original recipe, and keep in mind that simple substitutions do not constitute an adapted or original recipe. For details regarding recipe copyright law, please visit the Food Blog Alliance.
The Nourishing Home is a participant in the Amazon Services LLC Associates Program, an affiliate advertising program designed to provide a means for sites to earn advertising fees by advertising and linking to amazon.com.

Privacy Policy
DMCA.com

Copyright © 2026 · All Rights Reserved · The Nourishing Home · Artwork by Nancy Panaccione · Site Design by Deluxe Designs · Log in