The Nourishing Home

living healthier lives in service to the King!

  • Home
  • About
    • About TNH
    • Contact
  • Meal Planning
  • Health & Wellness
    • Real Food Basics
  • Whole30
  • GF Recipes
    • Whole30
    • Breakfast
    • Lunch
    • Entrées
    • Slow Cooker
    • Soups & Stews
    • Sides & Salads
    • Snacks
    • Desserts
    • Kids in the Kitchen
  • My Cookbook
  • Subscribe

Happy-Happy Grain Free Ice Cream Cake (GF, DF option)

By Kelly · 15 Comments

Happy Happy Cake

NEW RECIPE!! (updated 07/21/14)

Happy, happy, happy, happy … whatever the happy occasion, this decadent grain free ice cream cake is certain to put a big smile on your favorite faces!

After all, cake and ice cream go together like bacon and eggs, bread and butter, peaches and cream … I think you get the point. So why not just put the two together and make it easier and more fun too!

That’s why anytime we’ve got a special something-to-celebrate going on around here, this is one of our favorite go-to desserts – it’s certain to make any occasion an even happier one!

Ice Cream Cake 2
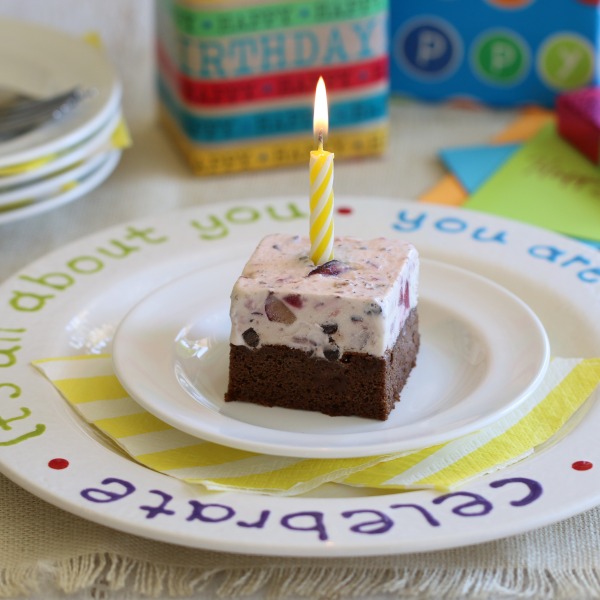
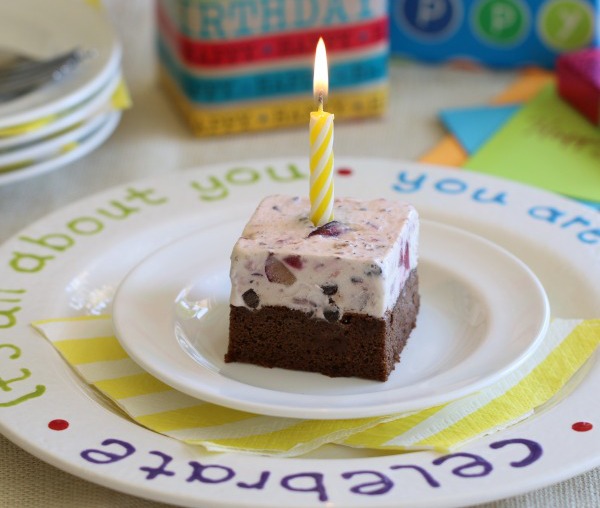
And, you have several options for making this delightful treat. As shown at left, I originally began my ice cream cake making tradition using my decadent fudgy brownie recipe as the base for the cake and topped it with homemade vanilla ice cream and a sprinkling of raw cacao bits.

Recently, my friend Kristin shared her amazingly rich almond flour chocolate cake recipe. So to celebrate my youngest’s 12th birthday, I decided to use her cake as the base and then topped it with my newest creation – Fresh Cherry Chocolate Chip Ice Cream (see recipe below). WOW! It’s definitely my family’s newfound favorite!

Happy Happy Cake CloseUp

So whether you have something special to celebrate, or simply want to surprise your loved ones with an extra special treat, you can bet this easy grain-free ice cream cake is certain to bring a lot of happiness to the table! (P.S. If you’re dairy-free, you can easily modify this recipe as noted below and top with your favorite dairy-free ice cream.)

Print
Happy-Happy Ice Cream Cake (GF, DF option)

Yield: serves 12-15

Ingredients

    Choose Your Cake Base:
  • You can use either my decadent fudge brownie recipe, Kristin's almond flour chocolate cake recipe, or my nut-free coconut flour chocolate cake recipe
  • For the Ice Cream Layer:
  • 2 quarts of homemade vanilla ice cream (or *dairy-free vanilla ice cream, see note below)
  • 1 1/2 cups diced fresh or frozen cherries
  • 3/4 cups dairy-free mini chocolate chips
  • (Or simply use your favorite store-bought ice cream)

Instructions

  1. Make the vanilla ice cream a day or two ahead of time and fold in the diced cherries and chocolate chips, if desired. Place in freezer to harden.
  2. For the cake layer: Lightly grease a 9x13-inch baking dish with coconut oil or palm shortening. Prepare the cake of your choice following the instructions in the recipe, making sure to follow the instructions for baking in a 9x13-inch pan.
  3. Allow the cake to cool completely in the baking dish and then place it in the freezer to freeze solid.
  4. Note: It usually takes about an hour for the cake to cool enough to go into the freezer and then another 2-3 hours for the cake to freeze. So, I find it easier to bake the cake a day ahead of time to ensure ample time for it to cool/freeze.
  5. Once the brownie cake is frozen, top with ice cream. If using store-bought ice cream (or homemade that's been in the freezer), allow it to sit on the counter for about 10 minutes to soften a bit. Then use an ice cream scoop to scoop the ice cream out and place the scoops side-by-side on top of the frozen cake. Then, use a cake spreader to even-out the ice cream across the top of the cake.
  6. If making homemade ice cream, I recommend making the ice cream base a day ahead of time, so it's thoroughly chilled and the flavors have had a chance to meld. Then, at least 3-4 hours before you plan to serve the cake, add the ice cream base to your ice cream maker. Once your ice cream is finished churning, spoon it over the frozen cake and spread it evenly across the top.
  7. Cover the ice cream cake and place it in the freezer until frozen solid. About 10 minutes before you plan to serve the ice cream cake, place it on the counter to thaw a bit so it's easier to slice. Enjoy!

Notes

*If you're dairy-free, simply substitute using your favorite DF vanilla ice cream. Personally, I enjoy Danielle's decadent French vanilla coconut milk ice cream recipe. It works beautifully as a topping for this festive and fun ice cream cake.

3.1
https://thenourishinghome.com/2012/09/happy-happy-ice-cream-cake/

You Might Also Like:

No Bake Mini-Cheesecakes (GF)
Easy Chocolate Ganache Icing (DF Option)
3 Favorite Frostings!

Filed Under: Cakes/Cupcakes, Desserts, Frozen Treats · Tagged: almond flour cake, almond flour cupcakes

Lemondrop Cupcakes with Creamy Lemon Frosting (GF)

By Kelly · 59 Comments

Lemon cupcakes
I wish you could reach right through your screen and grab one of these delightful lemony cupcakes. Their sweet, tangy flavor is reminiscent of lemondrop candies, except these are good for you!

These sweet little cupcakes are made with nutritious coconut flour, which yields a light, moist baked good. Top them with my simple Creamy Lemon Frosting and you’ve got a delicious little bite-sized treat perfect for any celebration!

And speaking of celebrations … these little cuties also make a great patriotic dessert for Memorial Day, July 4th or any day you’re feeling patriotic. Check out my Red, White & Blueberry Cupcakes special guest post for details.

Lemon Cupcakes 2

Print
Lemondrop Cupcakes with Creamy Lemon Frosting (GF)

Yield: 24 mini-cupcakes

Lemondrop Cupcakes with Creamy Lemon Frosting (GF)

Ingredients

  • 1/2 cup organic coconut flour
  • 1/2 tsp baking soda
  • 1/4 tsp sea salt
  • 1/2 cup pure honey (I prefer sage honey due to its mild flavor)
  • 1/4 cup butter, melted (or coconut oil)
  • 4 large eggs
  • 3 tbsp fresh-squeezed lemon juice (about 2 lemons)
  • 1 tbsp, plus 1 tsp fresh organic lemon zest

Instructions

  1. Preheat oven to 350 degrees. Zest lemons first, then juice them; set aside. (Save one teaspoon of zest for frosting.)
  2. In a small bowl, combine coconut flour, baking soda and salt.
  3. In a large bowl, use an electric mixer on low speed to beat together the honey and melted butter until creamy. Then, beat in eggs, lemon juice and zest until well combined.
  4. Add the dry ingredients to the wet, blending until batter is smooth and fluffy. (Using an electric hand mixer, or stand mixer, to whip up a fluffy batter is key to making the texture of these cupcakes light and moist.)
  5. Spoon batter into a 24-cup mini-muffin tin lined with mini-muffin baking cups, making sure not to overfill the cups.
  6. Bake approximately 10-12 minutes, until toothpick inserted in center comes out clean. (These mini-cupcakes will not brown, unless over-baked.)
  7. Allow cupcakes to cool completely. Top with Creamy Lemon Frosting, if desired.

Notes

If you prefer to make regular-sized cupcakes, this batter will yield about 8 cupcakes. Simply follow steps listed above, and extend the bake time to approximately 15 minutes, until toothpick inserted in center comes out clean.

(Please note: Baking regular-sized cupcakes will result in slightly over-browned bottoms. To help reduce this a bit, may want to double-line the muffin tins with two paper-liners per muffin cup.)

3.1
https://thenourishinghome.com/2012/06/lemondrop-cupcakes-with-creamy-lemon-frosting-gf/

You Might Also Like:

Grain-Free Chocolate Cake with Fudge Icing
Lemon Poppy Seed Muffins {GF, DF}
Pumpkin Spice Cake: Special Fall Guest Post!

Filed Under: Cakes/Cupcakes ·

Coconut Flour Chocolate Cake & Cupcakes (GF)

By Kelly · 13 Comments

This chocolate cake is SO DELICIOUS that my boys and hubby literally say “Mmm, sooo good!” with each and every bite – funny, but absolutely true!

As shown in the photo above, when cherries are in season, I like to finely dice some and sprinkle them across the top of the chocolate cream frosting to make a pretty & tasty garnish. Another delicious option is to sprinkle the top of the frosted cake with some raw cacao bits, or grated dark chocolate. YUM!

This grain-free, protein-packed cake is the perfect healthy treat for celebrating a special occasion, as it’s absolutely scrumptious and full of wonderful nutritious ingredients! What a delicious way to celebrate with family and friends!

As shown above, the final batter should be thick, creamy and whipped in appearance.

A good way to keep eager fingers out of your cake is to use the extra batter to bake-up a half-dozen cupcakes for the kiddos! Or you can use all of the batter to make about two dozen cupcakes.

Print
Coconut Flour Chocolate Cake & Cupcakes (GF)

Coconut Flour Chocolate Cake & Cupcakes (GF)

Ingredients

  • 1 cup unsalted butter (room temperature)
  • 1/2 cup pure honey (I prefer sage honey due to its mild flavor)
  • 1 1/3 cup unsweetened organic applesauce (room temperature)
  • 10 eggs (room temperature) P.S. This is not a typo it really is 10 eggs!
  • 1 tsp vanilla extract
  • 2 cups organic coconut flour
  • 1 cup fair-trade unsweetened cocoa powder
  • 1 1/2 tsp baking soda
  • 1/2 tsp aluminum-free baking powder
  • 1 tsp sea salt
  • 1 1/3 cups whole raw milk (or coconut milk)

Instructions

  1. Preheat oven to 350 degrees. Grease a 9x13-inch baking dish with coconut oil. (Please note: This recipe produces too much batter for an average 9x13 dish, but that is no problem! In fact, it actually solves a bigger problem – keeping my boys' fingers out of the cake before guests arrive! So I simply line a muffin tin with six paper muffin liners and use the extra cake batter to make a half-dozen cupcakes too! Then I'm able to ward off the pleas for a taste of the cake, by handing over a cupcake instead. Problem solved!)
  2. In a very large, deep bowl, combine the butter and honey, using an electric mixer. Add the applesauce and mix until well blended. Add the eggs one at a time, mixing each one in before adding the next. Then beat the batter at high speed for 2-3 minutes. Finally, mix in the vanilla.
  3. In a separate bowl, combine the dry ingredients together until well blended. Then, take turns adding the dry ingredients and the milk to the batter, until all ingredients are incorporated. Finally, beat the batter for about 4-5 minutes on high speed. Batter will be thick, creamy and whipped in appearance (see photo below). Spoon the batter into the prepared baking dish, using a spreader to smooth out the top and evenly distribute the batter. Leave at least 1 1/2 inches of space from top of batter to top of baking dish, so you have room for the frosting after the cake bakes. (Use the extra batter to make 6 cupcakes as described below, be sure to bake them separately.)
  4. Bake cake in preheated oven for 30-35 minutes, until toothpick inserted into the center of cake comes out clean. Place baking dish on wire rack and allow to cool completely.
  5. Top with Chocolate Cream Frosting. Enjoy!
  6. Cupcakes:
  7. Follow recipe as directed above, but spoon batter into muffin cups and bake for about 22-25 minutes. If using all of the batter, the yield is about 24 cupcakes.

Notes

If you prefer, you can make a layer cake using two 9-inch round cake pans. Reduce bake time to 25-30 minutes.

This recipe was adapted from Tropical Traditions free coconut recipes website.

3.1
https://thenourishinghome.com/2012/03/coconut-flour-chocolate-cake-cupcakes/

You Might Also Like:

Strawberry Shortcake Biscuits
Coconut Flour Brownie Cake (GF, DF Option)
Pumpkin Praline Coffee Cake

Filed Under: Cakes/Cupcakes, Desserts ·

  • « Previous Page
  • 1
  • …
  • 3
  • 4
  • 5
  • 6
  • Next Page »

My New Cookbook is Here!

Welcome to The Nourishing Home!

I’m so glad you’re here and want you to feel right at home! My heart in creating this blog is to help you by sharing helpful meal planning strategies and nourishing GF recipes that are healthy, easy and delicious with thanksgiving to God! [Read More …]


All content (recipes, photos, posts, etc.) on this site is the creative property of Kelly Smith. You are welcome to share a photo via social media, as long as it contains a link back to the corresponding recipe or post from this site. However, you may not republish a recipe in its entirety in any form. For questions, or for permission to use a photo or recipe, please contact me via email at [email protected]. Thank you!

Please Note: All content (recipes, photos, text, etc.) on this site is the creative property of Kelly Smith of The Nourishing Home. You are welcome to share a photo via social media, as long as it contains a link back to the corresponding recipe from this site. However, re-publishing a recipe in any form is strictly prohibited. Additionally, please refrain from adapting recipes without properly linking back to the original recipe, and keep in mind that simple substitutions do not constitute an adapted or original recipe. For details regarding recipe copyright law, please visit the Food Blog Alliance.
The Nourishing Home is a participant in the Amazon Services LLC Associates Program, an affiliate advertising program designed to provide a means for sites to earn advertising fees by advertising and linking to amazon.com.

Privacy Policy
DMCA.com

Copyright © 2026 · All Rights Reserved · The Nourishing Home · Artwork by Nancy Panaccione · Site Design by Deluxe Designs · Log in