The Nourishing Home

living healthier lives in service to the King!

  • Home
  • About
    • About TNH
    • Contact
  • Meal Planning
  • Health & Wellness
    • Real Food Basics
  • Whole30
  • GF Recipes
    • Whole30
    • Breakfast
    • Lunch
    • Entrées
    • Slow Cooker
    • Soups & Stews
    • Sides & Salads
    • Snacks
    • Desserts
    • Kids in the Kitchen
  • My Cookbook
  • Subscribe

Healthy Homemade “Lunchables”

By Kelly · 25 Comments

Why purchase a lunch that not only has zero nutritional value, but actually contains ingredients that are detrimental to your children’s health? Of course, the lure of this product is its convenience, but that’s the whole problem with processed foods – you trade convenience for quality nutrition.

Believe me, I’m not trying to be a lunchbox killjoy here – in fact, the more fun lunch is, the more likely it is that your child will eat it. So that’s what inspired me to create a few Healthy Homemade Lunchables ideas that are as nutritious as they are fun to create and eat. The following three lunchable-makeover recipes are my boys’ personal favorites. I hope your children enjoy them too!

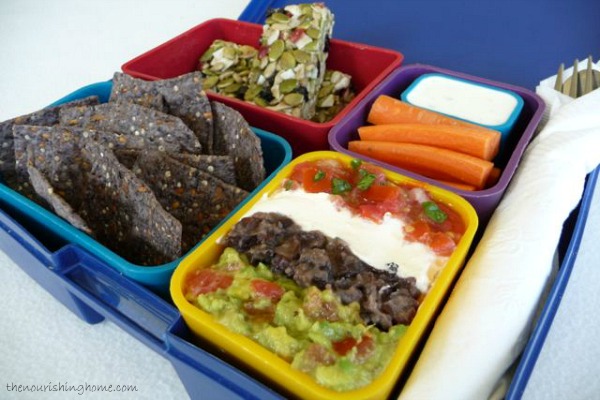
The fun-colored *reusable BPA-free storage containers come from Laptop Lunches, which is also where you can find even more healthy lunch ideas. Another fun site for getting more healthy lunchable ideas is MOMables, see *note below.

Here’s to making lunch healthy and FUN!  🙂

Lunchbox Love Collage
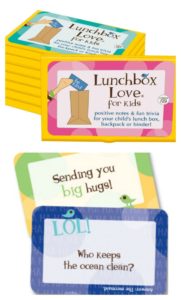
P.S. I’ve got a fun way to say I Love You! These little Lunchbox Love Notes are absolutely precious, and are such a heartfelt way to let your kids know how much you love and care about them.

Whether you have preschoolers, elementary age kids or teens, SayPlease.com has an amazing line of “love notes” for kids of all ages, even adults. The notes include an inspiring message along with cool trivia and funny jokes.

I love putting these thoughtful little notes into my boys’ lunchboxes, because I know it makes them feel loved and special!


Grilled Chicken Dunkers
Wrap individually (or place in reusable separate containers) the following items:
• Leftover grilled chicken, cut into bite-size chunks
• Homemade ranch dressing for dipping
• Raw zucchini sticks
• Fresh melon
• Grain-free fruit muffin


Turkey & Cheese Cracker Stackers
Wrap individually (or place in reusable separate containers) the following items:
• Grain-free crackers
• Nitrate-free turkey slices, cut into squares
• Raw cheese, cut into squares
• Cultured dill pickle (cultured pickles contain beneficial probiotics, we like Bubbies brand)
• Organic grapes
• Crispy nut mix with dried cherries and fair-trade dark chocolate chips


Make-Your-Own-Pizza
Wrap individually (or place in reusable separate containers) the following items:
• GF bagel, cut in half (for little ones or light eaters, just pack one half)
• Organic pizza sauce
• Organic shredded mozzarella cheese
• Organic apple slices
• Healthy cookies

Rainbow Bean Dip Lunchable2
From Leftovers to Lunchables

And be sure to check out “From Leftovers to Lunch” for a few of our favorite ways to transform leftovers into healthy, delicious and FUN “lunchables” the whole family will love!

Three cheers for healthy “lunchables” that are just as nutritious as they are delicious!

Looking for more great lunch ideas and recipes?
MomablesFinal_wtagBe sure to check out my friend Laura at MOMables for lots of whole food based recipes and ideas for making lunch delicious, nutritious and FUN! (P.S. Laura offers a weekly lunch meal plan subscription program. There is no obligation, but if you opt to sign up via the link here, a small portion of the proceeds helps to support The Nourishing Home at no additional cost to you. Thank you!)

Happy lunch packing! Joyfully Serving HIM, Kelly

You Might Also Like:

Raw Cookie Dough Bites (GF)
Summer Veggies Pasta (Grain-Free Option)
Creamy Custard with Summer Berries (GF, DF Option)

Filed Under: Kid Friendly Recipes, Lunch ·

Honey Graham Cracker Cookies

By Kelly · 24 Comments

These crunchy, delicious graham crackers are so easy to make – simply roll out the dough and cut into rectangles for traditional graham crackers, as shown above.

Or cut out the dough using your favorite holiday cookie cutters to make festive graham cracker cookie treats, as shown below.

You can also create Chocolate Graham Cracker Cookies by simply adding unsweetened fair trade cocoa powder  (see recipe for details).

The Key to Crisp Crackers: To make these honey grahams crisp and crunchy like a cracker, be sure to roll the dough out thinly and evenly (to about an 1/8-inch). Also, once baking time is completed, follow step #11 below to allow additional time for the crackers to get nice and crispy.

Additional Baking Tip: To ensure cookies bake evenly, gently transfer cracker cut-outs to a parchment-lined baking sheet as shown above.

Honey Graham Crackers are absolutely delicious by themselves, or dunked in a big glass of raw milk!

This recipe was inspired by a whole wheat graham cracker recipe I came across at Heavenly Homemakers. Since graham crackers are one of my all-time favorites, I decided to adapt the recipe to utilize whole spelt instead, since it’s our whole grain flour of choice.

Why whole spelt? I prefer whole spelt over whole wheat for a couple of reasons. Mainly because I can tolerate spelt better than wheat and also, I find that spelt has a lighter taste and texture than whole wheat.

Whole spelt does contain gluten, so it’s not a good choice for those with gluten-related allergies or sensitivities. For more about whole spelt, click here.

Print
Honey Graham Cracker Cookies

Yield: 24 three-inch crackers

Honey Graham Cracker Cookies

Ingredients

  • 2 1/4 cups organic whole spelt flour (see note below about sprouted flour)
  • 1/3 cup rapadura (or sucanat)
  • 1 tsp baking powder
  • 1/2 tsp baking soda
  • 1/4 tsp sea salt
  • 1/4 tsp cinnamon
  • 1/2 cup butter, melted
  • 3 tbsp pure honey (I prefer sage honey due to its mild flavor)
  • 1/4 cup water
  • 1 tsp pure vanilla extract

Instructions

  1. In a large bowl, add melted butter, honey, water and vanilla and whisk well to combine.
  2. In a smaller mixing bowl, combine the flour, rapadura, baking powder, baking soda, salt and cinnamon. (If making Chocolate Grahams, add 5 tablespoons of unsweetened fair trade cocoa powder.)
  3. Add the flour mixture to the melted butter mixture and mix well using a large spoon. Cover and chill dough for at least 30 minutes in frig (but no longer than 12 hours).
  4. While you’re waiting for the dough to chill, cut two large pieces of parchment paper for rolling out the dough, and one sheet to fit your baking sheet.
  5. Once dough is chilled, preheat oven to 325 degrees.
  6. Place dough on one large sheet of parchment paper on your countertop and flatten slightly using your hand. Then, place the other piece of large parchment paper on top of the flattened dough.
  7. Use a rolling pin to roll the dough between the two pieces of parchment paper. To make these honey grahams crisp and crunchy like a cracker, be sure to roll the dough out thinly and evenly (to about an 1/8-inch).
  8. Use a pizza cutter or knife to trim the rolled-out dough into a large rectangle. Then cut the rectangle-shaped dough into 2x3-inch rectangles and poke with a fork in center of each cracker. Or you can use your favorite cookie cutters to make fun-shaped cookie-crackers.
  9. Gently transfer cracker cut-outs to the parchment-lined baking sheet to ensure cookies bake evenly. (You may need to use a metal spatula to lift the cut-outs so they don’t lose their shape.)
  10. Bake for 9-12 minutes. Remove from oven and allow crackers to cool slightly on baking sheet. Then, transfer them to a wire rack to cool completely. (Please note: Smaller-sized cookies may require less baking time. Likewise, larger-sized cookies may require longer baking time.)
  11. For crispier cracker-like cookies, once baking time is completed, open oven door and check cookies for doneness. If cookies are done, turn off the oven and leave the oven door open just a bit to allow some of the heat to escape. Allow cookies to remain in warm oven for an additional 6-10 minutes. Then remove from oven and transfer cracker-cookies to a wire rack to cool completely.
  12. Store in an airtight container for up to one week in pantry, or in freezer for one month.

Notes

The Key to Crispy Crackers: To make these honey grahams crisp and crunchy like a cracker, be sure to roll the dough out thinly and evenly (to about an 1/8-inch). Also, once baking time is completed, follow step #11 above to allow additional time for the crackers to get nice and crispy.

For increased nutrition, sprouted spelt flour works great in this recipe. Sprouted flour contains a tremendous amount of beneficial nutrients because the grain is first sprouted, and then is milled into flour (or you can buy whole sprouted spelt berries and grind your own flour).

For the original whole wheat graham cracker recipe that inspired this one, please visit Heavenly Homemakers.

3.1
https://thenourishinghome.com/2012/04/honey-graham-cracker-cookies/

This recipe was featured at Ingredient Spotlight–Honey.

You Might Also Like:

Day in the Life of a Meal Planner ...
Baked French Toast Casserole
Italian Sausage & White Bean Soup (GF)

Filed Under: Uncategorized ·

The Secret of Success: “Mise en Place!”

By Kelly · 31 Comments


Ever wonder how those famous chefs on Food Network seem to whip up amazing meals in what seems like mere minutes?

Well, believe it or not, getting a great meal on the table quickly and effortlessly isn’t just about talent or experience. The real secret to increasing your efficiency and success in the kitchen is to commit to some good ol’ fashioned planning and organization in the form of “mise en place.” (Of course, having a team of sous chefs doesn’t hurt either.)

I remember the first time I heard about mise en place – it was Julia Child speaking in her distinctly unusual accent, telling me and all her PBS viewers that there was nothing more efficient than practicing mise en place.

I was enlightened, I was thrilled, I knew life in the kitchen would never be the same again … after all, I now knew a secret that renowned chefs across the globe utilized to increase efficiency and ensure the success of their culinary creations.

Mastering “Mise En Place”
“Mise en place” (pronounced MEEZ ahn plahs) is a French culinary term that means “to put in place.” In a nutshell, the purpose of mise en place is to have all of your ingredients prepared and ready to go before you start cooking, so you don’t have to stop during the cooking process to do anything other than add the next ingredient.

Trust me, friends … if you adopt the practice of mise en place, you will find life in the kitchen not only quicker and easier, but more successful and enjoyable too!

Mise en place will truly help you to be a better cook, guaranteed! Why? Because you will be able to focus your attention fully on the most critical aspect of what makes a meal a success – cooking.

Let’s Get Started!

chicken kebobs mise en place

There are two simple steps when it comes to mise en place:
• Planning ­– making sure you have all of the ingredients (and necessary tools) called for in a recipe before you get started, and
• Organizing – making sure you have all of the ingredients prepared (ready to go) before you start cooking.

Step One: Planning
Have you ever come home from a busy day and starred blankly into the refrigerator or pantry hoping for divine inspiration on what to make for dinner, only to find that when inspiration finally strikes, you’re missing one of the essential ingredients needed to make the meal? I admit that I had this experience almost daily before I got serious about weekly meal planning.

Honestly, there’s no better way to ensure that you have all of the ingredients on hand to make a recipe, than to practice the time-saving and money-saving strategy of meal planning! In fact, may I be so bold as to suggest that meal planning is the ultimate mise en place!

Meal planning not only guarantees that you’ll have all of the ingredients necessary to execute every recipe on your meal plan, but it also helps to save time, stress and money because you’ve already pre-planned what you’ll be cooking for the week. For details, please check out “Mastering Meal Planning.”

Step Two: Organizing
I think it’s safe to say that most of us wouldn’t pack a suitcase by simply opening it up and filling it with random socks, shirts, pants, shoes, etc. First, we’d plan what we’re going to wear. Then we’d start organizing and assembling all of the necessary components before we packed the suitcase.

Successful, efficient cooking isn’t much different – by planning ahead in the form of weekly meal planning (as discussed above), you’ll already have what you need for each recipe you’ll be making. This makes it much easier to take the next step of mise en place – organizing!

If you’ve watched any cooking show on TV, you’ve seen the results of the behind-the-scenes organization that has taken place – all those little bowls of ingredients already pre-prepped and ready to go for the chef. All the chef has to do is talk you through the recipe as he/she adds each perfectly prepped and measured ingredient.

It would be awesome to have a personal sous chef to prep and assemble all of your recipe ingredients, but the fact is you can still benefit from this practice, you just have to commit to Be Your Own Sous Chef! Or better yet, train up little sous chefs to help you!

Mise en Place in Action!
Ready to be a “Real” Food Network Star in your own home? Below are some of my favorite mise en place tips to help you get organized before you start cooking:

• Gather all of the ingredients, as well as all of the measuring tools and cooking tools, etc. that are needed to execute the recipe(s) and place them close at hand. (Even better is to organize them in the order you’ll be using them.)

• Dice, chop, grate, mince, etc. all of the ingredients needed for the recipe(s) so they’re all ready to go before you start cooking.

• Premeasure out ingredients in individual prep bowls or measuring cups. (Or group them together in one bowl, if you’re going to add them at the same time to a recipe.) You don’t have to measure out everything, just those ingredients that would cause you to hold up progress. (For example, when baking, I never pre-measure out vanilla extract, but I always pre-measure out things like yogurt, honey, maple syrup, etc.)

• Clean as you go … another great benefit of mise en place is less mess to clean-up after cooking. Since you’re spending time prepping before you start cooking, you can also take a minute to clean-up a bit after prep-time is completed, before you start cooking. This is especially rewarding if you’re having dinner guests – not only so your kitchen appears tidy when guests arrive, but also so you can relax after dinner, rather than having to look forward to a lengthy clean-up progress.

• Timing is everything – If you’re going to be cooking or assembling more than one dish, it’s important to start with the recipe items that take longer to cook and then work your way to those ingredients or dishes that take less time to prepare. This strategy helps you to develop good timing – so everything is ready all at the same time!

• Schedule a “Mise en Place” Prep Day! If you meal plan, a great time-saving strategy is to schedule a prep day so you can prepare for the week ahead by pre-cutting and marinating meats; chopping veggies, such as lettuce for quick and easy salads; making and freezing key ingredients (or meals) that can be defrosted later for quicker meal assembly. The ideas for prepping in advance are endless! That’s why prep days are a great mise en place strategy – they help reduce your time in the kitchen during the rest of week, so you can still provide healthy homecooked meals even on the busiest of days.

A Final Mise en Place Tip
Let’s talk about preheating for a minute. This is one of the most often overlooked mise en place strategies.

There’s a reason a recipe calls for preheating – it helps to ensure the food cooks properly. So before just throwing a steak on a barely heated grill (for example), be sure to preheat the grill, so it’s nice and hot. A hot grill helps to sear the exterior of the meat and lock in its juices, making the steak so much more tender and juicy!

Similarly, before sautéing, be sure your pan is well heated. By allowing time for your pans to heat-up before cooking, you’ll help to ensure better, tastier results.

Additionally, when cooking with oil, it should be close to its smoking point, before you add your recipe ingredients for best results.

And it probably goes without saying, that before you put those homemade cookies or muffins in the oven, it’s wise to be sure that your oven is preheated to the precise baking temperature called for in the recipe. Otherwise, you may end up with burned bottoms (and nobody likes a burned bottom).

Investing Your Time Wisely!
I promise, practicing mise en place isn’t just for famous TV chefs and restaurateurs, it’s a proven technique that can help everyone to cook with more ease and more success. That’s because mise en place helps us to invest our time wisely!

So remember the secret – Putting in the necessary time upfront to plan your meals and then, gather and prep all of the recipe’s ingredients in advance, helps to ensure that the time you spend cooking is much more efficient and enjoyable, as well as results in a healthy and delicious meal for the family you love!

Joyfully Serving Him, Kelly

You Might Also Like:

How to Spiralize ... it's easy, delicious and nutritious!
Day Zero: Getting Ready for the Whole30!
Room for Dessert? (the joys of healthier all-natural sweeteners)

Filed Under: The FUNdamentals ·

  • « Previous Page
  • 1
  • …
  • 135
  • 136
  • 137
  • 138
  • 139
  • …
  • 182
  • Next Page »

My New Cookbook is Here!

Welcome to The Nourishing Home!

I’m so glad you’re here and want you to feel right at home! My heart in creating this blog is to help you by sharing helpful meal planning strategies and nourishing GF recipes that are healthy, easy and delicious with thanksgiving to God! [Read More …]


All content (recipes, photos, posts, etc.) on this site is the creative property of Kelly Smith. You are welcome to share a photo via social media, as long as it contains a link back to the corresponding recipe or post from this site. However, you may not republish a recipe in its entirety in any form. For questions, or for permission to use a photo or recipe, please contact me via email at [email protected]. Thank you!

Please Note: All content (recipes, photos, text, etc.) on this site is the creative property of Kelly Smith of The Nourishing Home. You are welcome to share a photo via social media, as long as it contains a link back to the corresponding recipe from this site. However, re-publishing a recipe in any form is strictly prohibited. Additionally, please refrain from adapting recipes without properly linking back to the original recipe, and keep in mind that simple substitutions do not constitute an adapted or original recipe. For details regarding recipe copyright law, please visit the Food Blog Alliance.
The Nourishing Home is a participant in the Amazon Services LLC Associates Program, an affiliate advertising program designed to provide a means for sites to earn advertising fees by advertising and linking to amazon.com.

Privacy Policy
DMCA.com

Copyright © 2026 · All Rights Reserved · The Nourishing Home · Artwork by Nancy Panaccione · Site Design by Deluxe Designs · Log in