The Nourishing Home

living healthier lives in service to the King!

  • Home
  • About
    • About TNH
    • Contact
  • Meal Planning
  • Health & Wellness
    • Real Food Basics
  • Whole30
  • GF Recipes
    • Whole30
    • Breakfast
    • Lunch
    • Entrées
    • Slow Cooker
    • Soups & Stews
    • Sides & Salads
    • Snacks
    • Desserts
    • Kids in the Kitchen
  • My Cookbook
  • Subscribe

Salted Caramel Apple Bars (GF, DF)

By Kelly · 4 Comments

Salted Caramel Apple Bars (GF, DF)Guest Post by Tiffany, Don’t Waste the Crumbs

Ever since we went strawberry picking earlier this year, we’ve been making plans to go apple picking at the same orchard. Unfortunately, between homeschool, vacations, new jobs and still more trips to come, it just isn’t in the cards for us. Thankfully, my favorite farmer’s market is bursting with more fresh local apples than I can shake a stick at!

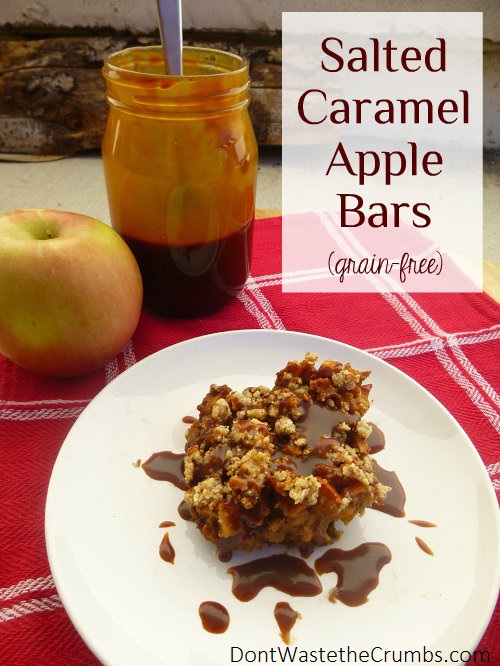
Fresh apples aren’t the only thing in season though. Two years ago we were introduced to a certain salted caramel beverage that appears each fall, and ever since, I’ve noticed recipes calling for that sweet-n-salty combo are all over the web. Although, I’m not a huge salted caramel fan (I prefer pumpkin spiced instead), there’s something about mixing salted caramel with fresh, crunchy apples that makes my mouth start to water!

I have to admit – devising a recipe for a primarily gluten-free crowd is not easy to do, especially when your family doesn’t avoid gluten. So after attempting this dessert twice, and coming up with failures each time, I decided to go back to the drawing board. Instead of reinventing the wheel, I based these bars off of a tried a true GF recipe – Kelly’s tasty almond flour snickerdoodles! I’ve transformed this cookie into a delicious GF bottom layer and crumble topping, while the center is filled with delicious apples bathed in sweet-n-salty caramel goodness!

For more delicious ideas for using homemade salted caramel, I invite you to pop on over to my place for visit. And please feel free to share a few of your tasty ideas as well!
Blessings, Tiffany at Don’t Waste the Crumbs

Print
Salted Caramel Apple Bars (GF, DF)

Yield: 9 bars

Ingredients

    Bottom Layer
  • 2 1/2 cups blanched almond flour
  • 4 Tbsp arrowroot powder
  • 1/2 tsp ground cinnamon
  • 1/2 tsp baking powder
  • 1 1/2 Tbsp coconut oil, melted
  • 1/4 cup maple syrup
  • 2 tsp pure vanilla extract
  • Apple Filling
  • 3 cups peeled and chopped apples, (approx 2 large apples, any variety)
  • 2 Tbsp granulated organic evaporated sugar cane juice (or sucanat)
  • 1 Tbsp lemon juice
  • 1 tsp arrowroot powder
  • 2 Tbsp coconut flour
  • 1 tsp cinnamon
  • 1/2 tsp nutmeg
  • 1/4 - 1/3 cup homemade salted caramel, room temperature
  • Crumble Topping
  • reserved 1/2 cup of bottom layer
  • 1 Tbsp unsalted butter (or coconut oil)

Instructions

  1. Prepare a batch of homemade salted caramel. Allow it to cool while you make the rest of this recipe. Preheat the oven to 350 degrees.
  2. In a medium bowl, combine the dry ingredients of the bottom layer (almond flour, arrowroot, cinnamon and baking powder). Measure out 1/2 cup of dry mixture and set it aside for the crumble topping.
  3. Combine the wet ingredients of the bottom layer in a separate small bowl (coconut oil, maple syrup and vanilla). Then add to the bottom layer dry ingredients and mix well. Allow the dough to sit for at least 30 minutes, up to two hours.
  4. Press the dough into the bottom of an 8x8-inch or 9x9-inch glass pan, ensuring the dough reaches the edges. The dough will be sticky, so use wet hands to help you spread it, if necessary.
  5. Using a fork, prick the dough throughout to allow steam to escape. Bake the dough for 7 minutes and remove from the oven.
  6. While the dough is baking, combine the apple filling ingredients in a large bowl. Pour over baked dough. (The bottom layer does not need to cool first.)
  7. Next, drizzle 1/4 to 1/3 cup of homemade salted caramel over the apples so that the apples are covered by a thin layer of caramel.
  8. Using your fingers, mix the reserved bottom layer mixture with one tablespoon of cold butter (or coconut oil), until the mixture resembles coarse breadcrumbs. Sprinkle evenly over the salted caramel layer.
  9. Bake in the oven for 30 minutes, or until the juices from the apples begin to bubble through the top.
  10. Cool for 30 minutes at room temperature, then refrigerate for at least one hour before serving. (Note: The longer this stays in the fridge, the easier it will be to cut into bars. Serving sooner than three hours will likely not offer a rigid bar shape, but the dessert will still be delicious.)

Notes

Time-Saving Tip: In light of the upcoming holiday baking season, why not purposefully make extra snickerdoodle cookie dough and freeze it. That way when you're in the mood for these scrumptious salted caramel apple bars (which you will be if you continue to stare at the photo!), you can quickly whip up a batch in half the time! (By the way, doubling recipes is just one way I stay sane while homeschooling and trying to feed my family healthy food. It's a perfect example #2 in this list of ways to work smarter, not harder in the kitchen.)

3.1
https://thenourishinghome.com/2013/10/salted-caramel-apple-bars-gf-df/

Meet-TiffanyMeet Tiffany!
Tiffany is a frugal foodie – passionate about feeding her family healthy food, while being a good steward of her family’s finances. She’s a homeschooling mother of two, loving wife to one and a child of God blessed in more ways than she can count. She shares her enthusiasm for affording real food without going broke, and documents her baby-sized strides at Don’t Waste the Crumbs. Join Tiffany and the Crumbs Community on Facebook or Google+ for encouragement and small, simple steps to healthier living.

You Might Also Like:

Healthier Cracker Jack Snack
A Simply Delicious Thanksgiving!
A Healthy New Year … Now!

Filed Under: Uncategorized ·

Peasant Soup: Simple & Delicious!

By Kelly · 4 Comments

Peasant Soup
Let me introduce you to my sweet friend Katie at Simple Foody. She has a real gift for for making real food affordable through her frugal and creative approach to cooking. Today, Katie is sharing one of the simple and delicious ways she stretches her food budget to serve healthy, nutrient-dense meals.

Guest post by Katie at Simple Foody

Soup can be a frugal, yet delicious way to feed your family, which is why I recently posted “64 Nourishing Soups for Fall” – an amazing round-up of some of the best seasonal soups on the internet.

Of course, some soups are what I like to call “ultra frugal” – helping to maximize your food budget while still providing a satisfying nutrient-dense meal. Making soup out of leftovers is a great way to stretch those grocery dollars.  

For instance, rather than discarding bones from a roast chicken, I like to save them for making stock. After dinner, I’ll throw any bones into the crockpot and cover with water. I’ll also toss in any leftovers vegetables from the fridge (or veggie scraps from preparing dinner). Then, cover and cook the mixture overnight on low.

By morning the house is filled with the savory aroma of chicken stock. I let it keep simmering until lunch or dinner.  Then I carefully pour the contents of the crockpot into a mesh colander that sits inside a stockpot, collecting all that yummy chicken stock. I place about two quarts of the stock into a stockpot over medium heat. (The rest I save to make other recipes like nourishing rice.)

Then, I add whatever soup-worthy vegetables I have on hand, as well as some rice (or gluten-free pasta). I also gather any remaining meat from the colander and place into the stockpot. Within 30 minutes I have a rich, nourishing soup that was nearly free considering most of it was made from scraps that would have headed to the compost (or trash) otherwise.

Peasant Soup (2)
There is no strict recipe for Peasant Soup. So please consider this “recipe” as a simple guideline to help inspire you in developing your own deliciously frugal Peasant Soup!

Print
Simple Peasant Soup (Gluten-Free)

Ingredients

  • 2 quarts (8 cups) homemade bone broth
  • 1 cup sliced carrots
  • 1 cup uncooked brown rice (or 2 cups uncooked GF pasta)
  • Leftover chicken meat
  • Fresh or dried herbs of your choice (ex. thyme, parsley, bay leaf)
  • Sea salt and pepper to taste

Instructions

  1. Combine all the ingredients in a medium stockpot over medium heat. Feel free to add your favorite vegetables – whatever you have on hand.
  2. Cover and allow soup to simmer 10-30 minutes (at least 10 minutes if you’re adding pasta or firm vegetables like potatoes, or up to 30 minutes, if adding brown rice).
  3. Remember to make this recipe your own. Don't feel as if you are limited to chicken bones only. If you have leftover pork or beef ribs, pork chops or steak bones, simply cover the bones with water and make a bone broth in the same way described above. Then, after you’ve strained the broth, pick off any remaining meat from the bones and add it to your soup. (You don't need much meat, as bone stock is full of nutrient-dense gelatin and protein.)

Notes

Budget-Saving Tip: You can generally save several dollars per pound by purchasing whole chickens rather than pre-cut chicken pieces or breasts. This is especially true when it comes to organic chicken, which can be pricey. Roasting whole chickens is an easy way to gain a lot of succulent meat, and also – as this recipe suggests – make use of the bones to create a nutritious stock perfect for soups and other meals.(Learn more on how I save money here.)

3.1
https://thenourishinghome.com/2013/10/peasant-soup-gf/

Happy Fall Blessings, Katie at Simple Foody

Katie-headshot-150x150Meet Katie!
Katie is a military wife and mother of four. She is passionate about family, food and serving the LORD. By day you may find her changing diapers, folding laundry, home educating her older children, and cooking three meals a day with a baby on her hip next to a sink of dirty dishes. By night she writes and shares recipes, tips, and tutorials for economical, nourishing and simple gluten-free foods at Simple Foody. Join Katie and the Simple Foody Community on Facebook for encouragement on your journey to healthier living.

You Might Also Like:

You're invited to attend Kombucha 101
Pantry Makeover Giveaway from MightyNest
New recipe for Savory Cottage Pie

Filed Under: Uncategorized ·

Breaking Down The Walls …

By Kelly · Leave a Comment

The Wall Around Your Heart Review

“I see walls nearly everywhere. Devastation and bitterness in the aftermath of relationship blowups … Hurt people barricading themselves from ever having to feel relational pain again, discovering instead the angst of loneliness behind the barrier. People holding tightly to control, only to see their relational worlds spin into chaos … Walls aren’t pretty. But they’re real.”
– excerpt from Mary Demuth’s “The Wall Around Your Heart”

Often we fail to see the walls that we’ve carefully constructed to keep others out. Other times, we’re very much aware of them, as we continually fortify them, maintaining these walls as a shield we trust in to guard against the bad, the uncomfortable, the unknown.

Some walls are there to keep people in view at a safe distance … or they’ve grown so tall and strong that they completely block our view of seeing altogether.

What are the walls within the heart? Why do we construct them? How can we tear them down and live without constraint – free in the Lord to be the people He calls us to be?

These are the questions Mary DeMuth explores in her life-changing book that just released, “The Wall Around Your Heart.” Here, Mary explores the Lord’s Prayer as a roadmap to guide us in how we can achieve wholeness and healing in the aftermath of painful relationships and begin to dismantle the walls in our heart to fully love and serve others to the glory of God. You’ll walk through story after story of hurt people who are led through biblical truth into life-changing, joyful growth.

A key aspect of the book that I appreciate most is that Mary not only shares her wisdom and the stories of others to inspire and encourage us, she also provides “Questions for Growth” at the end of each chapter that challenge us to dig deep and apply the truths of God in our own hearts and lives.

So when Mary asked me to be part of her book launch team, I was honored. The Lord has used her books to touch my life (and so many others) in such remarkable ways.

Gifts

As I turned the pages, some of the walls around my heart were hard to see at first – I just didn’t even know they were there. And until this book, I never would have thought to seek them out, or to try break them down …. to discover what I was missing.

What I lenjoy most about Mary’s writing, is that you can feel her right there with you as you read each page – sharing her own journey and spurring you on in yours. Her ability to help her readers open their eyes to the possibilities that come when we surrender our hearts more and more to Jesus is a gift the Lord has given her to serve each of us.

Not to digress, but Mary’s book “Everything,” is one of the most beautiful and inspiring books that I’ve read on giving our hearts fully to Jesus. And now, The Wall Around Your Heart follows in its footsteps sharing the wisdom needed to recognize and tear down the barriers in our hearts, so we can accomplish the will of God in our lives to fully love and serve others for His glory.

If you’re feeling hurt by past relationships, constrained in living the life the Lord is calling you to live, or you are simply seeking the encouragement to live an unbridled life more fully to the glory of God, I highly recommend my friend Mary’s wonderful books. I can’t express enough gratitude to God for inspiring her to openly share her wisdom.

And of course I am thankful to Mary for being such a humble and gracious example of living life uncaged – fully free and joyfully living her life for the King of Kings and inspiring us all to do the same!

Joyfully Serving HIM, Kelly

You Might Also Like:

Salted Caramel Apple Bars (GF, DF)
Celebrate July 4th with an Easy & Healthy Patriotic BBQ Menu
A Real Food Journey – Small steps in the right direction!

Filed Under: Uncategorized ·

  • « Previous Page
  • 1
  • …
  • 11
  • 12
  • 13
  • 14
  • 15
  • …
  • 44
  • Next Page »

My New Cookbook is Here!

Welcome to The Nourishing Home!

I’m so glad you’re here and want you to feel right at home! My heart in creating this blog is to help you by sharing helpful meal planning strategies and nourishing GF recipes that are healthy, easy and delicious with thanksgiving to God! [Read More …]


All content (recipes, photos, posts, etc.) on this site is the creative property of Kelly Smith. You are welcome to share a photo via social media, as long as it contains a link back to the corresponding recipe or post from this site. However, you may not republish a recipe in its entirety in any form. For questions, or for permission to use a photo or recipe, please contact me via email at [email protected]. Thank you!

Please Note: All content (recipes, photos, text, etc.) on this site is the creative property of Kelly Smith of The Nourishing Home. You are welcome to share a photo via social media, as long as it contains a link back to the corresponding recipe from this site. However, re-publishing a recipe in any form is strictly prohibited. Additionally, please refrain from adapting recipes without properly linking back to the original recipe, and keep in mind that simple substitutions do not constitute an adapted or original recipe. For details regarding recipe copyright law, please visit the Food Blog Alliance.
The Nourishing Home is a participant in the Amazon Services LLC Associates Program, an affiliate advertising program designed to provide a means for sites to earn advertising fees by advertising and linking to amazon.com.

Privacy Policy
DMCA.com

Copyright © 2026 · All Rights Reserved · The Nourishing Home · Artwork by Nancy Panaccione · Site Design by Deluxe Designs · Log in