The Nourishing Home

living healthier lives in service to the King!

  • Home
  • About
    • About TNH
    • Contact
  • Meal Planning
  • Health & Wellness
    • Real Food Basics
  • Whole30
  • GF Recipes
    • Whole30
    • Breakfast
    • Lunch
    • Entrées
    • Slow Cooker
    • Soups & Stews
    • Sides & Salads
    • Snacks
    • Desserts
    • Kids in the Kitchen
  • My Cookbook
  • Subscribe

Fruit & Nut Bars in a Jar (GF)

By Kelly · 17 Comments

Fruit & Nut Bars-in-a-Jar

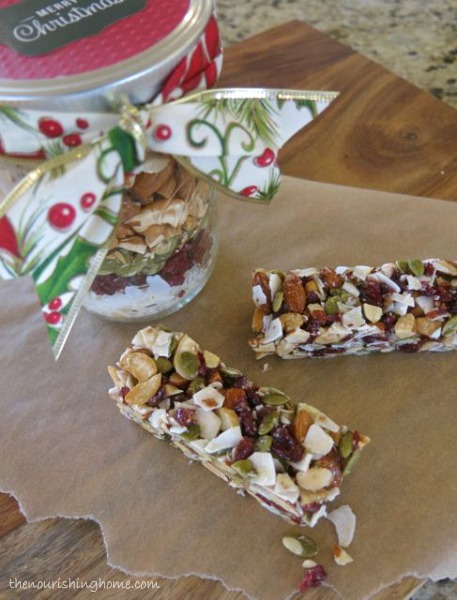
One of my most popular recipes this year, these mock-KIND fruit & nut bars are not only healthy and delicious, they also make a beautiful, thoughtful homemade gift-in-a-jar! I simply modified the recipe a bit so the ingredients fit nicely into a one pint mason jar.

So delicious – and chock-full of protein and healthy nutrients – this beautiful gift will most certainly be appreciated (and devoured) by your favorite health nuts. (silly pun intended) 

For another great grain-free gift idea, check out “Grain-Free Cookie Dough Bites in a Jar.”

Grain-Free Fruit & Nut Bars-in-a-Jar Gift

Simply layer the ingredients in a wide-mouth one-pint (2 cup) mason jar in the following order:

Rough Chopped Nuts• 1/2 cup rough-chopped unsweetened coconut flakes
• 1/3 cup chopped dried cranberries (or cherries)
• 1 cup rough-chopped unsalted whole nuts of your choice
(I use: 1/2 cup almonds, 1/4 cup cashews and 1/4 cup pistachios)

As shown in photo at right, rough-chop the whole unsalted nuts first (as well as the dried fruit and coconut flakes). Then measure out the ingredients as noted above.

Note: If substituting any or all of the nuts with seeds (such as pepitas shown in photo above), there’s no need to rough chop them first.

In a small snack-size ziplock baggie, add:
• 1 tbsp, plus 1 tsp coconut flour (or ground flaxseed)
• Pinch of sea salt

The ziplock baggie should be sealed and folded. Then placed on top of the nut mix before sealing the jar.

Finishing the gift:
Cut out festive paper in circles the same size as the jar top; place paper on top of the circle seal and then screw the lid over the paper. Add decorative ribbon and a gift tag.

Be sure to include the baking instructions (see below).
I like to print the directions out and place them into the Christmas card we give along with the gift jar. To make it extra festive, I place both the card and gift jar in a recycled gift bag.

——————————–

Instructions for Making Fruit & Nut Bars
You will need the following ingredients to make these delicious & healthy grain-free Fruit & Nut Bars:

• 1/4 cup pure honey (mild honey such as sage or clover are best)
• 2 tsp all-natural nut butter (mild nut butters like almond or cashew are best)

1. Preheat oven to 300 degrees. Trim parchment paper to line a 9×5-inch loaf pan, leaving parchment paper to hang over the two shorter sides of the pan.

2. In a large bowl, mix together the honey and all-natural nut butter until smooth and creamy.

3. Next, dump the contents of the small packet inside the jar into the bowl and use a spoon to mix together until well blended. Then, dump the remainder of the jar’s contents into the bowl. Stir well until thoroughly combined.

4. Place the bar mixture into the parchment-lined baking dish. Fold overlapping flaps down and evenly press the top of the bar mixture firmly to pack-in the ingredients so they hold together better after baking. Then, peel back the parchments flaps from top of bars.

5. Bake for 18-20 minutes. Then remove from oven and allow to cool on stovetop for approximately one hour (or until bottom of baking dish should is room temp).

6. Place in freezer to continue cooling. Once cold, but not frozen (about 20-30 minutes), remove dish from freezer. Then, run a knife along the two edges without parchment. Using the parchment paper ends, lift the bars from the baking dish and place on a cutting board.

7. Cut into 5 bars and individually wrap and store in the fridge or freezer. (Bars are best kept cold in order to hold the bars shape.) Enjoy!

Storage: This gift-in-a-jar can be stored in the pantry for 3-4 weeks. Yield: 5 bars

You Might Also Like:

Cherry Chocolate Chip Scones
15 Fabulous Ways to Enjoy Dried Strawberries
Apricot-Almond "KIND" Bars (GF)

Filed Under: Sweet ·

Cherry Chocolate Chip “KIND” Bars (GF)

By Kelly · 24 Comments

Cherry Chocolate Chip Bars GF

Yes, it’s true! We can’t seem to get enough of these “KIND” of bars around here. So this week, I’m sharing a few of our favorite flavor combinations – like this incredible Cherry Chocolate Chip version.

The great thing about these healthy little bars is their versatility, which makes it easy to change out ingredients to fit your own personal taste preferences and food sensitivities. Speaking of which, if you’re nut-free, there’s no need to miss out on these bars, simply pop over to check out my amazing Nut-Free “KIND” Bar.

Looking for more great bars? Check out these:
• Original Everything Fruit & Nut Bar 
– the original bar that started my obsession
• Nut-Free “KIND” Bar – perfect for those with nut-allergies
• Apricot-Almond Crunch Bar – mildly sweet, tangy & delicious!

Cherry Chocolate Chip Bar

Print
Cherry Chocolate Chip “KIND” Bars (GF)

Yield: 8 bars

Ingredients

  • 1/3 cup pure honey (I prefer sage honey due to its mild flavor)
  • 2 tbsp coconut flour
  • 1 tbsp *all-natural almond butter
  • 1/8 teaspoon sea salt
  • 1 cup unsweetened coconut flakes
  • (not finely shredded coconut)
  • 1 cup coarse-chopped unsalted cashews
  • 1/3 cup coarse-chopped unsalted almonds
  • 1/4 cup mini chocolate chips
  • 1/4 cup chopped dried organic cherries or cranberries (see **note below)

Instructions

  1. Preheat oven to 300 degrees. Trim parchment paper to line an 8×8-inch baking dish, leaving parchment paper to hang over two sides of the dish.
  2. In a large bowl, add the honey, coconut flour, all-natural almond butter and salt. Use a spoon to stir until well combined.
  3. On a large cutting board, coarse-chop a couple of large handfuls of whole cashews and measure out 1 cup. Then, coarse chop a handful or two of whole almonds and measure out 1/3 cup. Add the chopped nuts to the honey mixture.
  4. Next, chop the dried cherries (or cranberries) and measure out 1/4 cup; add to the honey mixture.
  5. Then add 1/4 cup of mini-chocolate chips.
  6. Finally, measure 1 cup of coconut flakes (not shredded coconut). Place coconut flakes on the cutting board and coarse-chop. Add chopped coconut flakes to honey mixture.
  7. Using a spoon, mix ingredients together making sure they are thoroughly combined.
  8. Place the bar mixture into the parchment-lined baking dish. Fold overlapping flaps down and evenly press the top of the bar mixture firmly to pack-in the ingredients so they hold together better after baking. Then, peel back the parchments flaps from top of bars. (Do not trim, as the flaps make it easier to remove the bars after baking.)
  9. Bake for 20 minutes. Then remove from oven and allow to completely cool on stovetop for approximately one hour (or until bottom of baking dish is room temp).
  10. Place in fridge to continue cooling. (Do not freeze as it makes it impossible to cut the bars without them crumbling.) Once cold, remove dish from refrigerator. Then, run a knife along the two edges without parchment. Using the parchment paper ends, lift the bars from the baking dish and place on a cutting board.
  11. Cut into 8 bars and individually wrap and store in the fridge or freezer. Then you can easily take out what you need and place directly into your child’s lunchbox (or yours) – no need to thaw. However, for best results, bars should be kept cold so they do not become over-sticky. Simply include an ice pack, if placing them in a lunchbox, or taking them on the go.

Notes

*You can use any all-natural nut butter you choose, just be sure it’s simply ground nuts without additives for best results and nutrition.

**Most dried fruits are treated with sulfur dioxide, so if you wish to avoid this preservative, be sure to purchase unsulfured organic dried fruits, or conventional dried fruits specifically labeled as sulfur dioxide free.

3.1
https://thenourishinghome.com/2013/09/cherry-chocolate-chip-kind-bars-gf/

follow-me-on-pinterest-button

*Disclosure: If you opt to purchase using the affiliate links in this post, a small portion of the sale goes to support The Nourishing Home at no additional cost to you. There is no obligation to purchase, but if you do, you are helping to support the free resources, meal plans and recipes here at The Nourishing Home. Thank you!

You Might Also Like:

Fruit & Nut Grain-Free Bars
Veggie Confetti Spread (GF)
Healthy "Caramel" Apple Dip (GF, DF)

Filed Under: Savory, Sweet ·

Apricot-Almond “KIND” Bars (GF)

By Kelly · 22 Comments

Apricot Almond Bars Grain-Free

Mildly sweet, with a hint of tangy goodness, these bars are a personal favorite. I must admit that I’ve been having a blast creating lots of variations of these scrumptious “KIND” inspired bars. I hope these recipes inspire you to get creative too – these little bars make it easy to find endless ways to making snacking healthy and FUN!

Looking for more great bars? Check out these:
• Original Everything Fruit & Nut Bar 
– the original bar that started my obsession
• Nut-Free “KIND” Bar – perfect for those with nut-allergies
• Cherry-Chocolate Chip Bar – chocolate chips, need I say more?

Print
Apricot-Almond “KIND” Bars (GF)

Ingredients

  • 1/3 cup pure honey (I prefer sage honey due to its mild flavor)
  • 2 tbsp coconut flour
  • 1 tbsp *all-natural almond butter
  • 1/8 teaspoon sea salt
  • 1 cup unsweetened coconut flakes
  • (not finely shredded coconut)
  • 1 cup coarse-chopped unsalted almonds
  • 1/3 cup coarse-chopped unsalted cashews
  • 1/2 cup chopped dried organic apricots (see **note below)

Instructions

  1. Preheat oven to 300 degrees. Trim parchment paper to line an 8×8-inch baking dish, leaving parchment paper to hang over two sides of the dish.
  2. In a large bowl, add the honey, coconut flour, all-natural almond butter and salt. Use a spoon to stir until well combined.
  3. On a large cutting board, coarse-chop a couple of large handfuls of whole almonds and measure out 1 cup. Then, coarse chop a handful or two of whole cashews and measure out 1/3 cup. Add the chopped nuts to the honey mixture.
  4. Next, chop the dried organic apricots and measure out 1/2 cup; add to the honey mixture.
  5. Finally, measure 1 cup of coconut flakes (not shredded coconut). Place coconut flakes on the cutting board and coarse-chop. Add chopped coconut flakes to honey mixture.
  6. Using a spoon, mix ingredients together making sure they are thoroughly combined.
  7. Place the bar mixture into the parchment-lined baking dish. Fold overlapping flaps down and evenly press the top of the bar mixture firmly to pack-in the ingredients so they hold together better after baking. Then, peel back the parchments flaps from top of bars. (Do not trim, as the flaps make it easier to remove the bars after baking.)
  8. Bake for 20 minutes. Then remove from oven and allow to completely cool on stovetop for approximately one hour (or until bottom of baking dish is room temp).
  9. Place in fridge to continue cooling. (Do not freeze as it makes it impossible to cut the bars without them crumbling.) Once cold, remove dish from refrigerator. Then, run a knife along the two edges without parchment. Using the parchment paper ends, lift the bars from the baking dish and place on a cutting board.
  10. Cut into 8 bars and individually wrap and store in the fridge or freezer. Then you can easily take out what you need and place directly into your child’s lunchbox (or yours) – no need to thaw. However, for best results, bars should be kept cold so they do not become over-sticky. Simply include an ice pack, if placing them in a lunchbox, or taking them on the go.

Notes

*You can use any all-natural nut butter you choose, just be sure it’s simply ground nuts without additives for best results and nutrition.

**Most dried fruits are treated with sulfur dioxide, so if you wish to avoid this preservative, be sure to purchase unsulfured organic dried fruits, or conventional dried fruits specifically labeled as sulfur dioxide free.

3.1
https://thenourishinghome.com/2013/09/apricot-almond-kind-bars-gf/

P.S. Note about the glamour shot – I used traditional dried apricots for the photoshoot only since they have more photogenic appeal than their dark prune-color sulfur-free counterparts. Yet, make no mistake, I highly recommend using sulfur dioxide free dried fruits, particularly if you have respiratory issues or sulfite allergies. Dried fruits are among the foods highest in sulfites. The best bet for avoiding sulfites in dried fruits is to purchase organic only, or look for dried fruits specifically labeled “sulfur dioxide free,”  “unsulfured,” or “sulfite-free.” 

follow-me-on-pinterest-button

*Disclosure: If you opt to purchase using the affiliate links in this post, a small portion of the sale goes to support The Nourishing Home at no additional cost to you. There is no obligation to purchase, but if you do, you are helping to support the free resources, meal plans and recipes here at The Nourishing Home. Thank you!

You Might Also Like:

Top 10 Healthy Snacks for Kids (& Adults)
How to Make Grain Free Granola {Step-by-Step}
15 Fabulous Ways to Enjoy Dried Strawberries

Filed Under: Savory, Sweet ·

  • « Previous Page
  • 1
  • …
  • 4
  • 5
  • 6
  • 7
  • 8
  • …
  • 11
  • Next Page »

My New Cookbook is Here!

Welcome to The Nourishing Home!

I’m so glad you’re here and want you to feel right at home! My heart in creating this blog is to help you by sharing helpful meal planning strategies and nourishing GF recipes that are healthy, easy and delicious with thanksgiving to God! [Read More …]


All content (recipes, photos, posts, etc.) on this site is the creative property of Kelly Smith. You are welcome to share a photo via social media, as long as it contains a link back to the corresponding recipe or post from this site. However, you may not republish a recipe in its entirety in any form. For questions, or for permission to use a photo or recipe, please contact me via email at [email protected]. Thank you!

Please Note: All content (recipes, photos, text, etc.) on this site is the creative property of Kelly Smith of The Nourishing Home. You are welcome to share a photo via social media, as long as it contains a link back to the corresponding recipe from this site. However, re-publishing a recipe in any form is strictly prohibited. Additionally, please refrain from adapting recipes without properly linking back to the original recipe, and keep in mind that simple substitutions do not constitute an adapted or original recipe. For details regarding recipe copyright law, please visit the Food Blog Alliance.
The Nourishing Home is a participant in the Amazon Services LLC Associates Program, an affiliate advertising program designed to provide a means for sites to earn advertising fees by advertising and linking to amazon.com.

Privacy Policy
DMCA.com

Copyright © 2026 · All Rights Reserved · The Nourishing Home · Artwork by Nancy Panaccione · Site Design by Deluxe Designs · Log in