The Nourishing Home

living healthier lives in service to the King!

  • Home
  • About
    • About TNH
    • Contact
  • Meal Planning
  • Health & Wellness
    • Real Food Basics
  • Whole30
  • GF Recipes
    • Whole30
    • Breakfast
    • Lunch
    • Entrées
    • Slow Cooker
    • Soups & Stews
    • Sides & Salads
    • Snacks
    • Desserts
    • Kids in the Kitchen
  • My Cookbook
  • Subscribe

Easy Slow Cooker “Apple Pie” Sauce

By Kelly · 5 Comments

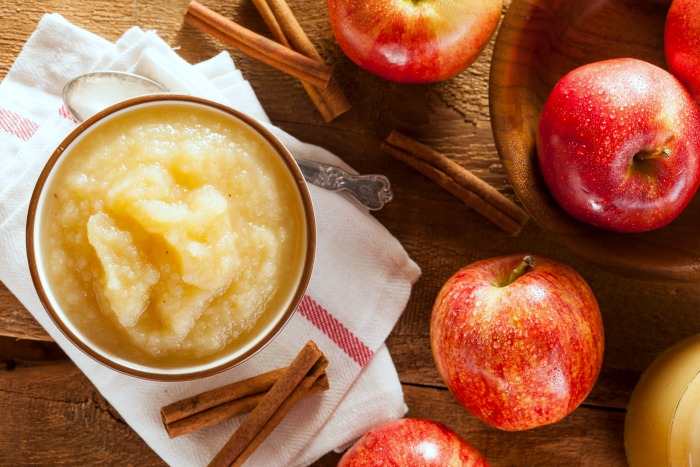
My boys adore this simple homemade applesauce. (Affectionately known as “apple pie sauce” in our house.) So when my neighbor’s apple tree exploded with an abundance of apples this month, we pulled out our slow cooker and started peeling …This lightly spiced version of a traditional classic uses pure apple juice and maple syrup, with just a hint of cinnamon, to accentuate the sweetness of the apples. Mmm…so yummy!

I’m sharing this easy-to-make recipe (perfect for getting the kids in the kitchen with you) over at The Better Mom website. Join me there to get this delicious recipe, perfect for enjoying as a healthy snack, scrumptios lunchbox side and it’s great for creating delicious, healthier baked goods too!


You Might Also Like:

Yogurt Banana Split Parfaits (GF)
Simply Sweet Plantains {Whole30}
Super Smoothies (GF)

Filed Under: Kid Friendly Recipes, Sides, Slow Cooker, Sweet ·

Simple Grain-Free, Dairy-Free Tortillas


By Kelly · 12 Comments

This easy-to-make recipe is essentially a simple crepe batter flavored with just a touch of savory seasonings to create a delicious tortilla, perfect for filling with your favorite fixins!

These tortillas are wonderful with just about any hearty filling you desire – from grilled steak fajitas (shown below) to grilled chicken or fish. Enjoy!

(Fun fact about this tortilla recipe, it’s simply a tweaked version of my scrumptious fruit-filled crepes, which if you haven’t tried yet, I highly recommend!)

Print
Simple Grain-Free, Dairy-Free Tortillas


Yield: 10 four-inch tortillas

Simple Grain-Free, Dairy-Free Tortillas


Ingredients

  • 3 tbsp coconut flour

  • 3 tbsp blanched almond flour
  • 1 tsp arrowroot powder
  • 1/2 tsp sea salt

  • 1/4 tsp homemade Emeril Essence Seasoning
  • 1/8 tsp dried oregano
  • 5 egg whites (save yolks for making lemon custard)
  • 1/3 cup plain unsweetened almond milk (or raw whole milk)

Instructions

  1. Preheat griddle (or cast iron skillet) over medium high heat.
  2. In a small bowl, mix together the flours, arrowroot powder and seasonings.
  3. In a medium bowl, whisk together the egg whites and almond milk until well blended and slightly foamy.
  4. Add the dry ingredients to the wet and whisk well until no lumps remain. The batter will resemble a thicker crepe batter, since this is essentially a tortilla-flavored crepe.
  5. Allow batter to sit about five minutes, which will allow ample time for the griddle to thoroughly preheat. You'll know the griddle is ready when a couple of drops of water added to it's surface "dance."
  6. (Sidebar: I'm not a fan of lukewarm tortillas – so a little trick I use to ensure everyone gets a nice hot tortilla is to rewarm them in the oven once I’ve finished making all of them. If you like this idea, then you'll want to preheat your oven to 250 degrees before you start cooking the tortillas.)
  7. Add a small amount of coconut oil or butter to the preheated griddle or skillet. Then whisk batter again and add a spoonful or two of batter to the griddle. Work quickly and carefully, using the back of the spoon to spread the batter into a thin, even layer to form a 4-5 inch round tortilla. You want these to be just a tiny bit thicker than a traditional crepe, so they can stand up to being filled with heavy filling ingredients like grilled beef, poultry, fish and/or veggies.
  8. Cook tortillas about 1-2 minutes until they begin to firm up. Then carefully slide a spatula under the tortilla and gently flip it over. Cook on the second side about 1-2 minutes.
  9. Either stack the tortillas on a plate and keep them covered as you cook and skip to step #12.
  10. Or if you prefer to use my oven-trick for ensuring hot tortillas, then place tortillas on a wire rack to cool, while continuing to make the remaining tortillas and then follow step #11 below.
  11. Once you’re done making all of the tortillas, transfer them to a baking sheet and place in preheated oven to rewarm about 4-5 minutes.
  12. Top these delicious tortillas with your favorite “fixins!” Yum!

Notes

Keeping the tortillas small (about 4-5 inches in diameter) makes it easier to flip them. Another trick is to use a slightly damp nylon spatula, if you're having trouble with sticking. Sticking can also result if the pan is not re-oiled between tortillas and if the tortilla is not cooked enough before you attempt to flip it over.

These tortilla can be made ahead of time and then rewarmed in the oven when ready to serve. Simply cook the tortillas and place on a wire rack to cool. Then, stack cooled tortillas in an airtight container with a piece of trimmed parchment between each tortilla to avoid sticking; refrigerate up to 24 hours, or freeze for future use making sure to defrost in frig overnight before rewarming. When ready to serve, rewarm tortillas, as described in steps 6 and 11 above.

3.1
https://thenourishinghome.com/2012/06/simple-grain-free-dairy-free-tortillas%e2%80%a8/

You Might Also Like:

Crispy Zucchini Sticks w/Creamy Avocado Dip (GF)
Roasted Herb Sweet Potato Bites
Wilted Greens (GF)

Filed Under: Sides ·

More Bacon, Peas!

By Kelly · 6 Comments


This side dish combines two favorites – organic peas and crispy bacon (pastured and nitrate-free of course!). You can always add more bacon, if your family wishes. Just be sure they say “peas!”

All cornyness aside (oh, look, I just mentioned another veggie), this dish really is delicious and you can even turn this recipe into a main dish too (as shown below).

Print
More Bacon, Peas! (GF)

Yield: 4-6 servings

More Bacon, Peas! (GF)

Ingredients

  • 3-4 slices of pastured, nitrate-free bacon, cut into small bit-sized pieces
  • 2 small shallots, finely chopped
  • 1 clove garlic, finely minced
  • 2 tbsp white wine (or white vinegar)
  • 16 oz frozen organic peas, thawed
  • sea salt and freshly ground black pepper to taste
  • 2 tbsp fresh organic parsley, finely chopped

Instructions

  1. In a large skillet over medium heat, add chopped bacon and cook until it begins to crisp (about 5 minutes).
  2. Add finely chopped shallots and cook, stirring occasionally, until they become transluscent (about 3-4 minutes).
  3. Then add, minced garlic and cook one minute before adding the white wine (or vinegar) and stir to combine.
  4. Last but not least, add the thawed peas and cook, while stirring, until cooked through (about 2-3 minutes).
  5. Season with salt and pepper to taste. Top with chopped parsley.

Notes

From Side to Main Dish: More Bacon & Pasta, Peas!

To turn this side into a main dish, cook 12 oz. spaghetti (or linguini) pasta according to package directions (we like Tinkyada brand brown rice spaghetti). Reserve 1/4 cup of the pasta cooking liquid and then drain the pasta. (If using brown rice pasta, be sure to rinse thoroughly in cold water once cooking time is completed.)

Add cooked and drained pasta to the cooked bacon-peas mixture and toss well to combine over medium heat. Next, add just enough of the pasta cooking liquid to make a very light sauce. Add salt and pepper to taste. Divide into four bowls and top with a sprinkling of freshly grated Parmesan cheese, if desired. YUM!

3.1
https://thenourishinghome.com/2012/04/more-bacon-peas-please/

You Might Also Like:

How to Make Sweet Potato Buns {GF, Whole30}
Crockpot Pinto Beans (GF)
Summer Veggies Brown Rice Risotto (Gluten-Free)

Filed Under: Sides ·

  • « Previous Page
  • 1
  • …
  • 7
  • 8
  • 9
  • 10
  • 11
  • …
  • 13
  • Next Page »

My New Cookbook is Here!

Welcome to The Nourishing Home!

I’m so glad you’re here and want you to feel right at home! My heart in creating this blog is to help you by sharing helpful meal planning strategies and nourishing GF recipes that are healthy, easy and delicious with thanksgiving to God! [Read More …]


All content (recipes, photos, posts, etc.) on this site is the creative property of Kelly Smith. You are welcome to share a photo via social media, as long as it contains a link back to the corresponding recipe or post from this site. However, you may not republish a recipe in its entirety in any form. For questions, or for permission to use a photo or recipe, please contact me via email at [email protected]. Thank you!

Please Note: All content (recipes, photos, text, etc.) on this site is the creative property of Kelly Smith of The Nourishing Home. You are welcome to share a photo via social media, as long as it contains a link back to the corresponding recipe from this site. However, re-publishing a recipe in any form is strictly prohibited. Additionally, please refrain from adapting recipes without properly linking back to the original recipe, and keep in mind that simple substitutions do not constitute an adapted or original recipe. For details regarding recipe copyright law, please visit the Food Blog Alliance.
The Nourishing Home is a participant in the Amazon Services LLC Associates Program, an affiliate advertising program designed to provide a means for sites to earn advertising fees by advertising and linking to amazon.com.

Privacy Policy
DMCA.com

Copyright © 2026 · All Rights Reserved · The Nourishing Home · Artwork by Nancy Panaccione · Site Design by Deluxe Designs · Log in