The Nourishing Home

living healthier lives in service to the King!

  • Home
  • About
    • About TNH
    • Contact
  • Meal Planning
  • Health & Wellness
    • Real Food Basics
  • Whole30
  • GF Recipes
    • Whole30
    • Breakfast
    • Lunch
    • Entrées
    • Slow Cooker
    • Soups & Stews
    • Sides & Salads
    • Snacks
    • Desserts
    • Kids in the Kitchen
  • My Cookbook
  • Subscribe

Kitchen Pantry Make Overs on a Budget!

By Kelly · 8 Comments

Pantry Makeover on a Budget

Today, I thought it would be helpful to share some inspiration for those interested in tackling a little pantry make-over project that can really help to improve efficiency in the kitchen.

That’s because having a well-organized pantry enables you to not only quickly locate items needed for a recipe, but also ensures that you’re better able to track what’s in your pantry. Being able to better monitor your food inventory allows you to avoid buying in excess, which not only wastes space, but usually results in having to toss out items that expire due to them getting “lost in the disorganized crowd.”

Another great thing about reorganizing your pantry is, it can be easily accomplished with even the smallest of budgets!

A Peek into My Pantry!

It’s slow, steady progress that leads to healthy changes that last a lifetime! And a great way to keep your family on track with your healthy eating goals and budget is to get your pantry whipped into shape!

Here’s a peek at how we reorganized our pantry so my family and I can easily locate whatever we’re looking for and also maximize the available space we have in our traditional cabinet-style pantry.

Of course, I’d like to point out that my pantry may not hold the same food items that yours does. It’s important to remember and be encouraged that healthy living is a journey and it’s not going to look the same for every person!

My Pantry Make Over:

pantry-peek-797x1024

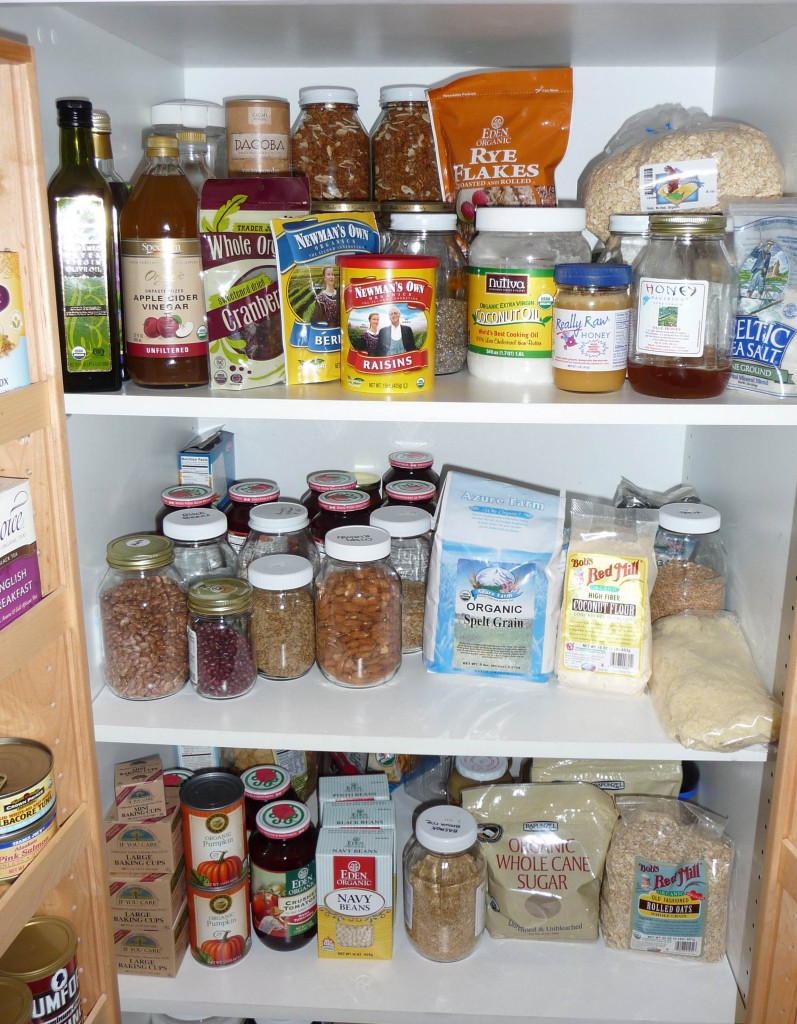
We installed a rack system on the inside doors of our pantry to increase our storage capacity. We also have several raised shelves that also help to increase our storage capacity by making use of available vertical space. And my food storage system of choice is simply repurposed glass jars of all shapes and sizes. Although I also have several BPA-free Snapware containers that I really like for storing certain dry goods.

And, if you’re curious about my favorite real food staples for a well-stocked pantry, then I invite you to check out “Stocking Your Pantry with Real Food Cooking Essentials.”

Tips for Organizing Your Pantry!

There are many different systems, gadgets and ideas for organizing a kitchen pantry. The following are just a few ways that Becky and I have found to better maximize pantry space, as well as better organize how pantry items are arranged for increased efficiency.

• Pantry Door Rack – Adding a vertical pantry door rack is an economical way to really increase storage space and provide easy access to frequently used items. It’s definitely a favorite addition to both of our pantry make-overs, as shown in the photos above.

• Raised Shelves – Raised shelves are a terrific way to not only make use of vertical space, thereby increasing your storage capacity, but they’re also great for keeping food items in sight and easy to reach. Raised shelves are especially great for deep pantries because they eliminate the need to continually pull things off the shelves in order to get to the items in the very back, which in turn helps you to avoid food getting lost and forgotten in the back of the pantry.

• Baskets & Bins – Recycling old baskets and bins for use as storage containers is a simple and cost-effective method for organizing food and other pantry items. There are also stacking bins available that enable you to better utilize vertical space in your pantry. You can find all kinds of options online at Amazon. However, you can also find various types of inexpensive baskets and bins at places like Target, Ikea and many 99¢ stores.

• Food Storage Containers – There are so many options for storing food from snap-top BPA-free plastic storage containers and canisters to old-fashioned glass jars and terrines. The key is to make sure to use the right type of container for the food being stored. For example, foods with natural oils, such as nuts, seeds and certain grains, as well as all liquid-type foods such as oils and vinegars should be stored in glass rather than plastic. While dry foods such as pastas, oats and beans do fine when stored in either plastic or glass.

• Recycled Jars – When it comes to storing food, you can really save money by repurposing various sized jars to store food in your pantry (and in your fridge too). Using recycled jars as storage containers is a particular favorite of Kelly’s, as shown in her pantry make over photo above.

• Trays – tray
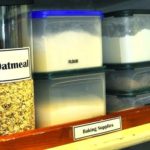
Becky has many uses for trays in her kitchen. In her pantry, she uses a simple wooden tray to hold all of her baking supplies (as shown at right). That way, she can just grab the whole tray and take it over to where she’s mixing up a batch of something yummy!

• Turntables – Using a simple flat or two-tiered pantry turntable is a great way to gain quick-n-easy access to frequently used items like spices and baking supplies. Just turn it until you locate what you need. Again, these types of time-saving organization devices eliminate the need to have to pull things out from behind one another to get to what you’re looking for.

• Homemade Labels – Labeling food bins, containers and jars really helps you (or even more important, the kids and hubby) to quickly identify what’s what. Labels can be as simple or ornate as you please – anything from writing on the lid of a jar (my favorite method) to creating homemade laminated tags or using a labeling machine. Whatever works to help you easily identity what’s in the container or bin, that’s really all that’s needed.

Getting Started …The best way to get started is to simply take a look at your own pantry and determine what you’d like to change about it? Then, set a budget and shop around to find the most cost-effective ways to make the best use of your pantry space. Remember, recycling is a great way to save money. So don’t be shy about repurposing old baskets, bins and jars as you consider affordable ways to tackle your own pantry make over.

What are your favorite ways to keep your pantry well organized? We’d love to hear your recommendations and ideas … so please share in the comments below!

Disclosure: Some of the links in this post include affiliate links, providing The Nourishing Home a small percentage of the sale at no additional cost to you. Of course, you are not obligated to use these links to make a purchase, but if you do, it helps to support this site and ministry.

You Might Also Like:

How to Spiralize ... it's easy, delicious and nutritious!
The Secret of Success: “Mise en Place!”
Day Zero: Getting Ready for the Whole30!

Filed Under: The FUNdamentals ·

The Secret of Success: “Mise en Place!”

By Kelly · 31 Comments


Ever wonder how those famous chefs on Food Network seem to whip up amazing meals in what seems like mere minutes?

Well, believe it or not, getting a great meal on the table quickly and effortlessly isn’t just about talent or experience. The real secret to increasing your efficiency and success in the kitchen is to commit to some good ol’ fashioned planning and organization in the form of “mise en place.” (Of course, having a team of sous chefs doesn’t hurt either.)

I remember the first time I heard about mise en place – it was Julia Child speaking in her distinctly unusual accent, telling me and all her PBS viewers that there was nothing more efficient than practicing mise en place.

I was enlightened, I was thrilled, I knew life in the kitchen would never be the same again … after all, I now knew a secret that renowned chefs across the globe utilized to increase efficiency and ensure the success of their culinary creations.

Mastering “Mise En Place”
“Mise en place” (pronounced MEEZ ahn plahs) is a French culinary term that means “to put in place.” In a nutshell, the purpose of mise en place is to have all of your ingredients prepared and ready to go before you start cooking, so you don’t have to stop during the cooking process to do anything other than add the next ingredient.

Trust me, friends … if you adopt the practice of mise en place, you will find life in the kitchen not only quicker and easier, but more successful and enjoyable too!

Mise en place will truly help you to be a better cook, guaranteed! Why? Because you will be able to focus your attention fully on the most critical aspect of what makes a meal a success – cooking.

Let’s Get Started!

chicken kebobs mise en place

There are two simple steps when it comes to mise en place:
• Planning ­– making sure you have all of the ingredients (and necessary tools) called for in a recipe before you get started, and
• Organizing – making sure you have all of the ingredients prepared (ready to go) before you start cooking.

Step One: Planning
Have you ever come home from a busy day and starred blankly into the refrigerator or pantry hoping for divine inspiration on what to make for dinner, only to find that when inspiration finally strikes, you’re missing one of the essential ingredients needed to make the meal? I admit that I had this experience almost daily before I got serious about weekly meal planning.

Honestly, there’s no better way to ensure that you have all of the ingredients on hand to make a recipe, than to practice the time-saving and money-saving strategy of meal planning! In fact, may I be so bold as to suggest that meal planning is the ultimate mise en place!

Meal planning not only guarantees that you’ll have all of the ingredients necessary to execute every recipe on your meal plan, but it also helps to save time, stress and money because you’ve already pre-planned what you’ll be cooking for the week. For details, please check out “Mastering Meal Planning.”

Step Two: Organizing
I think it’s safe to say that most of us wouldn’t pack a suitcase by simply opening it up and filling it with random socks, shirts, pants, shoes, etc. First, we’d plan what we’re going to wear. Then we’d start organizing and assembling all of the necessary components before we packed the suitcase.

Successful, efficient cooking isn’t much different – by planning ahead in the form of weekly meal planning (as discussed above), you’ll already have what you need for each recipe you’ll be making. This makes it much easier to take the next step of mise en place – organizing!

If you’ve watched any cooking show on TV, you’ve seen the results of the behind-the-scenes organization that has taken place – all those little bowls of ingredients already pre-prepped and ready to go for the chef. All the chef has to do is talk you through the recipe as he/she adds each perfectly prepped and measured ingredient.

It would be awesome to have a personal sous chef to prep and assemble all of your recipe ingredients, but the fact is you can still benefit from this practice, you just have to commit to Be Your Own Sous Chef! Or better yet, train up little sous chefs to help you!

Mise en Place in Action!
Ready to be a “Real” Food Network Star in your own home? Below are some of my favorite mise en place tips to help you get organized before you start cooking:

• Gather all of the ingredients, as well as all of the measuring tools and cooking tools, etc. that are needed to execute the recipe(s) and place them close at hand. (Even better is to organize them in the order you’ll be using them.)

• Dice, chop, grate, mince, etc. all of the ingredients needed for the recipe(s) so they’re all ready to go before you start cooking.

• Premeasure out ingredients in individual prep bowls or measuring cups. (Or group them together in one bowl, if you’re going to add them at the same time to a recipe.) You don’t have to measure out everything, just those ingredients that would cause you to hold up progress. (For example, when baking, I never pre-measure out vanilla extract, but I always pre-measure out things like yogurt, honey, maple syrup, etc.)

• Clean as you go … another great benefit of mise en place is less mess to clean-up after cooking. Since you’re spending time prepping before you start cooking, you can also take a minute to clean-up a bit after prep-time is completed, before you start cooking. This is especially rewarding if you’re having dinner guests – not only so your kitchen appears tidy when guests arrive, but also so you can relax after dinner, rather than having to look forward to a lengthy clean-up progress.

• Timing is everything – If you’re going to be cooking or assembling more than one dish, it’s important to start with the recipe items that take longer to cook and then work your way to those ingredients or dishes that take less time to prepare. This strategy helps you to develop good timing – so everything is ready all at the same time!

• Schedule a “Mise en Place” Prep Day! If you meal plan, a great time-saving strategy is to schedule a prep day so you can prepare for the week ahead by pre-cutting and marinating meats; chopping veggies, such as lettuce for quick and easy salads; making and freezing key ingredients (or meals) that can be defrosted later for quicker meal assembly. The ideas for prepping in advance are endless! That’s why prep days are a great mise en place strategy – they help reduce your time in the kitchen during the rest of week, so you can still provide healthy homecooked meals even on the busiest of days.

A Final Mise en Place Tip
Let’s talk about preheating for a minute. This is one of the most often overlooked mise en place strategies.

There’s a reason a recipe calls for preheating – it helps to ensure the food cooks properly. So before just throwing a steak on a barely heated grill (for example), be sure to preheat the grill, so it’s nice and hot. A hot grill helps to sear the exterior of the meat and lock in its juices, making the steak so much more tender and juicy!

Similarly, before sautéing, be sure your pan is well heated. By allowing time for your pans to heat-up before cooking, you’ll help to ensure better, tastier results.

Additionally, when cooking with oil, it should be close to its smoking point, before you add your recipe ingredients for best results.

And it probably goes without saying, that before you put those homemade cookies or muffins in the oven, it’s wise to be sure that your oven is preheated to the precise baking temperature called for in the recipe. Otherwise, you may end up with burned bottoms (and nobody likes a burned bottom).

Investing Your Time Wisely!
I promise, practicing mise en place isn’t just for famous TV chefs and restaurateurs, it’s a proven technique that can help everyone to cook with more ease and more success. That’s because mise en place helps us to invest our time wisely!

So remember the secret – Putting in the necessary time upfront to plan your meals and then, gather and prep all of the recipe’s ingredients in advance, helps to ensure that the time you spend cooking is much more efficient and enjoyable, as well as results in a healthy and delicious meal for the family you love!

Joyfully Serving Him, Kelly

You Might Also Like:

Day Zero: Getting Ready for the Whole30!
Stocking Your Pantry/Fridge with Whole Food GF Cooking Essentials
Kitchen Pantry Make Overs on a Budget!

Filed Under: The FUNdamentals ·

Room for Dessert? (the joys of healthier all-natural sweeteners)

By Kelly · 16 Comments

The Joys of Healthier All-Natural Sweeteners

Following a real food lifestyle doesn’t mean you cannot enjoy an occasional sweet treat. The key is healthier ingredients and moderation.

What makes your sweet treat sweet?
If it’s refined sugar (white, brown, raw, confectioners), high fructose corn syrup (now disguised as “corn sugar”), artificial sweetners, etc., then it’s time to give your sweets a major overhaul by using healthier real food sweetening agents in moderation, such as raw honey, pure maple syrup, coconut sugar and Rapadura (or sucanat). Each of these healthier options is discussed in detail below.

Developing a healthy palate
As Americans, we have been reared in a culture geared toward sugar (and salt) addiction. Because most of our food supply is nothing more than nutrient-stripped, processed junk, sugar (and salt) has to be inserted at high levels into these “foods” in order to give them some level of flavor. So it’s no wonder that our palates have become accustomed to high levels of sweetness (as well as saltiness).

The good news is, by adopting a real food lifestyle and weeding out refined sugars, we can retrain our palates to enjoy the delicious variety of flavors of real food rather than masking them with an overdose of sweetness. Unlike processed food, real food is bursting with a wealth of amazing flavors that God has infused within them for our enjoyment.

So the ideal is not to use natural sweeteners in excess either. Moderation is key with any of these healthier natural sweeteners. As we back off our addiction to sweet (and salt), we will come to enjoy the full flavors and health benefits of real food.

Pure Raw Honey 
Raw honey is the best option because it’s a living food full of natural antioxidants, enzymes, amino acids, vitamins, and minerals, including calcium, iron, zinc, potassium, phosphorous, magnesium, copper, chromium, manganese and selenium. Research also shows that nutraceuticals are found in raw honey. These important nutrients assist in neutralizing the free radical activity in your body, and also help boost the overall function of your immune system.

Another plus is that raw honey tends to be much sweeter to taste than sugar, so you can use less, yet still achieve an exceptional sweet taste. Raw honey is a great choice for recipes that you will not be heating, as heating above 115 degrees destroys the naturally occurring enzymes and nutraceuticals.

For example: I like to use Honey Pacifica brand creamy raw wildflower honey to sweeten smoothies, as a sweet treat on toast and homemade biscuits, and as a spread on nut-butter sandwiches!

When it comes to baking or cooking with honey, I still prefer to use raw honey, even though it will be heated because I simply prefer a minimally processed all-natural product. However, when baking or cooking, I prefer liquid raw honey, rather than the solid version, as it is easier to measure and incorporate into recipes. My favorite choice for cooking/baking are the very mild flavors of either clover honey or sage honey, since their delicate taste never overpowers the intended flavor of a recipe.

Important to note: Honey requires a lower baking/cooking temperature because it burns easily. So when baking or cooking with honey, for best results, do not exceed 350 degrees.

Pure Organic Maple Syrup 
Pure organic maple syrup is a rich and delicious natural sweetener perfect for use in just about any recipe, especially baked goods like quick breads, muffins and cakes. Additionally, pure maple syrup has a higher baking temperature than honey, so it is a better choice for recipes that require baking temps of 350 degrees or higher.

As with other natural sweeteners, pure maple syrup has beneficial nutrients not found in refined sugars. In fact, according to research from the University of Rhode Island, maple syrup has more than twenty compounds that are beneficial to health, including important trace minerals such as zinc and manganese – and it also contains bioactive compounds that serve as antioxidants. But before you start slathering on the maple syrup, do keep in mind that it is high in calories, so again moderation is key!

When it comes to maple syrup, there are two basic varieties to choose from – Grade A and Grade B. Grade A is the most popular, with a light maple flavor and a relatively thin consistency. Grade A is usually made from the maple sap collected at the beginning of the mapling season. Grade B maple syrup is much darker and has a stronger maple flavor. It’s also a bit thicker in consistency than Grade A. Experiment with both and discover which you prefer.

organic-coconut-palm-sugar
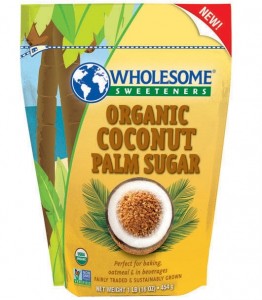
Coconut Sugar (Coconut Palm Sugar)
Coconut sugar is produced by tapping the sweet nectar from the coconut palm tree flower (similar to tapping a maple tree for syrup) and drying the nutrient rich juice in a large open kettle drum. The juice condenses into a delicious whole brown sugar with a low glycemic value. Coconut sugar can be used as a one-for-one replacement for refined sugar, and not only adds sweetness to recipes, but rich caramel undertones as well.

I personally like to purchase brands such as Wholesome Sweeteners Organic Coconut Palm Sugar because it is produced on small, sustainable, cooperative owned farms. These cooperative farmers are committed to sustainable agriculture and use every part of the coconut palm tree.

Rapadura (Sucanat) 
Rapunzel Rapadura is a special brand of all-natural sugar made by dehydrating pure organic cane sugar juice. According to the Weston A. Price Foundation, both Rapadura and a similar product called sucanat are healthier alternatives to refined white or raw sugar. That’s because both Rapadura and sucanat are much more nutritious than refined sugars. Like coconut palm sugar, Rapadura and sucanat are minimally processed, therefore, they retain all of the natural vitamins and minerals found in pure sugar cane juice, along with its rich molasses and caramel flavor, making them excellent substitutes for any recipes that calls for sugar. Additionally, because both undergo less processing, they have no harmful chemicals (if grown organically).

Again, moderation is key. Both Rapadura and sucanat work well for baking and can be substituted cup-for-cup for refined sugar. Sucanat can be found in many health food stores, while Rapadura, may be harder to find. However, it is available at many whole foods type markets, or online at Amazon.com.

Other sweet choices
There are several other natural sweeteners that are better choices than refined sugars. The above sweeteners outlined are simply the basic staples I use in my recipes here at The Nourishing Home.

Some other natural sweeteners to consider include: molasses, sorghum syrup (a good replacement for corn syrup), raw green stevia, maple sugar and date sugar.

What it really comes down to is opting to use the least refined, healthiest choices available – in other words, selecting natural unrefined sweeteners (that maintain all of their healthy nutrients) rather than using refined, processed or artificial sweeteners.

Yet keep in mind, the goal, even with healthier sweeteners, is moderation. Less truly is more – by using less sweetening agents in our real foods, we can retrain our palates to appreciate the natural flavors of the food God created for us to enjoy and be nourished by!

Joyfully Serving Him, Kelly

Shown in photos above: Almond Flour Thumbprint Cookies and Raw Cookie Dough Bites – two of the many examples of The Joys of Healthier All-Natural Sweeteners!

Disclosure: Some of the links in this post include affiliate links, providing The Nourishing Home a small percentage of the sale at no additional cost to you. Of course, you are not obligated to use these links to make a purchase, but if you do, it helps to support this site and ministry.

You Might Also Like:

Real Food on a Budget, Part 2
What are GMOs? (and how to avoid them)
8 Tips for Real Food on a Budget {and how to set healthy living goals}

Filed Under: Real Food Basics, The FUNdamentals ·

  • « Previous Page
  • 1
  • 2
  • 3
  • Next Page »

My New Cookbook is Here!

Welcome to The Nourishing Home!

I’m so glad you’re here and want you to feel right at home! My heart in creating this blog is to help you by sharing helpful meal planning strategies and nourishing GF recipes that are healthy, easy and delicious with thanksgiving to God! [Read More …]


All content (recipes, photos, posts, etc.) on this site is the creative property of Kelly Smith. You are welcome to share a photo via social media, as long as it contains a link back to the corresponding recipe or post from this site. However, you may not republish a recipe in its entirety in any form. For questions, or for permission to use a photo or recipe, please contact me via email at [email protected] Thank you!

Please Note: All content (recipes, photos, text, etc.) on this site is the creative property of Kelly Smith of The Nourishing Home. You are welcome to share a photo via social media, as long as it contains a link back to the corresponding recipe from this site. However, re-publishing a recipe in any form is strictly prohibited. Additionally, please refrain from adapting recipes without properly linking back to the original recipe, and keep in mind that simple substitutions do not constitute an adapted or original recipe. For details regarding recipe copyright law, please visit the Food Blog Alliance.
The Nourishing Home is a participant in the Amazon Services LLC Associates Program, an affiliate advertising program designed to provide a means for sites to earn advertising fees by advertising and linking to amazon.com.

Privacy Policy
DMCA.com

Copyright © 2023 · All Rights Reserved · The Nourishing Home · Artwork by Nancy Panaccione · Site Design by Deluxe Designs · Log in